Author:
Mark Sanchez
Date Of Creation:
7 January 2021
Update Date:
2 July 2024

Content
- Method 2 of 3: Roll a cone out of a triangle
- Method 3 of 3: Roll the cone with precise proportions
- Tips
- No compass at hand, use another method, circle the cup.
- The middle cone will turn out if you spread the compasses by 23-25 centimeters.
- So that the width of the cone is equal to w, the diameter of the semicircle should be w x 3.14 (or w x π).
 2 Cut a semicircle out of paper. Take scissors or a knife for this purpose. 3 Roll the paper into a cone. Raise the two corners of the semicircle and connect them so that they seem to go slightly behind each other, thereby forming a "closed" cone. 4 Secure the cone. Glue or tape is what you need. Secure along the line where the sides of the semicircle meet. If you are using glue, you may need to hold the cone in your hands for a while until the glue hardens. In the case of scotch tape, in turn, it is worth fixing both outside the cone and inside.
 Method 2 of 3: Roll a cone out of a triangle
- 1 Cut a square or rectangular piece out of a piece of paper or cardboard. You can start, of course, with a rectangle, but it's easier to work with a square - the shape of the cone will be neither too thin nor too wide. Use the ruler to define the outline of the square, cut it out of paper. Don't have a ruler? Fold one corner of the paper to the opposite to make a square, and then draw a line where you need to cut off the excess paper.
- Just bend, don't bend the sheet!
- If the base of the cone must have a width w, then the side of the square must be equal to w÷ 0.45, although a little more is possible. This equation is based on the Pythagorean theorem and the formula for the circumference of a circle (as well as a little rounding off): w÷(√2/π).
 2 Cut the sheet in half diagonally. Whether with a knife or scissors - cut diagonally. The diagonal will become the base of the cone.
 - 3 Secure one side of the cone. Lift up one corner of the triangle, the one next to the long side, and tuck it to the corner between the two short sides, thus forming a cone. Secure the whole thing with glue or paper clips (or even tape) to keep it securely.
- You can make the cone more or less sharp by shifting the angle to another point of the triangle, rather than aligning it with a different angle.
 4 Finish the cone. To do this, you need to roll up the paper that has been left without work and fasten everything together with glue or paper clips.
Method 3 of 3: Roll the cone with precise proportions
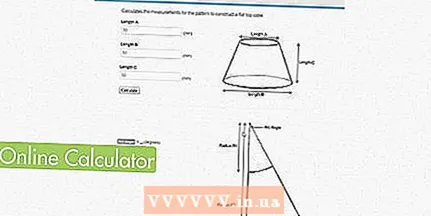 1 Use an online calculator if you're making a funnel. If you need a template for a cone-shaped funnel open on both sides, then an online calculator will save you time and reduce the chance of making a mistake somewhere. Enter the proportions you want in the form on i-logic.com or craig-russel.co.uk to see what you need. If you are making an ordinary cone that is open only on one side, then read below and learn how to do the necessary calculations yourself.
 - If you are not interested in the explanations, then pht of the formula for an ordinary cone:
- L = √(h + r), where h - the height of the cone (with the tip), and r - radius of its base
- a = 360 - 360(r / L)
- You can make a cone from a circle with a radius Lby cutting out a segment with an angle a.
- 2 Decide what shape the cone should have. To make a cone of a certain size, you need to use a circle of a certain diameter, where a segment with a certain degree will be missing. If you are making a funnel, the second circle will be cut from the first to make the hole smaller.
- In this article, we will talk about a cone with a wide base and a narrow top.
- A very narrow cone can be obtained by cutting out a segment that is more than half the circle.
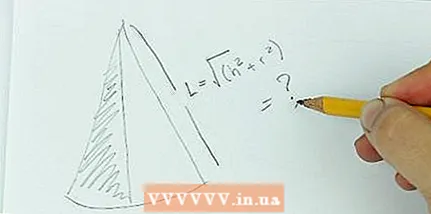 3 Find the length of the side of the cone. Draw the finished cone (don't draw the hole at the top yet). Side length - the distance from the base of the cone to its apex; this is the hypotenuse of a right-angled triangle. The other two sides in such a triangle are the height of the cone (h) and base radius (r). We calculate the length of the side by the Pythagorean theorem (L):
 - L = h + r (use radius, not diameter!)
- L = √(h + r).
- For example, a cone with a height of 12 and a radius of 3 would have a side length of √ (12 + 3) = √ (144 + 9) = √ (153) = something around 12.37.
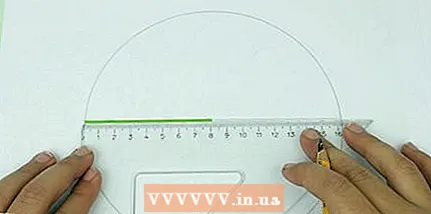 4 Draw a circle with a radius equal to the length of the side of the cone. Imagine that you are sort of cutting the finished cone and unfolding it. This will be a circle with a radius equal to the side length we just found. Sign the radius and read on, it is also important there.
 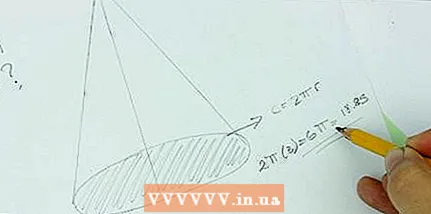 5 Calculate the base circumference. Basically, this is the length of the circle if it could be turned into a straight line. To calculate this value, you need to take into account the required base radius (r) and use the corresponding formula:
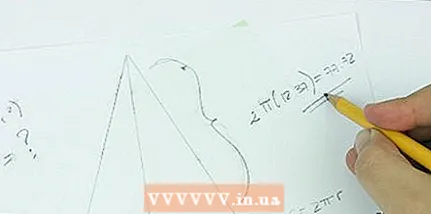
 - C = 2 π r
- For a cone with a radius of 3, the base length would be 2 π (3) = 6 π = something around 18.85
 6 Calculate the circumference of the common circle. We know the circumference of the cone, which is good, but the circle itself has a larger circumference (before something is cut out of it). The formula remains the same, only the value of the radius changes - now it is the length of the side of the cone (L).
 - C = 2 π L
- In our example, the side length is 12.37, that is, the total circumference of the circle is 2 π (12.37) = approximately 77.72
- 7 To determine how large a segment should be cut, subtract one circumference from the other. It's simple: from the circumference of the circle as a whole (C1), you need to subtract the circumference of the base of the cone (C2), then you will find out what is the share of the segment (C3), which will need to be cut:
- C (1) - C (2) = C (3)
- In our example, this is, 77.72 - 18.85 = C (3) = 58.87
- 8 Find the corner you want (optional). You can cut a circle, then measure the circumference of the segment to be deleted, but it is much easier to do everything in advance using a protractor and, of course, measuring from the center of the circle. In any case, there are a couple more equations waiting for you:
- Calculate the ratio of the segment to be cut to the total circle: C (3) / C (1) = Rt.In our example, this is: 58.87 / 77.72 = 0.75. In other words, the segment you cut out will be about ¾ of the circle.
- Use the found value to find the angle. The found relation extends to angles as well. Since the circle is 360º, the angle of the segment to be cut (a) can be found by the formula Rt = a / 360º, it is a = (Rt) x (360º). In our example, this would be 0.75 x 360º = 270º.
- 9 Cut out the template and roll it up. If you have more serious equipment than scissors and a pair of hands, entrust the work to these tools - it will be more accurate. However, you can take a compass, draw a circle of the desired diameter, then use a protractor to mark the desired angle, draw guides along the ruler and cut everything accordingly, and then finally fold it into a cone.
- It is a good idea to cut a little more than you need to so that you can use the excess to secure the sides of the cone.
Tips
- A plastic egg, ping pong ball, or rubber ball can be glued onto the tip of the cone.
- The measurement system does not play any role for the formulas given in the article. The main thing here is to use the same measurement system in the process.


