Author:
Sara Rhodes
Date Of Creation:
14 February 2021
Update Date:
1 July 2024

Content
1 Understand why you need to show through your eggs. When hatching chicks at home, it's a good idea to keep an eye on how the eggs are developing. However, this can be very difficult (or even impossible) if you don't see through them. Translucent is when you shine on an egg to see what is going on inside it.- When you hatch your chicks at home, you will never have a 100% hatching rate. Some eggs may not be fertile to begin with, while others may stop developing during the incubation period.
- It is important to find non-fertile eggs and those that stopped developing during the incubation period, otherwise they may start to rot and, in the end, may explode in the incubator, contaminating it and causing bacteria to develop in other eggs and bad smell.
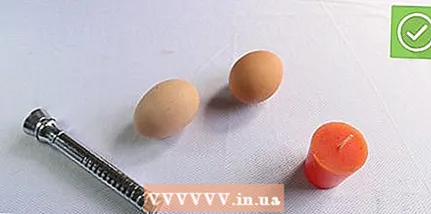 2 Use the correct scanning equipment. Scanning equipment does not have to be expensive. In the old days, this process took place using candlelight (hence the name of the process). The main requirement is bright light (the brighter the better), with a hole smaller than the diameter of the egg you want to illuminate. You will need to transilluminate in a dark room so you can see the inside of the egg.
 - You can buy a special x-ray device at any store that sells bird hatch products. They are like small flashlights that are powered by either batteries or an outlet.
- You can make your own home light device by putting a 60 watt lamp in a coffee box and making a 2.5 cm hole at the very top of the box. Another way is to take a very bright flashlight and cover the hole with a piece of cardboard with a hole (2.5 cm in diameter) in the middle.
- Another more advanced and expensive choice for translucent eggs is ovoscopy. It has a rotating stand on which you lay the egg. Further, the egg is covered with a bag that does not allow light to penetrate. You can then look at the egg through special equipment that enlarges the egg slightly so that you can better examine it.
 3 Follow the correct scan schedule. You must show your eggs through before placing them in the incubator. You will most likely not see anything, you will not even notice the difference between a good and a bad egg, but you will be able to understand what an undeveloped egg looks like, which may not be a bad comparison for the future.
 - It can also be helpful to look for small cracks that cannot be seen with the naked eye. Cracked eggs can have harmful bacteria inside that can affect the development of the embryo. If you find an egg with a crack, don't throw it away yet, just remember to write about the crack and check the egg's progress in the future.
- Although some people transilluminate their eggs every day during the incubation period, it is not a bad idea to start translucent eggs after the seventh day. There are two reasons for this:
- Reason 1: Eggs are very sensitive to temperature changes, and if you constantly take them out of the incubator, you can adversely affect their development, especially at an early stage.
- Second reason: Before the seventh day, the eggs will not be sufficiently developed, and it will be difficult for you to distinguish between a bad egg and a good one.
- After shining through on the seventh day, you should leave the eggs alone until day 14. At this point, you can re-check those eggs that you were not sure about, and discard them if they still show no signs of development.
- You should refrain from shining through after the sixteenth or seventeenth day, as the eggs should not move, and they should not even be turned over before the day they hatch. True, the embryos will be so large that they will fill the entire egg from the inside, and you can see them.
Method 2 of 2: Part Two: Translucent Eggs
 1 Hold the egg in front of the light. Place your scanning equipment in a dark room as close to the incubator as possible. Select an egg from the incubator and keep it in the light. The correct way to do it is as follows:
 - Place the thick edge of the egg right in front of the light. Hold the top of the egg, between your thumb and forefinger. Bend the egg slightly to one side and rotate it until you have a good look.
- While you are working, you should mark the eggs with a number and record the results of the transillumination. This way you will be able to compare the results with future transilluminations.
- Try to work quickly, but not too much, so as not to drop your eggs. If the eggs are returned to the incubator within 20-30 minutes, the transillumination process will not affect their development. The mother hen often leaves her eggs when she hatches them.
- Keep in mind that brown eggs or spotted eggs will be harder to see through because their dark shells will not let in as much light.
 2 Look for signs of a developing egg. The egg must have a developing embryo. You can tell if the embryo is developing by:
 - You should see a web of blood vessels spreading from the center of the egg to the sides.
- Use a dim light so you can see the bottom of the egg (where the air sac is) and the darker, top of the egg (where the embryo is developing).
- With bright lighting, you will be able to see the outline of the embryo in the center of the web of blood vessels. You will most likely be able to see the eyes of the embryo, that is, the two black dots inside the egg.
- If you're lucky, you can see the embryo wiggle.
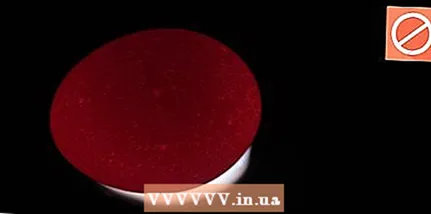 3 Look for signs of a non-developing egg. A non-developing egg is one that has stopped developing during the incubation period for some reason. Some may stop developing due to poor temperature and humidity, others may be contaminated with bacteria, and others may simply have bad genes.
 - The main sign that the egg has stopped developing is a blood ring. The blood ring looks like a distinct red circle that is visible inside the shell. It forms when the embryo dies and the blood vessels leave the center and lie next to the shell.
- Other signs of a non-developing egg are the development of blood points and blood streaks within the egg. However, those dark parts may not be easily distinguishable from a healthy embryo at an early stage of development.
- If you are 100% sure that the egg will not develop (if you see a blood ring, you can be sure), then you should immediately get rid of the egg so that it does not deteriorate and explode inside the incubator.
 4 Look for signs that the egg is not fertile. Such eggs will never fertilize and never produce an embryo. You can understand if the egg is not fertile for the following reasons:
 - The egg does not have any changes after the first transillumination you did before placing it in the incubator.
- The insides of the egg appear clean and free of blackheads, blood vessels, or blood rings.
 5 If unsure, put the egg back. If you think you've found a non-fertile or undeveloping egg, but you're not 100% sure, don't throw it away yet. If you throw them away, you risk throwing out a healthy egg.
 - Just mark these eggs with a question mark and put them back in the incubator. You should always give one more chance.
- Check the eggs in question after 14 days. If you still don't see any signs of development, or the blood ring has finally formed, you can throw them away.
Tips
- Although transillumination is more commonly used by people who hatch chicks, you can use this method to test goose eggs, duck eggs, guinea fowl eggs, and even parrot eggs.
- Read here to find out how you can successfully hatch chicks.
Warnings
- Do not eat non-fertile eggs that have spent time in the incubator. They are not fresh and you could get seriously ill.
What do you need
- Bright lantern


