Author:
Carl Weaver
Date Of Creation:
22 February 2021
Update Date:
27 June 2024

Content
- Method 2 of 3: Planting Seeds
- Method 3 of 3: Seed Care After Germination
- Tips
- Warnings
- What do you need
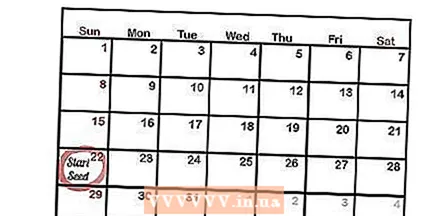 2 Plan your landing at the right time. Some seeds need to germinate indoors several weeks before warm weather, while others need only a few days. The time when you should start planting seeds is also different given the growing region. Timing is important if you want your seeds to have a better chance of growing strong, healthy plants.
 - Check the back of the seed bag for instructions on when they should be planted. Seed bags contain a lot of important information.
- You can also check the internet for more information on when to start planting seeds.
- If you're still not sure when to plant your seeds, then plant them a few weeks before the last frost. Start growing them indoors and let them germinate a few centimeters before planting outdoors. This is a win-win for many plant species.
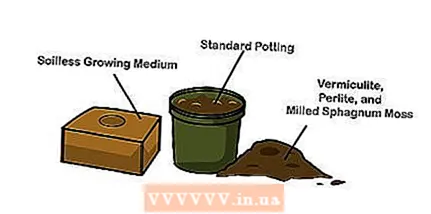 3 Prepare the correct culture medium. Seeds must germinate in a nutrient medium that is generally different from standard potting soil or soil. They require a specific chemical composition to germinate, and this differs from seed to seed. Research the needs of the seeds you are growing and purchase the appropriate nutrient media from your nursery or online.
 - You can buy a hydroponic growth medium that is premixed and suitable for many types of seeds.
- It is cheaper to make your own nutrient medium from vermiculite, perlite, and crushed sphagnum moss. Everything is sold in garden stores. A 1: 1: 1 ratio is usually effective.
- Do not try to plant seeds in regular soil. The seeds already contain all the nutrients needed for germination. The extra nutrients in regular soil are harmful to them during the germination period.
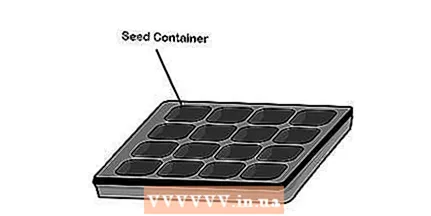 4 Choose a seed container. You will need a container 5-8 cm deep with drainage holes in the bottom. It can be in the form of an open tray or have separate segments for different seeds. The width of the container depends on how many seeds you plant. Make sure there is enough room for the seeds to germinate.
 - You can buy a seed pallet or tray, but it's also easy to make your own from an old cardboard egg carton, newspaper, wooden box, or other household items.
- When the seeds germinate and grow, the seedlings need to be transplanted into larger containers or planted in the ground. For this reason, the aesthetics of seed germination in containers is not as important as their practicality.
Method 2 of 3: Planting Seeds
 1 Prepare containers. Fill seed containers with nutrient medium. Fill containers, less than 1 cm to the top. Spray the culture medium with water to moisturize. Don't wet it, it should just be slightly damp to provide a good seed environment.
 - 2 Determine if the seeds need to be soaked. Some seeds need to be soaked for several hours before planting, while others can be planted without soaking. Determine if your seed needs pre-treatment before planting. Look at the back of the package or check on the internet.
- To soak the seeds, place them in a clean container and cover them with room temperature water. Let them lie like this for 3 to 24 hours. Then, strain them and pat dry with a paper towel.
- If you have soaked the seeds, plant them right away. Don't let them dry out again.
- 3 Sow seeds. Sow the seeds evenly into the nutrient medium and press lightly with your fingers. Cover the seeds with a layer of nutrient medium three times thicker than the seeds. Moisten the medium again as soon as you sow the seeds.
- Don't sow too many seeds together; try not to overfill containers.
- Some seeds need to be planted deeper into the nutrient medium, while others need not be covered at all. Most seeds planted need to be coated with a thin layer as described above, but you should check to see if your seeds need special treatment.
- 4 Place the seeds in containers with a suitable medium. Most seeds do not need sunlight to germinate, but some do, so you need to check to make sure you are providing the seeds with the right conditions. Place the seeds in a room with a temperature of 16-27 ° C, but again, some seeds need special handling and may require very low or high temperatures to germinate quickly.
- You can put an electric heating pad under the pan to regulate temperature and keep warm during germination.
- Once the sprouts have sprouted, move them to a place with temperatures below 21 ° C until they are ready to be transplanted into the open ground.
- 5 Keep the growing medium moist. Cover containers with plastic wrap to maintain moisture and regulate temperature. Raise the plastic wrap every day to lightly water the seeds. Make sure they are always moist or they will not germinate properly.
- Do not add seeds. If they are flooded with water, they will not grow.
- You can use newspaper instead of plastic wrap. Use a spray bottle to keep the newspaper moist while the seeds germinate.
Method 3 of 3: Seed Care After Germination
- 1 Move the seedlings to a sunny location. When you see the first green shoots sprouting, move the seedlings to a sunny location. Make sure the room temperature is below 21 ° C, but provide a bright place for them to grow strong and healthy.
- 2 Maintain soil moisture. If your seedlings are covered with plastic wrap or newspaper, remove everything and keep the soil moist by watering a couple of times a day. Water in the morning and early in the day, and do not water again that day. If water is left in the growing medium overnight, it can contribute to the development of mold.
- 3 Feed the seedlings after a few weeks. Since the growing medium contains no nutrients, you need to fertilize the seedlings after they have grown a few centimeters. Find out what type of fertilizer is right for your seedlings. Use organic fertilizer if possible.
- 4 Thin the seedlings. If many of the seeds germinate, they must be thinned out by removing the weaker shoots so that the strong shoots will become even stronger. Thin so that you have 2 or 3 sprouts per container, or 2 or 3 sprouts in each segment of the egg carton. Take excess shoots close to the base, remove and discard.
- 5 Transplant seedlings when the time is right. When the favorable period begins, this is the time to transplant the seedlings into large containers or plant them in the garden. Make sure you pick the right type of soil for your plants and plant them in an area with the right amount of sunlight and drainage.
Tips
- Label your seeds so you know what type of plant they are.
- Some seeds last longer than others. To test seed viability, sprinkle about ten on a well-dampened paper towel and cover it all with plastic wrap. Watch the seeds over the next few weeks and see how many sprouts there are. If they sprout, sprouts can be planted; if not, or if there are too few sprouts, take fresher seeds.
- Read the instructions on the package. The seed bags are full of helpful information on when to start planting, how much light and water they need, and so on. If you have stored seeds, check the instructions for this type of plant on the Internet. In addition to water, some seeds need heat and light.
Warnings
- Once the plants are germinated, keep them away from slugs and other herbivorous creatures as they can eat all of your plants very quickly.
What do you need
- Seeds
- Nutrient medium
- Container


