Author:
Joan Hall
Date Of Creation:
28 July 2021
Update Date:
1 July 2024

Content
- Steps
- Method 1 of 4: Preparation
- Method 2 of 4: Weaving Cornrow
- Method 3 of 4: Sewing in overhead strands
- Method 4 of 4: Hair Care
- Tips
- What do you need
It's hard not to envy the models promoting hair products when they shake, flip, undo and otherwise show off their long, thick curls. By adding false strands to your natural hair, you can get the long and thick hair that you crave. If you are good at needle and thread or are ready to learn it, you can sew yourself overhead strands.
Steps
Method 1 of 4: Preparation
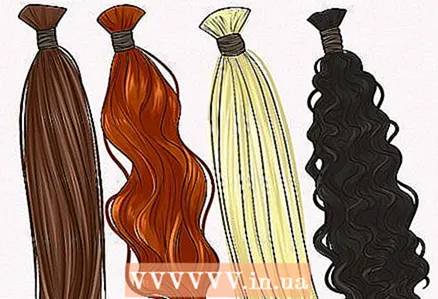 1 Decide if you want to use natural or artificial strands. There are two types of false hair strands: artificial hair and natural hair. Human hair is most popular in overhead strands: it is easy to care for (just like your own hair) and is mostly invisible when properly attached. Natural strands can be washed and styled just like your own hair. With them, you can use a straightening iron, curling iron, curling irons and, if desired, even color them.
 - Natural strands require careful handling.
- Natural human hair is more expensive than synthetic hair. The price does not always determine the quality, so in any case, the strands should be carefully examined and felt.
- The most expensive strands are those that have not been exposed to chemicals or dyes. The cuticle of such hair is intact, and it looks completely natural. They can be labeled "virgin".
- The ethnicity of the original owner of the hair can affect its texture, volume, curl and ease of styling. For example, European hair is thinner, but natural red or blond strands can be found. Indian hair is much thicker and is great for sleek, silky hairstyles.
 2 Think about synthetic strands. If you want to thicken your hair, synthetic hair is a great choice as it creates more volume. Synthetic strands can be sold pre-curled or otherwise styled. They are cheaper than natural ones, but most often they cannot be washed, dyed or permed. In addition, they usually should not be straightened or curled with hot tools, as the high temperature spoils them.
  3 Choose a color. Unless you intend to use strands of original colors, such as pink, blue or purple, choose the shade that most closely matches your hair tone. If you can't decide between two shades, lean towards the lighter one.
 - It can be difficult to find a color that matches yours exactly, so if you are purchasing natural hair extensions, consider taking them to your hairdresser to dye them the color of your hair.
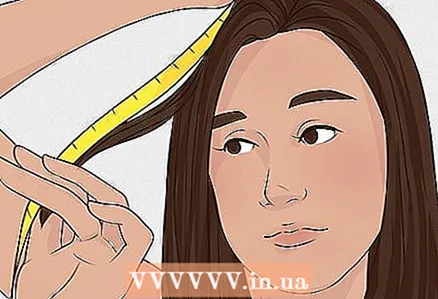 4 Calculate how much hair you need. The amount of hair extensions required depends on the original thickness of your own hair and how much length and / or volume you want to add.
 - If you just want to add volume and your hair is the same length as the strands, get about 55-115 g of hair.
- If your hair is much shorter than the desired length of the false strands, you will need 170 to 225 g of hair to achieve a naturally bushy look.
- In general, the longer the hair extensions, the more hair is required to complete the hairstyle.
 5 Consider how you style your hair. Think about styling and decide how you want your hair to look after adding the fake strands to it. This is important because how the hair is split and the overheads are sewn in will affect the final look of the hairstyle.
  6 Wash and condition your hair. Blow dry your hair and comb through it to avoid knots or tangles.
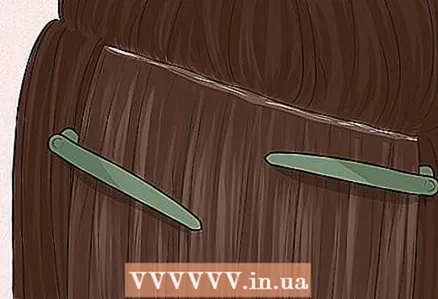
 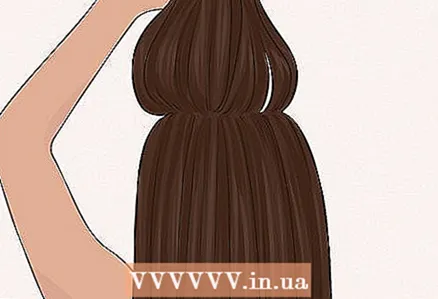 7 Create a parting where the patch is attached. Part (s) where you want to secure the overhead strands. For example, if you decide to sew in overhead strands to lengthen your hair, create a parting from temple to temple and / or a parting from the top of the right ear around the head to the top of the left ear.
 - Work in front of a mirror. Since this task is extremely difficult to cope with on your own, it may be worth asking a friend or hairdresser for help.
- Try to make the parting as even as possible. When finished, comb your hair up over the parting and pin it up.
- Make another part just below the first. You need to create a very thin "line" of hair that will be used to braid the cornrow braids. Take your hair under the second part and tie it in a ponytail.
- The cornrow pigtail will serve as an "anchor" to which the overhead strands will be sewn.
Method 2 of 4: Weaving Cornrow
 1 Start braiding on one side of your head. Do not start at the very edge, or if you want to pull your hair up or pull it up in a ponytail, the overhead strands will be visible. Start weaving, stepping back a little less than one and a half centimeters.
  2 Take three small strands of roughly the same amount of hair in each of the thin sections you have selected for the cornrow braids. Hold one strand with your right hand, one with your left, and the center strand with whatever hand is comfortable for you.
 - Don't start with too much hair. Keep the strands small so that the finished braid does not create a bump under the overhead strands.
- If the braid is too thick, you may have problems drying your hair after washing, and it may become moldy.
 3 First, move the section of hair that you are holding with your right hand under the center section. Then bring the strand you are holding with your left hand under the new center strand.
 - Continue crossing strands all over the selected section of hair. Pick up extra strands from the head as you go and add them to the center strand to create one long cornrow braid.
- You can add new strands to the center, or you can add to the left and right, just be consistent in this.
- Make the cornrow as tight as possible without soreness.
- Continue crossing strands all over the selected section of hair. Pick up extra strands from the head as you go and add them to the center strand to create one long cornrow braid.
 4 Fix the end. When you get to the end of the selected section of hair, secure the end of the braid with an elastic band.
 - Braid two braids on both sides, moving from the temples to the center of the head, and connect them in the middle. This will keep the tip of the braid pointing down in the middle, rather than sticking out from one edge.
Method 3 of 4: Sewing in overhead strands
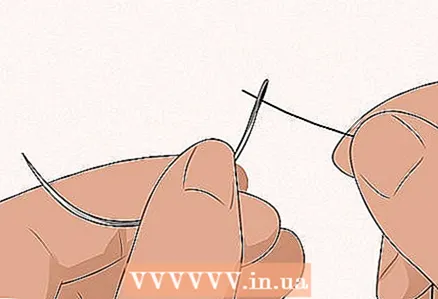 1 Insert the thread into the needle. Cut a piece of thread for the patch strand about 1.2m long and insert it into a curved needle. Pull the thread through the needle so that there are two equal ends. You will be sewing with two threads. Tie the ends of the thread with a strong knot.
  2 Clip the patch together. For extra volume, you can fold the false hair in half. Take a needle and thread and staple the unbent ends of the hair extensions together to keep them from coming apart.
 - You may need to trim the strand to the desired width. Its width should match the length of your braid. If you are going to fold the strand, it should be twice as wide as the length of the braid.
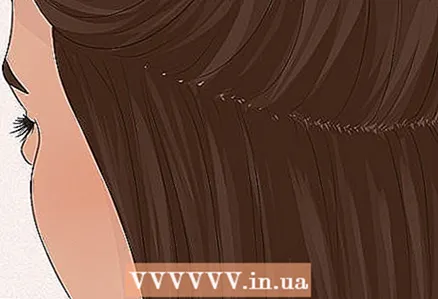
 3 Sew the first stitch. With the fake strand already attached to the threaded needle, slide the needle under the cornrow braid and out. With a curved needle, this should be easy. The tip of the needle should now be looking at you.
 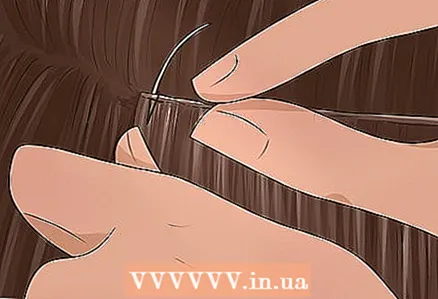 4 Attach an overhead strand. Grab the needle (the end is facing you) and insert it into the right side of the patch, just below the locking stitch on it. If you are working with a strand folded in half, make sure the needle goes under the two seams. Pull the patch up and try to cover the cornrow braid with it. Pass the needle under the braid again and gently pull the thread, making a loop.
 - If the strand is wider than the parting length for it, just tuck it in the opposite direction at the end when you sew it on.
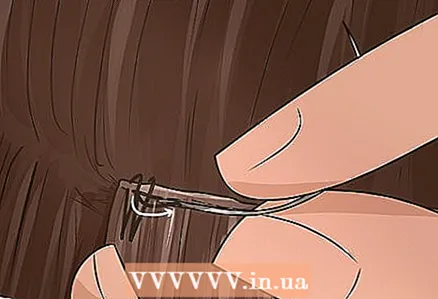 5 Make a knot. When you remove the needle from under the braid, pass it through the loop made in the previous step and pull the thread all the way. Pull firmly on the thread to hold the strand securely in place.
  6 Continue sewing on the overhead strand. Slide the needle under the seam of the patch strand again about 13 mm from the previous stitch. Pass the needle under the cornrow pigtail again, leaving a loop and thread through it to secure the strand. Continue to sew along the braid line, making even, even stitches about 13 mm apart.
  7 Finish sewing. When you are one stitch from the end of the strand sewing, stick the needle in from the right side of the strand and tuck in the edge of the strand. Do not pass the needle under the pigtail again. Sew 2-3 stitches to secure the folded edge to itself. Then pass the needle under one of the stitches, pull the thread to form a loop, and insert the needle into the loop to create a knot. Tie the knot 2-3 times for more security. Cut off the remaining ends of the threads.
 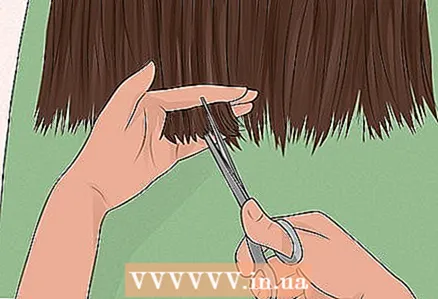 8 Cut your hair if necessary. Depending on how you style your hair, you may need to cut your hair to create a new hairstyle or help the fake strands blend in with your real hair.
Method 4 of 4: Hair Care
 1 Wash your strands carefully. It is definitely possible to wash overhead strands, only you need to do it carefully. Wash your hair and apply conditioner from top to bottom, rather than tilting your head or collecting hair at the top. Apply shampoo and conditioner in the palm of your hand and work through your hair. Avoid washing your hair with your head tilted over the sink or curled at the crown of your head.
 - Choose a moisturizing or moisture-retaining shampoo and conditioner. A leave-in conditioner spray is a good option, especially for the ends of the hair.
- Be extremely careful when brushing or combing your hair. Work from the ends, working slowly towards the scalp and gently unraveling the tangles. Do not pull or rub your hair.

Laura martin
Laura Martin is a licensed beautician based in Georgia. Has been working as a hairdresser since 2007 and has been teaching cosmetology since 2013. Laura martin
Licensed cosmetologistProperly care for the extended strands so that they last longer. Laura Martin, a licensed cosmetologist, notes: “They can last up to 8 weeks., depending on how often you wash them and how well you care for them. If they start pulling your hair or slipping off, you should take them off. "
 2 Use styling products carefully. You can use mousse, gel, and hairspray as long as they are alcohol-free. It is best not to use rinse aid or oils.
  3 Sleep well. When you sleep, braid your hair in two braids on the sides, or pull it up in a loose ponytail to prevent tangling. If you have frizzy hair, try sleeping on a satin pillowcase to prevent frizz from frizzing.
  4 Protect your hair while swimming. Salt and chlorinated water is very dry and can cause hair to fade or change color. If you are going to swim, wear a swimming cap.
Tips
- Hair extensions can be secured in small strands in a strand-by-strand fashion.This technique consists of attaching false strands to natural hair with glue or wax adhesive, or by fusing. This approach takes much longer (2.5–3 hours) compared to sewing. These strands should last on the hair for 2-7 months, depending on the person's natural hair and the quality of the overhead strands used.
- Mesh wigs are an alternative to overhead strands. The wigs are made by hand on French or Swiss braid. These wigs (once used exclusively in theaters) are lightweight, fit snugly around the head and look natural. These wigs can be full-length, full-length, or partial, for the front of the head. Wigs are usually glued with glue, which holds them for 6 months.
- "Invisible" overhead strands are another alternative. With this type of overhead strand, the hair "grows" from synthetic leather. Synthetic leather adheres directly to living skin. This waterproof attachment lasts for 5-8 weeks. These strands are recommended for people with very thin hair who want to achieve volume.
What do you need
- Overhead strands (natural or synthetic), held together by a seam
- Curved sewing needle specially designed for sewing hair
- Sewing thread for hair (must match the hair)
- Hair Clips
- Flat comb with a sharp end ("tail")


