Author:
William Ramirez
Date Of Creation:
24 September 2021
Update Date:
1 July 2024

Content
- Ingredients
- Steps
- Part 1 of 3: Buy pork skin and peel it
- Part 2 of 3: Dry the pork skins in the oven
- Part 3 of 3: Sear the dried pork skins
- Tips
- What do you need
Many chefs and meat sellers believe that pigskin (skin) is completely useless and throw it away. However, if you cook this product properly, you can get a very tasty dish. First, cut off all the fat from the skin and cut it into small pieces. Then send them to the oven to dry thoroughly. Then fry the hard skin pieces in the correct oil until they are large and fluffy. You will end up with crunchy, delicious cracklings, sometimes called pork chips. Serve them with salt, pepper and other spices of your choice.
Ingredients
- At least 450 grams of peeled pork skin
- Frying oil (coconut oil or lard)
- Salt (to taste)
- Black pepper (to taste)
- Seasonings (optional)
Steps
Part 1 of 3: Buy pork skin and peel it
 1 Buy pork skin. Pork skin with a small layer of fat is sometimes sold in farmers' markets and in small shops selling meat and offal.Try going to a store or market shortly before closing: quite often shoppers ask to cut the skin and fat from the pork when they buy a piece of meat, so by the end of the day the seller has quite a few of these pieces of skin left. If you can't find skins on sale, you can buy a large piece of pork belly with skin on it. Check that the skin on the piece of meat is not very thin (at least 0.6 cm thick).
 - You will need at least 450 grams of pork skin (excluding the weight of the meat, of course).
- Use the skin within three days of purchase. This product contains quite a lot of liquid, so it deteriorates quite quickly.
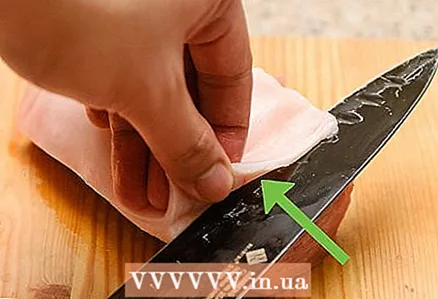 2 Separate the skin from the meat and fat layer. Cut off the remaining meat from the skin, cutting it into strips according to the thickness of the fat layer. Then, using a large spoon or the blunt side of a knife blade, carefully scrape off all of the fat from each strip of leather. The less fat remains on the skin, the more airy and fluffy you will get cracklings. Remember to keep your knife safe when cutting tough pieces of meat.
 - Pigskin is firm and elastic. The fat is quite soft, so you can easily scrape it off the inside of your skin.
- The fat removed from the pork skin can be used to make lard or simply thrown away. Save the cut meat for later use as a dish.
 3 Cut the skin into small pieces. After removing most of the fat from the skin, cut it into small portions. Try to keep skin squares about 5 by 5 centimeters in size.
 - After frying, the pieces of skin will double in volume. Keep this in mind and try not to make the pieces of raw skin too large.
- When you are finished handling raw meat, thoroughly wash your hands, knife, and cutting surface. You can not eat raw meat - this can cause very dangerous diseases.
Part 2 of 3: Dry the pork skins in the oven
 1 Preheat the oven. Set the heating mode to 120 ° C. Many modern models of ovens emit a sound signal when the temperature inside reaches the desired level. If your oven is not equipped with this function, wait at least ten minutes after switching on. During this time, the oven will just heat up to the desired temperature.
  2 Arrange the pork skins on a baking sheet. To do this, you will need a low-rimmed baking sheet, which can vary in size depending on the number of skins. Spread the skins over the entire baking sheet, with the outside of the baking sheet facing down.
 - If you are cooking a lot of skins, you don't need to try to fit all the pieces on one baking sheet - it is better to use two or even three baking sheets.
- To make it easier for you to clean the baking sheet after you finish using it, line the surface of the baking sheet with cling foil or baking parchment paper.
 3 Leave the skins in the oven for three hours. When you cook pork skins for a long time at low temperatures, the liquid will evaporate from the skins and the skins will dry out. When you fry these pieces in a skillet, they will swell and taste delicious.
 - Well-dried skins look dry and crispy, resembling jerky in appearance.
- It is better to overdry the skins than not dry well enough. If you think they don't look dry enough, leave them in the oven for another half hour or even longer.
Part 3 of 3: Sear the dried pork skins
 1 Heat butter or lard (ghee). Take a deep stainless steel skillet and fill it 1/3 full with butter or ghee. Place a skillet over medium heat and heat the oil for 5 to 8 minutes, or until it begins to simmer. Do not use oil with a low smoke point (such as olive oil) for frying. For best results, it's best to take:
 - peanut butter (do not use if you are allergic to nuts);
- Coconut oil;
- rendered fat (lard).
 2 Check if the oil is hot enough. To properly fry pork skins, the oil must be preheated to 200 ° C. If you have a kitchen thermometer, dip the metal tip in the oil for a few seconds. If you don't have this tool on hand, take a slice of bread and dip the rim in the butter.
 - If you see that the butter around the bread is boiling intensively, then it has already warmed up to the required temperature.
- If the butter is only slightly bubbling around the dipped bread, then it is not yet hot enough.
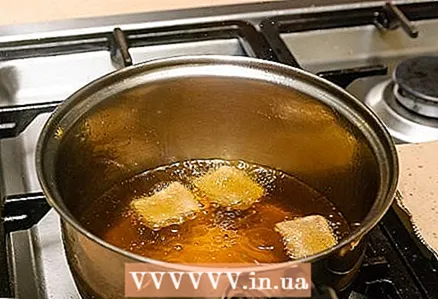 3 Fry the skins in oil until they swell. Dip three to four pieces of skin in heated oil and leave for 30-60 seconds. When the greaves swell in volume, swell and float to the surface, they are completely ready.
 - Do not put too many skins in the pan; fry them in small portions.
- Line a large, flat plate with paper towels. Use a metal slotted spoon to remove the greaves from the pan and place on a plate.
 4 Add seasoning and serve the cracklings to the table. In a small bowl, combine the seasonings of your choice and sprinkle on the skins. Many people find it best to stick to only salt and ground black pepper. However, you can get creative and use a more complex mixture of spices and seasonings. Try these combinations of ingredients:
 - Sweet seasoning: 1.5 tablespoons of salt, 0.5 tablespoons of anchored pepper (if you don't have this rare seasoning, replace it with ground smoked paprika) and 1 teaspoon of brown sugar.
- A teaspoon of salt and a teaspoon of the Chinese five-spice blend (a seasoning where star anise, cinnamon, fennel, Sichuan pepper and cloves are mixed in equal proportions).
- A teaspoon of salt, a teaspoon of pepper and a pinch of paprika.
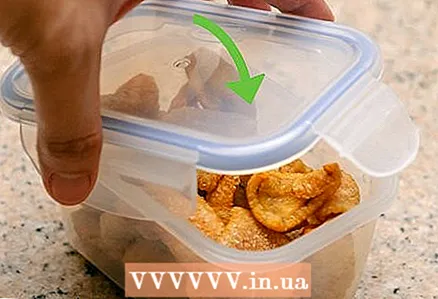 5 Save greaves that you didn't eat right away. Leftover pork rind should be stored in an airtight container or zip-lock bag. If the container is not closed tightly enough, the greaves will become stiff. In any case, do not store them for more than a week.
 - Greaves can be stored in a kitchen cabinet or elsewhere in the kitchen, but not in the refrigerator.
- If you feel the smell has gone rancid, throw away any remaining greaves without regret. They have deteriorated and are not good for food.
 6 Ready!
Tips
- Always wash your hands and any surfaces that have come into contact with uncooked pork thoroughly. Eating raw pork can lead to serious illness.
- Dispose of the oil in which you fry the greaves properly. Wait until it cools down, transfer to an unnecessary container and throw it in the trash. Never pour oil into the sink; you are unlikely to be pleased with a blockage in the drain.
What do you need
- Sharp knife
- Deep skillet or stainless steel casserole with thick bottom
- Low-rimmed baking trays
- Metal slotted spoon


