Author:
Mark Sanchez
Date Of Creation:
8 January 2021
Update Date:
1 July 2024

Content
Let's describe a simple method for quickly applying a uniform coat of latex paint to the interior walls of a room. It will allow you to get the job done quickly and avoid common problems such as unpainted areas, roller marks or streaks with excess ink around the edges of the roller passage.
Steps
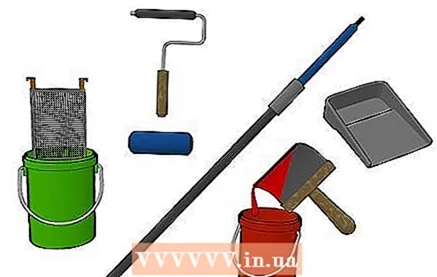 1 Get professional quality equipment that will last you for a little more than a cheap all-in-one kit.
- Start with a good roller holder.
- Attach a 1.2m wooden stick or telescopic handle to the holder for increased reach.
- Invest in a good roller (also known as a roller). It is tempting to buy a roller with the cheapest fur coat and throw it away after work, but cheap rollers do not absorb enough paint to get the job done well. It will take you twice as long to paint the room and the results will not be as good. Use fur coats with a pile length of 1 cm for painting flat walls and ceilings, 2 cm for painting rough textured surfaces, and 0.5 cm for glossy and semi-gloss paints. For more tips on equipment care, see the Tips section at the bottom of this article.
- It is rare to see a professional painter painting a large surface area with a paint tray.For such work, a large bucket with a special screen hung on it is best suited, it is easier to fill and close, it is easier to move with it, the likelihood of spilling paint or stepping on it is much lower. If you need to take a break, you can simply cover the bucket with a damp towel to prevent the paint from drying out.
- Paint trays are suitable for painting small areas, such as bedrooms, where only four liters of paint may be needed. Cleaning of pallets is much easier, and if the pallet is laid with a layer of polyethylene before filling, it will not be difficult at all.
 2 First paint the surface with a brush around the edges. Since the rollers cannot get close to the corners, the first step in painting is to paint over the corners of the walls and ceiling, as well as decorative elements with a brush.
 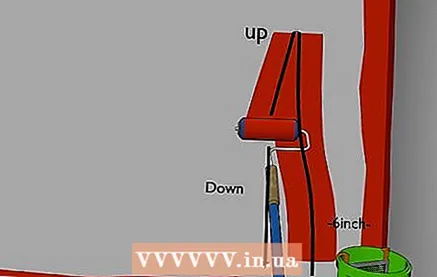 3 Apply paint to the wall in a sweeping motion. Start at the bottom 15cm from the corner and work your way up, working at a slight incline and applying light pressure to the roller. Stop a few centimeters from the ceiling. Now quickly spread the paint towards the corner by rolling up and down the paint roller. Don't worry about getting the perfect stain yet.
 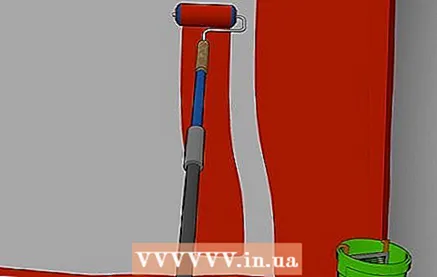 4 Reload the roller with paint and repeat the painting procedure on the adjacent wall. Make sure that the edges of the painted area do not dry out. This is critical for high quality work, whether painting doors, furniture or walls. The idea is to plan out the work sequence and speed so that each successive coat of paint overlaps the still wet edge of the previous coat. If you take a break in the middle of the wall, and then start painting when the previous part of the work is already dry, then it is very likely that there will be a noticeable junction of the two areas on the wall.
  5 Roll the entire painted area again to distribute the paint evenly. Do not apply paint to the roller at this step. Apply very light pressure. Roll up and down from floor to ceiling, each time moving sideways about three-quarters of the width of the roller so that each pass overlaps slightly with the previous one. When you get to the corner, roll the roller as close to the corner as possible without touching the adjacent wall.
  6 Smooth out the paint along the ceiling by long horizontal rolling of the roller without loading it with paint. Swipe the roller as close to the ceiling as possible. Brush stains leave marks that do not match the texture of the roller paint, so you need to cover them as much as possible in order to achieve the best results. Do this by carefully rolling the roller close to corners, decorations and ceiling. Rotate the roller with the open edge to the border (corner) and remember not to overload the roller with paint. If you are experienced enough to stop the roller 2.5 cm from the ceiling when painting vertically, you can skip this step.
 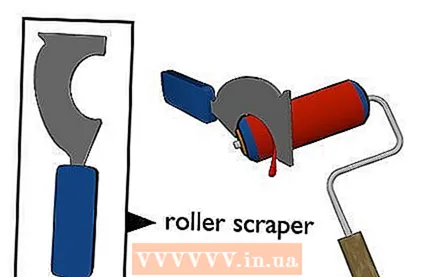 7 Scrape off any remaining paint from the roller before washing it. Use a spatula or, even better, a special roller scraper with a semicircular cut on it. The 5-in-one multipurpose paint scraper is perfect for this task.
  8 Wash the roller in warm water and detergent. Lather the roller and squeeze it out with your fingers as if you were bathing a shorthaired dog. The detergent will wash away large amounts of paint residue, making the next step easier.
  9 Rinse the roller coat with running water until it becomes transparent. Finding a roller and brush washer at your local hardware store will make your task easier. Simply slide the roller onto the device and wet it, then rotate it in the empty bucket until it is clean.
Tips
- High quality woolen coats can cake if too much pressure is applied during dyeing.Rolling requires light pressure. Regardless of the type of coat you use, let the paint do its job. Hold the roller laden with paint and apply just enough force to loosen and distribute the paint. Squeezing out the last drops of paint from the roller will only create problems for you. Start by painting the walls with the letter "V" or "W", and then spread the paint over the interspace. Smooth the paint up and down. After 1-2 minutes, look at the wall to make sure there are no streaks.
- Strain used paint through a paint sieve to remove any lumps from it. You can find 20 liter paint sifters in stores.
- If you notice roller marks (vertical lines) on the wall, rotate the roller in a different direction and re-run it over the wall (within 10 minutes for latex paints).
- Clean the surface to be painted before painting.
- For less clutter, it's best to take a trash bag with handles (which tightens when you pull on the handles), turn it inside out, and slide it over the paint tray. Tie the bag handles on the pallet legs. When you are done with your work for today, you can fold the rollers into the pallet and then pull the bag off the pallet by turning it back in and tying the strings again. If done correctly, the paint will not dry and you can continue using the rollers the next day. This also means you don't have to wash the pallet.
- Keep a wet rag in your pocket and remove lumps from the wall with it as you go.
- To minimize fiber shedding from the roller, wrap the new roller with duct tape and then release it to remove loose fibers. Repeat the procedure several times. You can also use a lighter to lightly scorch any loose fibers you notice.
- If you must finish painting later this day or the next day, the paint roller can be wrapped in a bag. It's also a good idea to put it in the refrigerator. It will remain in excellent condition and will be able to resume its work immediately.
- Disposable plastic pallet interlayers can be purchased quite cheaply. Buy 10 pieces and just throw away the used interlayer at the end of the day to make it easier for yourself to clean up after painting.
- Cover the bucket of paint with a damp cloth when not in use.
- If partially dried paint begins to flake off the pallet, clean it.


