Author:
Florence Bailey
Date Of Creation:
22 March 2021
Update Date:
1 July 2024

Content
- Steps
- Part 1 of 6: Installing Camtasia
- Part 2 of 6: Preparing to Record
- Part 3 of 6: Recording your first presentation
- Part 4 of 6: Editing the presentation
- Part 5 of 6: Publishing your presentation
- Part 6 of 6: Making Good Presentations
Do you need to record from your screen to make a presentation or showcase a product? Camtasia is one option when it comes to capturing screen content, and it gives you extensive editing options for the final video. You can upload this video to various streaming sites or distribute it yourself. See Step 1 below to get started.
Steps
Part 1 of 6: Installing Camtasia
 1 Download Camtasia software. Camtasia is available for free use for a period of 30 days. After the trial period expires, you will need to purchase it to continue using it. Camtasia can be downloaded from the TechSmith website.
  2 Run the installer. During installation, you will need to read and confirm the User Agreements. You will also be asked to enter a license key or choose to install a trial version of the program. If you have a key, enter it or copy it into the corresponding field and enter your name.
 - If you purchase Camtasia, a license key will be emailed to you. If you cannot find this email, please check your Spam folder.
- Camtasia will try to verify your license during the installation process, so make sure your computer is connected to the Internet.
 3 Select additional installation options. After entering the key, you will be prompted to choose where to install Camtasia. The default installation location will be fine for most users. You will also be prompted to install a PowerPoint add-in that will allow you to insert Camtasia recordings into your PowerPoint presentation.
Part 2 of 6: Preparing to Record
 1 Clean up your desktop. If you are recording a program in full screen mode, you shouldn't worry about it, but if you are creating a lesson using multiple windows, then your desktop should not be distracting.
 - Remove all icons from the desktop. Either put them in a folder or move them to another screen. After you finish recording, you can put them back.
- Close all unnecessary windows. Make sure all messaging programs, email programs, browsers, and other unnecessary programs are closed and not drawing attention.
- Change your desktop wallpaper to something muted. If your desktop wallpaper is very bright or has a photo of your family on it, change it to something neutral at the time of recording.
 2 Write a script or plan. Write a short outline of your presentation, with notes on when to switch between windows and with important tips. This will help you convey all the information you need and avoid any "oops" and "mmm ..." during the recording process.
 - As you write your script, try running your presentation to make sure it looks good enough from the outside.
- Some people don't need scripts, others need them. Familiarize yourself with this process and decide what works best for your presentation style.
 3 Connect a good microphone. Viewers will get the most out of your Camtasia presentation if the audio is well recorded. For the best sound recording, you need a good microphone that connects to your computer via USB.
 - Take care of the acoustic environment of the recording location. a large room with large empty walls will create an echo effect. Background noise will distract the viewer.
- During your presentation, you can also use your webcam to capture your face.
Part 3 of 6: Recording your first presentation
 1 Open Camtasia. When you first start Camtasia, you will be taken to the Editor window. The most important part of the Camtasia program is located here. You will use the Editor to start recording and to edit it after you finish recording.
  2 Click on the "Capture Screen Content" button. It is located at the top left of the Camtasia window. Clicking on this button will automatically hide the Editor window and open the recording window control panel.
  3 Select the recording area. If you are going to switch between multiple windows, the easiest way is to record the entire screen. Full screen recording is enabled by default.
 - You can set the recording area yourself by clicking the Custom button.
- A dotted line will appear around the area to be recorded.
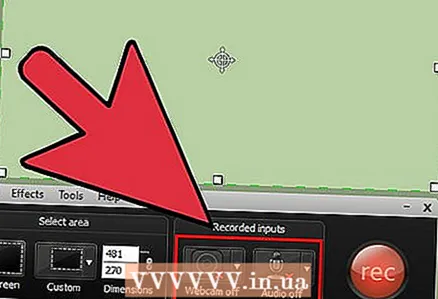 4 Select audio and video input devices. If you want to use the webcam, turn it on by clicking on the Webcam button. If several microphones are connected to your computer, click on the arrow next to the "Audio" button and select the required microphone from the drop-down list.
 - Use the Audio menu to turn system sounds on or off. If enabled, system warnings will be recorded for your presentation.
 5 Check if the audio input is working. If you are using a microphone, say something into it before recording and see if the signal strength indicator next to the volume slider changes. Move the volume slider so that the signal level from the microphone is approximately in the middle of the volume level scale.
  6 Open the windows you want. Before you start recording, open all the windows you need during your presentation. This will save you the awkward moments of finding the right window while recording.
  7 Start recording. Take a deep breath and press the REC key or the F9 hotkey. A countdown will appear on the screen. After it disappears, everything that you do on the screen and what you say will be recorded.
 - Speak slowly and clearly, take your time.
 8 Finish recording. After finishing your presentation, press F10 to stop recording. You can stop it using the taskbar, but this action will be recorded and you will have to cut it later.
 - After you finish recording, a preview of your presentation will appear. Take a look and make sure everything looks the way you want it, and click the "Save & Edit" button.
- Give your project a memorable name. Create a new folder if you end up splitting the project into multiple files.
Part 4 of 6: Editing the presentation
 1 Open the project in Camtasia Editor. If you've just finished recording and are watching a preview, saving the project will automatically open it in the Editor. This is where you will make changes, cut out unnecessary items, and add transitions.
 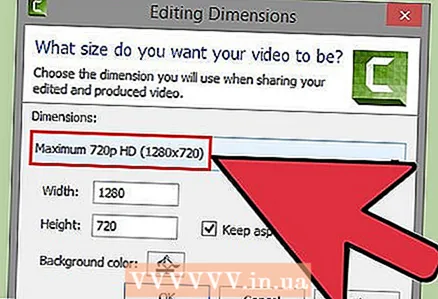 2 Select the video size. Before starting editing, you will be asked to select the dimensions for your final product. You can select preset values from the dropdown menu. These preset values are accompanied by comments as to what they are recommended for.
 - Try to use one of the automatically suggested size values. They are based on the original dimensions of the recording and are resized to maintain the aspect ratio of the image. Selecting one of these will prevent image distortion (flattening or stretching).
- You can change the size at any time by clicking on the Size button at the top of the preview window.
 3 Cut out unnecessary audio and video. However prepared you are, chances are there will be several mistakes in your presentation. Fortunately, you can easily cut out these errors with a few keystrokes. Note: If audio and video are recorded on different tracks, deleting some part from one of them does not automatically delete from the other.
 - Use the navigation bar to find the exact spot where you want to cut the piece. Click on the magnifying glass to enlarge the scale, which will allow you to pinpoint the location more precisely.
- Click and drag the red tab at the top of the navigation bar. Drag the red tab to the end of the section you want to cut.
- Press Space to play the part you selected.
- Click on the Cut button (scissors icon) above the timeline to delete the selected section.
 4 Make sure SmartFocus is working properly. If you have reduced the size of the video, Camtasia will apply the Smart Focus effect to enlarge areas of your presentation and to focus on the active element. It will try to focus on the cursor and the active window.
 - You can see where smart focus was automatically added by looking at the dedicated icons on the timeline.
- Click and drag the SmartFocus icon to where the transition occurs.
- Click on the SmartFocus icon and then click on the Visual Properties button to specify exactly how the transition should occur. You can make the movement slower or faster, make the magnification more or less pronounced, or remove the SmartFocus transition altogether.
- You can remove all SmartFocus animations by right-clicking on one of the icons and choosing Remove All Visual Animation in Media.
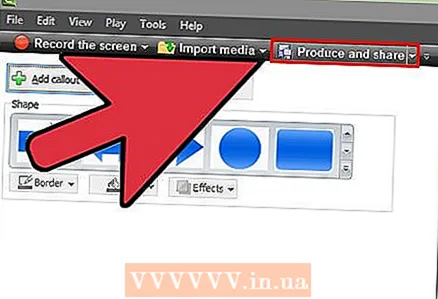
 5 Add callouts to your presentation. Callouts are visual effects that help focus the viewer's attention on important aspects of a presentation. Callouts can be text, symbols, or just highlighting. You can also use callouts to blur parts of the screen.
 - Use the timeline to navigate to the part of the presentation where you want to add the callout.
- Click the Leader button above the timeline.
- Create a leader. You can use a large selection of predefined shapes, type your own text, or choose an animated callout.
- Click on the "+ Add Callout" button to add it to your presentation.
- Move the callout around the presentation by simply dragging and dropping it in the preview pane. In the timeline, you can adjust the callout duration.
Part 5 of 6: Publishing your presentation
 1 Click on the "Create and Share" button. Once your video is edited and ready to watch, it's time to export and share it. To do this, click the "Create and Share" button.
  2 Select a destination. You can share videos directly to several built-in services like Screencast.com and YouTube. You can also create a video file or upload a video to another service.
 - When creating a video file, select the "MP4 Only" option. In this case, a file will be created that can be opened on almost any device.
 3 Enter the exchange service. If you are going to upload to YouTube or Screencast, you will be asked for a username and password so that Camtasia can connect to the service and upload the video on behalf of your account.
 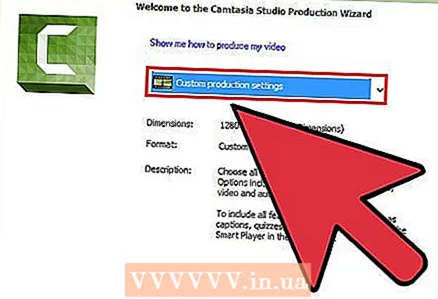 4 Use custom file creation settings. If you need to create a video in a format other than the preset settings, then select the "Custom creation settings" option. You will be able to choose from many formats including WMV, MOV, AVI, and even GIF.
 - MP4 is the most versatile format for devices and streaming.
- Be careful when choosing the resolution for your final product. Increasing the resolution will result in degraded image quality. For example, if you recorded at 800x450, you shouldn't publish video at 1920x1080.
- Choose a middle ground between size and quality. When you select your video settings, you will see a slider labeled "Smaller file" on the left and "Better quality" on the right. Moving this slider affects the final video quality. Consider the file size if you need to share the file with many people.
 5 Decide if you just make a video or add a program to play it. Camtasia can save videos that are opened using the Camtasia control panel. Although you will not be able to upload such video files to streaming services, you can use them on your sites or distribute them in another way.
Part 6 of 6: Making Good Presentations
 1 Practice as much as possible. Try to walk through your presentation several times before you start recording. Practice pronouncing difficult words and making difficult window transitions. Make sure everything works. Correct your script and cut out all unnecessary information. All this will help you save a lot of time when working in the Editor.
  2 Move the mouse cursor slowly and deliberately. Move the mouse pointer slowly while recording the screen. Try to move it straight without jerking. Move it slowly enough so that viewers can see where you move it and where you click it.
 - Don't use your mouse to highlight something on the screen! This will distract the viewer. Instead, in Camtasia, use Callouts to draw the viewer's attention to what you want to emphasize.
- Do not obscure what you are recording with the cursor. Use your mouse to move between windows and open what you want, then move the cursor to the side so that it doesn't obstruct what you are showing.
 3 Do not hurry. Make your presentation slow enough for everyone to keep up with. Most likely, you are making a presentation precisely because you are very familiar with the program that you are demonstrating. However, your audience is most likely not familiar with her, so the presentation should be done in such a way that they have time to understand everything, and there was no need to constantly stop and rewind.
  4 Write down in small chunks. When recording your presentation, you will find that it is much better to break it down into small chunks. For example, if you are making a 30-minute presentation, you can break it down into six 5-minute chunks. Not only will this make it easier to read (if you want to keep it separate, which you shouldn't), but it will make it easier to edit and find the frames you want. In the end, you can easily connect all of your pieces together.


