Content
To color chocolate, you first need to melt it. This is a rather complicated process, especially when it comes to white chocolate, which burns quickly. If you can, take the time to find the right ingredients and prepare a trial batch.
Steps
Part 1 of 2: Preparation
 1 Choose white chocolate. The composition of white chocolate should indicate whether it is made from real cocoa butter or from a cheap butter substitute. Artificial foods are more likely to set (become crumbly) than real chocolate. In terms of taste, experts tend to favor real chocolate, but some brands of artificial chocolate perform well in blind taste tests.
 - Use a chocolate you bought recently. When stored for a long time, chocolate begins to lose its taste and texture, especially real chocolate.
- For finer workmanship, use a chocolate coating or chocolate icing.
 2 Choose food coloring. Even a drop of water can turn your melted chocolate into a crumbly mess. For best results, buy powdered or oily food coloring from a specialty bakery or online store. The instructions below can be used for regular liquid food coloring, but be aware that it is much more difficult to work with.
 - Butter food coloring is best used for lighter shades, as if you add too much of it, the chocolate will taste bitter. Also, chocolate with too much color added can stain your mouth.
- The dye concentration in them is much higher than in liquid dyes.They can stain clothing, skin and kitchen surfaces.
 3 Preheat the oil colorant. Keeping the chocolate dry was a challenge in itself, as it can set if the temperature is not the same as the food coloring. If you are using oil dye, be sure to heat it above room temperature. Other types of dyes can be stored at room temperature.
 - Place the sealed bottle in a ziplock bag. Squeeze as much air out of the bag as you can and then close it tightly.
- Immerse the bag in a bowl of warm water for 10-15 minutes. The water should be pleasant to the touch and not scald.
- Shake the bottle a couple of times to distribute the heat evenly. Replace the water if it has cooled to room temperature.
- Remove the bottle from the bag and dry thoroughly.
 4 Place the steamer over low heat. If you don't have a steamer, make one with a large saucepan and an ovenproof mixing bowl or small saucepan to place on top of it. Start with a large saucepan without a lid. Heat 2.5-7.5 cm of water and bring it to a slow boil.
 - While you wait, thoroughly dry the top bowl and stirring stick, even if they don't look damp. It is best to use a rubber or silicone stirring stick, as wooden spoons may contain moisture.
Part 2 of 2: Melting and Staining
 1 Determine when to add food coloring. It all depends on which food coloring you use. Please read the instructions completely before you start, as you may need to change the order of the steps:
 - Add the powdered color as soon as the chocolate begins to melt.
- Butter coloring can be added after the chocolate has melted, provided you have heated it as mentioned above.
- Liquid color is less likely to set if added immediately before the chocolate has melted. That is why it can be left unheated beforehand.
 2 Place the chocolate in a smaller container. Place the chocolate on top of the steamer, which should still be at room temperature. Place this container in a pot of boiling water. The heat from the steam will slowly heat the chocolate, keeping it below its setting temperature.
 - If you want to melt a chocolate bar, break it into small pieces of equal size.
- Dry your hands dry. Moisture can spoil the chocolate.
- If using chocolate with real cocoa butter, set aside a third of the chocolate for later use. This is only necessary if you want to give the candy a glossy sheen.

- 3 Stir until all the chocolate is melted. White chocolate burns easily, so do not heat it above 46 ºC. Heat the water over the lowest heat, or turn it off altogether if you need to melt a small batch of chocolate. Stir the chocolate slowly until the consistency is smooth, then remove the container from the heat.
- If the instructions say that the color must be added before the chocolate melts, below is more information.
- If you are melting a large volume of chocolate (several kilograms), we strongly recommend using a kitchen thermometer or a fast thermometer in 1 degree increments. Maintain the temperature of the chocolate between 37 and 43 ºC.

Mathew rice
Professional baker Matthew Rice has been baking in various restaurants in the country since the late 1990s. His creations have been featured in Food & Wine, Bon Appetit and Martha Stewart Weddings. In 2016, Eater named him one of the top 18 chefs to follow on Instagram. Mathew rice
Professional bakerMatthew Rice provides tips on melting white chocolate.
In a water bath: “I bring the water to a boil, turn it off, put the chocolate in the top bowl and just let it melt in the water, which is still hot. It will take a little longer, but just be patient and stir it. Then the melted chocolate will have a good consistency. "
In the microwave: “Because white chocolate has such a lively temperament, do it maybe even a little less than half the power and stir it about every 15 seconds. When it acquires a uniform consistency, you can work with it. "
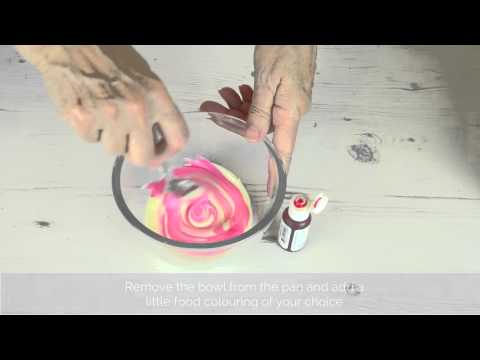
 4 Add dye slowly. Usually, powdered and oily food colors are more concentrated than conventional liquid colors. Add a small amount of color and mix thoroughly before deciding whether to add more.
 - Shake well before adding food coloring from the bottle.
- If the chocolate has set (become crumbly), remove it from the heat, then add and stir in one spoonful of neutral vegetable oil. This should make the chocolate smooth, but it can affect its taste.
 5 Temper the chocolate (optional). If white chocolate contains real cocoa butter, it may tarnish and slightly soften after melting and setting. Although this will not affect the taste of the chocolate, you can restore it to its previous shine by using “tempering”. Chocolate can be tempered in a variety of ways. The following is a general approach that does not require any additional hardware other than an accurate thermometer:
 - Remove the chocolate from heat and wrap a towel around the base of the bowl to keep warm.
- Add chopped, unmelted chocolate until the ratio is 1: 2 (hard to melted).
- Continue stirring the chocolate until the temperature reaches 27-28 ºC and all the chocolate has melted.
 6 Let the chocolate cool. Many chocolate makers allow their chocolate to cool gradually at room temperature to prevent cracking and moisture settling on it. Others prefer to leave it in the refrigerator for 10-20 minutes, which is much better if your kitchen is warm or humid. Store finished chocolate in a cool, dry place away from light.
 - For best results, place paper towels in the refrigerator to absorb moisture.
- If you want to pour the chocolate into molds or cover anything with it, keep it warm until the job is done.
What do you need
- Steamer (water bath)
- Rubber or silicone paddle or stirrer
- Food coloring - it is better to use powder or oil
- Bowl and ziplock bag (when using oil dye)
- Extra white chocolate for tempering (optional)
Warnings
- Chocolate is very difficult to melt when the air humidity is above 50%. In chilly weather, turn on the dehumidifier.


