
Content
- Steps
- Method 1 of 3: Hand painting ceramic surfaces
- Method 2 of 3: Working with spray paint
- Method 3 of 3: Painting and Patterning
- Tips
- Warnings
Painting ceramic items is a great, inexpensive way to update old home decor, make a special gift, or create a unique DIY creation. The process of painting ceramic tiles and painting ceramic plates or pots is generally the same, with only slight differences related to the size of the items. You can paint ceramics by hand or with spray paint, in addition, you can additionally decorate it with an interesting painting using artistic brushes. At the same time, for safety reasons, all work on the preliminary processing of the ceramic surface with sandpaper and its subsequent painting should be carried out only in a well-ventilated area.
Steps
Method 1 of 3: Hand painting ceramic surfaces
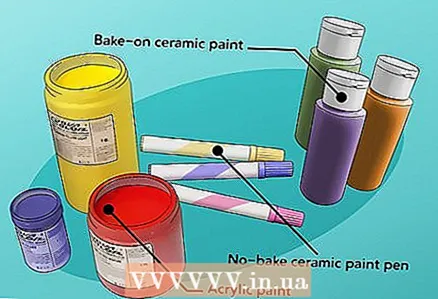 1 For ceramic tiles or large pottery, choose latex, acrylic or epoxy paint. For jobs such as painting tiled walls or ceramic vases, use hand-applied paint. Opt for epoxy paint for a very strong and durable high gloss finish. On the other hand, while acrylic and latex paints do not provide the same durable finish on ceramic work surfaces as epoxy paint, they are easier to find and easier to work with.
 - Remember that epoxy paints are significantly more expensive than other types of paints.
Advice: It is best to use latex paint on surfaces that no one will walk on, as it is a softer material that is easily scratched and chipped.
 2 Thoroughly wash the ceramics with water and a cleaning agent. If you are working with ceramic tiles, scrub the surface thoroughly with a brush and an abrasive cleaner, then wipe and dry. To clean pottery and plates, simply wipe the surface with a damp cloth to remove dirt.
 - Alternatively, you can use a clean sponge to gently wipe off any stubborn dirt or stains.
 3 Sand the surface of the ceramic to remove any existing glossy finish. If you are working with dishes and pottery, it is best to gently rub the surface by hand using a piece of steel wool. For ceramic tiles, use a 180-200 grit sandpaper and a surface grinder to gently grind large surface areas. After finishing this work, be sure to wipe the treated surface with a wet rag to remove the resulting dust.
 - Emery paper allows you to roughen the layer of glaze with which ceramic tiles or plates are coated, thereby providing better adhesion of the paint to the surface.
- Your goal is to remove excess gloss from the existing coating on the ceramic without affecting the ceramic itself.
 4 Cover the ceramic with two thin coats of primer. For tiles, use an oil or spray primer and coat the surface with a couple of thin, uniform coats. Allow each coat to dry to ensure good paint adhesion. If the primer still looks grainy after 2-3 coats, lightly rub the surface with steel wool.Allow the last coat of primer to dry for 12-24 hours before proceeding.
 Advice: If you paint your wall tiles in the shower, look for a special primer designed for damp rooms, such as epoxy.
 5 Sequentially paint over small areas of the surface, moving in zigzags. Dip a roller or paintbrush into the paint and scrape off excess paint on a tray or piece of cardboard. Use a roller or brush in short diagonal lines to paint over small areas of the ceramic. After finishing work on one area, move on to another to paint it in the same way. Work until the entire surface is covered with paint.
 Note: do not forget to let the paint dry within the time specified in the instructions on the can.
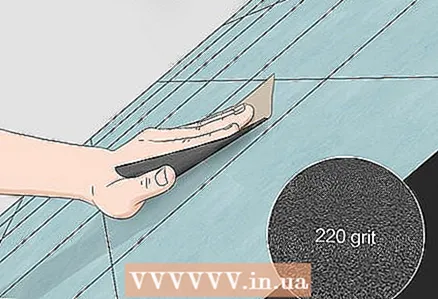 6 When the first coat of paint is dry, lightly rub it with sandpaper. When the paint is dry, use 220 grit sandpaper to lightly rub off the paint. Take sandpaper in your hand and concentrate your efforts on paint bumps and drips. If you are working with pottery or dishes, it is better to use steel wool instead of sandpaper.
 Advice: make sure the first coat of paint is completely dry before using sandpaper. If the paint is still damp, it may smudge.
 7 Apply a second and then the final coat of paint, this time with long vertical strokes. First apply a second coat of paint with a roller, successively painting small areas of the surface with zigzag strokes. When the tile is covered with a second coat of paint, apply the finishing coat in long vertical strokes from top to bottom. This will create an even, smooth finish on the ceramic.
 Note: this method can be used for both ceramic tiles and pottery. It allows you to achieve uniform surface coloration with a durable and visually beautiful coating.
 8 Allow the painted ceramic to dry for 2-3 days before using it. Whether you've painted a ceramic tiled wall, renovated floor tiles, or refined pottery, allow the paint to dry completely before touching the ceramic. Although the surface may feel dry to the touch after a day, leave it to dry for another 1-2 days to ensure the paint is dry and cured.
 Advice: you will also need to wait 2-3 days after applying a colorless varnish to the paint, so that it is also guaranteed to harden.
 9 To make the painted surface glossy, coat it with a clear urethane or epoxy varnish. For a simple and inexpensive solution, apply two coats of urethane varnish to the surface, allowing each to dry completely. For a more durable but expensive option, apply 1–2 coats of clear epoxy varnish to the surface.
 - Epoxy varnish can be applied to acrylic or latex paint to make it more durable and moisture resistant.
Method 2 of 3: Working with spray paint
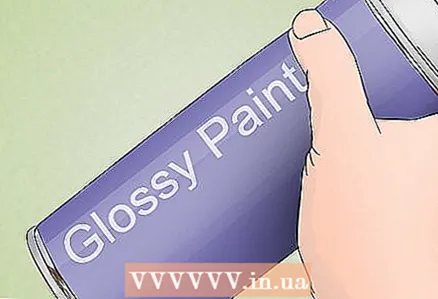 1 Choose spray paint for quick and easy staining of ceramics. For repainting glossy and previously painted ceramic objects, opt for a ceramic or plastic paint that contains special ingredients to adhere firmly to smooth surfaces. Apply glossy spray paint on large surfaces that need to be painted evenly with minimal effort.
 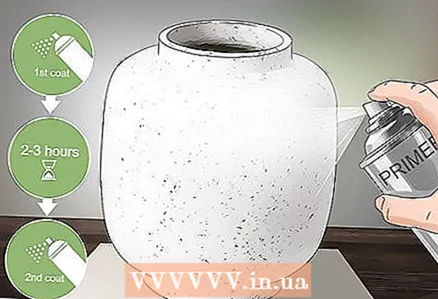 2 Apply 1–2 thin coats of aerosol primer to the surface. Unless the ceramics are initially white, choose an aerosol primer suitable for the ceramics. Shake the can for 15-30 seconds before painting the surface with a thin coat of primer.Next, let the first coat dry for 2-3 hours and then apply an additional coat of primer on top of it for a better surface finish.
 Note: If the primer is grainy after drying, sand it lightly with a piece of steel wool to remove any bumps and bumps.
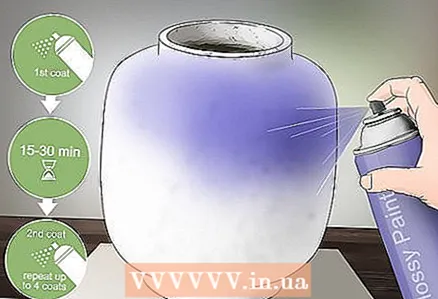 3 Apply 3-4 coats of spray paint to the primed ceramic surface. Apply paint to the item in zigzag lines over the entire surface, including the top, front, and sides. Once finished with one coat, wait until the paint is only slightly tacky, which should take about 15-30 minutes. Then apply an additional 1-3 coats until you achieve a perfectly painted surface.
 Advice: with glossy paint, you can achieve uniform staining with just two layers, but it all depends on the specific color in which you repaint the object.
 4 Let the paint dry according to the instructions on the can. Leave the painted object to dry in a well-ventilated area for 30-60 minutes. When you think the paint is dry, lightly touch the object in an inconspicuous place (for example, behind or below) to make sure that your guess is correct.
 Note: if you live in hot or humid climates, it can take up to two hours for spray paint to dry completely. Be patient and do not touch the item until it is completely dry!
Method 3 of 3: Painting and Patterning
 1 Apply small details such as twigs and flowers to the ceramic with small brushes. To paint buds or leaves, use a sharpened brush to apply a small drop of paint onto a ceramic plate where the base of the bud or leaf should be. Then, gradually tearing the brush away from the surface, draw it in the direction where the tip of the bud or leaf should be located.
 Flat brushes with a straight tip ideal for geometric patterns in the form of borders or straight lines, as well as for painting over large areas of the design. If you plan on using a stencil, a small, flat brush with a flat tip is probably also the best choice.
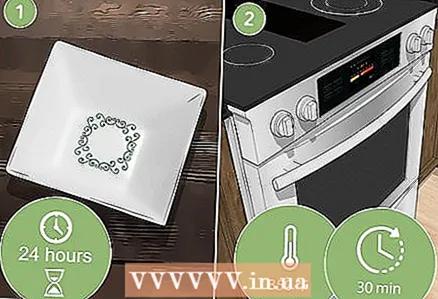
 2 Use acrylic or oil paint pens or markers to create drawings from contour lines. Wipe the ceramic item with a damp cloth, then dry it with a clean towel. Next, use paint pens or markers to draw patterns, write letters, or create drawings. When you are happy with the result, fix the paint by heating the item in the oven at 190 degrees Celsius for 40 minutes.
 Advice: if the ink pen doesn't write, place it on a piece of paper or cardboard and hold the tip down. Then shake the pen to help the paint flow further into the tip.
 3 Use masking tape to paint stripes on tiles, dishes, and bowls. Apply masking tape to the surface in two strips with a straight gap between them, then use a small brush to paint over the gap with ceramic paint. Let the paint dry for 5-10 minutes, then remove the masking tape while the paint is still not completely dry. Heat the painted object in the oven according to the paint instructions.
 Note: If you are painting a plate, mug, or bowl, be sure to use only food-safe paints.
 4 Use stencils to create dynamic and eye-catching patterns on ceramic tiles. To give ceramic tiles on a wall or floor a more interesting look, stick a stencil with an interesting pattern on the tile. Then paint over the stencil with a brush or roller and carefully peel off to leave only the pattern on the ceramic. If you decide to decorate a large area this way, attach the stencil to the next tile to create a pattern of repeating patterns.
 Advice: If you are decorating glossy or lacquered ceramics, be sure to pre-sand the surface with sandpaper using a surface grinder before stenciling. After that, you should paint the ceramics in a solid color to give it a smooth surface, and only then start working with the stencil.
 5 Do not forget to roast dishes that have been hand-painted with ceramic paint in the oven. If you've painted the dish with ceramic acrylic paint or used a paint pen, let it dry for 24 hours. Then bake it in the oven according to the paint manufacturer's instructions. Remember to turn off the oven after the specified time has elapsed and allow the item to cool completely before removing it.
 - Always follow the manufacturer's instructions when baking paint. The fixing paint you use may require a longer warm-up time or higher temperatures.
Advice: If you do not have any instructions for ceramic paint, put the pottery in a cold oven. Then turn on the heating to 190 degrees Celsius and let the ceramic heat up for 30 minutes, then remove it from the oven.
Tips
- Remember to use special non-toxic paints to paint food surfaces. Most ceramic paints are non-toxic, but it's best to verify this by reading the information on the label.
Warnings
- Be sure to work in a well-ventilated area or install fans to optimize ventilation in the area where you work. Dust, mold and paint fumes from inhalation can cause respiratory problems.


