Author:
William Ramirez
Date Of Creation:
16 September 2021
Update Date:
1 July 2024

Content
Over time, rust spots may appear on the machine body, which gradually grow under the influence of air and the moisture contained in it, which causes oxidation or corrosion of the metal. Whether you plan to continue using your car or selling it, it will look much better (and more expensive) without any rust marks, so try to get rid of them immediately. Take some time and deal with the rust before it spreads further and covers your entire vehicle.
Steps
Method 1 of 2: Sand and paint rust stains
 1 Take basic security measures. This method uses a sander, a powerful electrical device that removes shallow rust and old paint from the car body. To protect against dust and small particles flying in different directions, which can harm your health, use gloves, goggles and especially a gauze bandage to keep rust and paint particles out of your lungs.
 - If you have a lot of work to do, a respirator may be a better choice than a gauze bandage.
 2 Cover all parts of the vehicle that may become dirty. As mentioned, a lot of dust is generated during operation, consisting of small particles of rust and paint.If you do not take action, this dust will settle on the body of the machine, giving it a "dirty" appearance; cleaning the case can be a lot of work. To prevent this from happening, cover the areas not requiring treatment with a protective "mask" (that is, cover them with masking paper and adhesive tape). To protect the floor and define the work area, place a tarp under the machine, securing it with masking tape.
 - Protecting the car from dust is a delicate job. Do not use newspapers as paint can seep through and stain the glass. Take some kind of masking paper - it is thicker and does not let paint through. Secure all edges of the paper carefully with adhesive tape so that there are no gaps between them. You should tape all the edges of the paper, not just where the tape will hold the paper in place, otherwise ink may seep under the loose edges of the paper.
 3 Stick the paper along the body panels. The tape should not be interrupted somewhere in the middle of the panel, otherwise there will be a sharp border between freshly painted areas and areas with old paint. It will be too noticeable and you will not be able to remove it either by thorough polishing or by applying additional layers of varnish. The only option is to immediately glue the tape correctly, exactly along the edges of the panel, without going behind them and leaving only rust spots open.
 - If you have experience in painting cars, you can glue the tape several panels from the main one. If you are skilled at mixing paint gradually while spraying, use this technique to avoid abrupt paint transitions between panels.
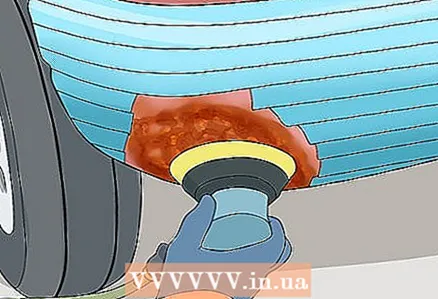 4 Remove paint around the rust stain with a double action sander. This tool allows you to control the speed of sanding while removing paint. Start with 80 grit sandpaper and work through to 150 grit. Using 80-150 grit sandpaper, remove old primer and paint, as well as light rust that has not yet set in the metal, then smooth the transition between the sanded area and the untouched painted surface ...
 - After sanding, check the surface with your fingers (wearing a glove) - it should be smooth.
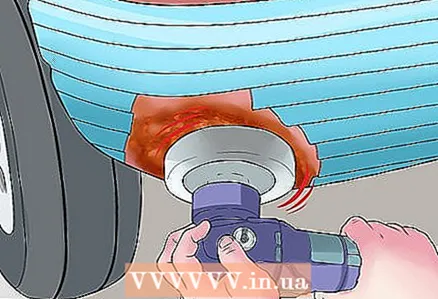 5 Place a metal grinding wheel on the typewriter. It removes deep rust stains and dents. When using a metal circle, work slowly and carefully, as careless handling of this tool can cause serious damage to the machine body. Once you sand off the rust, coat the treated surface with a rust remover acid to remove any remaining microscopic rust particles.
 - Phosphoric acid is usually the best choice for this, and is available at almost all auto parts stores.
- If desired, use Hole Filler or Bondo Filler to even out dents and fill in where you removed the paint. Then sand the spots by hand with 120-grit sandpaper to create a nice smooth metal surface. Below you will find more information on using placeholders.
 6 Prepare a primer site. Buy a metal primer and spray paint that matches the color of your car. These can be purchased at auto parts stores. There are different types of primers, so check with your dealer and follow the directions provided. As a rule, before applying the primer, you must:
 - Wipe the area to be treated with mineral spirits or paint thinner.
- Cover the entire adjoining surface of the machine with paper at a distance of one meter from the surface to be treated.
 7 Apply the primer evenly in thin layers. Apply three coats of primer, with a few minutes break between coats. Don't overdo it - the primer should not drip or drip down with each coat.
 - Most primers need to be left overnight (at least 12 hours) to dry completely.
 8 Sand the work surface with damp 400-grit sandpaper. This sandpaper is specially used to remove varnish and smooth out layers of old paint so that new paint adheres better to the surface. Keep a bucket of water handy and dip sandpaper in it often to prevent it from clogging up with paint. Then rinse the work surface with soap and water.
  9 Spray on a thin layer of paint. Apply the paint in thin layers, taking one to two minutes after each coat to allow the paint to dry slightly. Apply as many coats of paint to the primer as needed for the desired color and finish.
 - Wait at least 24 hours before removing the tape. Be patient - if the paint feels sticky to the touch, wait a little longer.
 10 Buff the edges of the freshly painted surface so that the new paint will blend in with the old one. If necessary, apply a colorless varnish on top so that the treated panel does not stand out from the surrounding background. Then let the paint dry for 48 hours.
  11 Wash and polish the car. It is finished! Now your car is free of rust and you can drive again.
 - As a precaution, do not wax the treated surface for 30 days after painting, otherwise fresh paint may peel off.
Method 2 of 2: Using patches
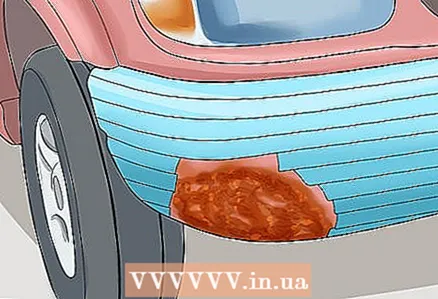
 1 Sand the rust down to "fresh metal". This method is slightly different from the previous one, however it uses the same basic principles and is best suited for removing deep rust spots that lead to holes and pits. At first fully remove rust with a sander. Sand all rust down to "fresh" (rust-free) steel, even if this results in holes.
 - It is important to completely remove all rust - if the smallest speck remains, over time it will grow under a layer of new paint and a new rust stain will form.
- When working with a sander, remember the safety precautions listed at the beginning of this article.
 2 Seal the hole with stainless filler. After sanding, apply aggregate to replace the old rust stain. Industrial aggregates (such as the aforementioned Bondo) can be purchased relatively inexpensively at almost any auto store. However, when sealing large holes, improvisation may be necessary. In this case, you will need something flat, durable and not prone to rust for the paint to adhere to to close the hole. Attach this patch to the hole with a layer of commercial aggregate and wait for it to dry.
 - Oddly enough, but cut metal cans from under the beer or lemonade are well suited for this purpose. These cans are made of corrosion-resistant aluminum, and many cans now have a thin protective coating. You can also use thin sheets of hard plastic.
 3 Smooth the surface with sandpaper. Sand the surface to line up the border between the applied patch and the machine body. This can be a long and time-consuming process - when sanding, you may find that you need to add some more aggregate and let it dry, then again ... The sequence is as follows: aggregate, sand, aggregate, sand, aggregate, sand , etc.
 - Start with a coarse (small number) sandpaper to smooth out large ridges, then gradually work down to medium, and finally to a fine (large number) sandpaper, resulting in a perfectly smooth surface.
- Slow and gentle hand sanding is best for this process, since the patch can be ripped off with a sander.
 4 Cover the surrounding surface. Now it is necessary to coat the sanded surface. As with the previous method, prepare for the coating process by protecting the untouched surface of the machine from primer, paint and dust. Do not forget about windows and tires.
 - As noted earlier, try to match the edges of the masking paper and masking tape with the edges of the body panels: in this case, a slight difference in color between the freshly painted and old areas will be almost imperceptible; however, this is not necessary if you are proficient in gradually mixing paint while spraying.
 5 Apply primer, then paint. Spray several thin coats of the primer, taking a break of one to two minutes after each coat in order for the primer to adhere to the metal. Allow the primer to dry overnight (about 12 hours), then sand it with 400-grit sandpaper for the paint to adhere well. Once ready, apply the paint in the same way as the primer previously: after spraying one coat, let it dry before applying the next, and so on.
 - As with the previous method, you can polish the edges of the freshly painted surface and apply a clear lacquer on top to make the treated area look the same as the rest of the case.
- Naturally, you need to choose the paint that best matches the color of your car. Most auto paint stores will be happy to assist you. However, remember that over time, car paint will fade somewhat.
Tips
- If your car is very heavily rusty, it may be worth having a professional remove it.
- A spray-less rust converter is great for small scratches, even if they haven't started rusting yet. Pour some of the converter into a paper cup (it will get dirty rather quickly with rust particles when used and will have to be discarded). Apply it to the edges of the pristine paint with a toothpick. Wait a few hours for the reaction to complete and the liquid to dry before doing anything with the machine (you can only drive it when the converter is dry). The product will leave behind a dull, dark tar-like film that is usually not visible on dark or metallic painted cars. This stain can be covered with car paint from above.
- An alternative to the described methods, which require a lot of time, are rust converters Are primers that can be applied directly to rusty surfaces. Unlike the standard procedure (remove paint, apply primer, paint again), you do not need to clean the work surface to non-corroded metal. Rust converters are composed of two main components: tannin and an organic polymer. An organic polymer provides a protective layer for the primer. Tannin reacts with iron oxide, converting it to iron tannate, a blue or black substance that is resistant to corrosion. You can purchase this product from a store or online.
- If there are rust spots on or around the fender, it may be worth jacking up the machine and removing the appropriate wheel. Also unscrew the dirt shield. This way, you can even out any dents from the inside and get more space for sanding and painting the wing.
Warnings
- When using phosphoric acid, ALWAYS READ AND FOLLOW the instructions for use of the product.
- Wear gloves, goggles and a respirator to protect yourself from rust and paint particles.
- The liquid in aerosol cans is explosive, so do not do anything to create sparks or fires and do not smoke in the vicinity of the work area during the entire rust removal process.


