Author:
Carl Weaver
Date Of Creation:
28 February 2021
Update Date:
1 July 2024

Content
1 When to prune the apple tree. Don't rush to prune the apple tree as soon as you see that it needs it. It is important to prune the apple tree at the right time so as not to damage it. Prune branches in the first or second month of spring, at least two weeks after the last frost.- If necessary, the apple tree can be pruned in late spring or early summer.
- Avoid pruning the apple tree in the fall, as pruning stimulates the growth of new shoots, but winter frosts will prevent this.
 2 Decide how many branches to trim. The apple tree loves a lot of light, so there must be a considerable distance between its branches. 3 What tools to use. You will need special tools to avoid damaging the wood. The pruning shears' blades should be proportional to the diameter of the branches to be cut.You can use pruning shears to cut thin branches. Large branches that are about 2 cm thick can be pruned with a delimber. Use a saw to cut any branches thicker than 6 cm. 4 What trees need to be cut. If your apple tree has a lot of shade, then it is an obvious candidate for pruning. However, not all trees need to be pruned. Don't do heavy pruning if your tree is younger than three years old. If the crown of the apple tree is too thick, then do not cut off excess branches at once, but do it gradually over several seasons.
 - Pruning young or small trees is done to stimulate the main branches and shape the crown.
- Pruning tall and mature trees improves yield and maintains overall crown shape.
Method 2 of 2: How to prune apple trees
- 1 Give the tree the shape you want. Your apple tree should be slightly tapered, with more branches at the bottom than at the top. This will provide the branches with more sunlight. Before you start trimming, keep in mind that you need to shape the crown into a pyramid.
- 2 Select the skeletal branches. At the apple tree, a central branch (conductor) emerges from the trunk, and skeletal branches (branches next in size) extend from them. Your tree should only have a few skeletal branches that do not intersect and are evenly spaced from each other. Depending on the size of your tree, it should only have two to six skeletal branches. The rest of the branches must be removed.
- When viewed from a bird's eye view, the skeletal branches of an apple tree should look like the rays of a star or like spokes in a wheel.
- 3 Remove root shoots. Root shoots grow at the base of the trunk and can be trimmed or removed even in late summer and early fall.
- 4 Cut off dry branches. Branches that are flaky, dead, diseased, damaged, or discolored should be removed. Cut off the entire branch if there are no shoots on it. If it has shoots at the base, trim them just above the outward-facing bud. Prune at an angle so that the raindrops run down and do not rot the branches.
- 5 Remove intersecting branches. To make the tree grow in the shape of a vase, remove all branches that intersect on top of each other. The vase-shaped tree not only looks more attractive, but is also better ventilated by the wind, which prevents some diseases. In addition, branches that do not cross have more access to sunlight and bear fruit better.
- Branches that intersect can rub against each other and hurt. Remove these branches at the base, as well as any other shoots that grow inward rather than outward.
- 6 Cut off the branches that grow downward. If your apple tree has any branches that grow downward, they should be removed. They will not be able to bear large and healthy fruits, they will take up valuable space and take away sunlight from other branches.
- 7 Cut through the shoots. Often, in mature trees, three or more shoots begin to grow from one bud. Because of this, the main branch on which they spawn weakens and becomes unable to support its other branches. Leave the largest and healthiest shoot, and then cut off any excess branches.
- 8 Cut off the remaining branches. Cut the remaining branches about half their length so that they begin to grow in thickness and begin to bloom the next season. Prune just above the outward-facing bud to form a beautiful, healthy apple tree.
Tips
- As an amateur gardener, it is unlikely that you will cut too many branches. Do not worry about it. Chances are, you are not cutting enough.
- Remove any cut branches from the ground and place them in a compost heap or make sawdust out of them for mulching.
What do you need
- Secateurs
- Pruning saw or delimber
- Telescopic pruning shears for tall branches
- Garden gloves optional
Additional articles
 How to identify the female and male marijuana plant
 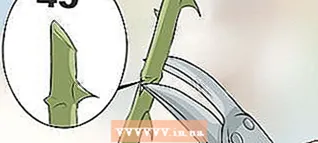 How to remove faded rose inflorescences
  How to get rid of horseflies
  How to dry lavender
  How to propagate a lavender bush
  How to plant succulents from leaves
  How to grow moss
  How to find a four leaf clover
  How to trim and harvest lavender
  How to grow mint in a pot
  How to plant poppy seeds How to grow aloe from a leaf How to trim aloe
  How to prune an oak


