Content
- Steps
- Method 1 of 3: Example
- Method 2 of 3: Drawing the head and face of the character
- Method 3 of 3: Drawing the Body of an Anime Character
Anime is a popular style of animation and drawing that originally originated in Japan. At first glance, it may seem that it is quite difficult to draw an anime character on your own, especially if you look at your favorite characters drawn by professional artists. Fortunately, anyone can learn to draw in anime style, and the whole process is relatively simple when broken down into small, sequential steps.
Steps
Method 1 of 3: Example
Method 2 of 3: Drawing the head and face of the character
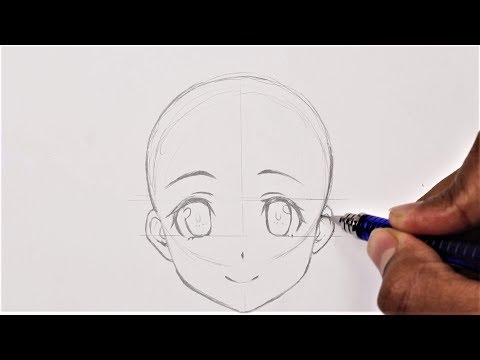
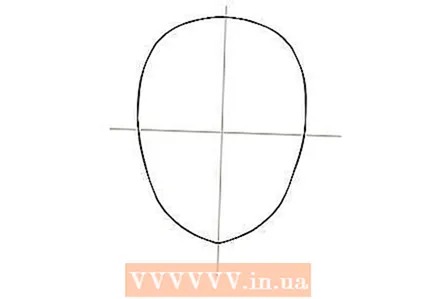 1 Draw an oval and divide it into 4 sectors with construction lines. This will be the basic outline of the character's head.The proportions don't have to be exact, but make the bottom of the oval narrower as it will become the chin. When the oval is ready, draw a horizontal line through its middle. Then draw a vertical line in the middle so that it intersects the horizontal one. Next, you will use these lines as guidelines for the location of the various facial features of your character.
 - If you want the character to have a larger face, make the bottom of the oval wider so that it is only slightly narrower than the top. If you need to depict a character with a narrow face, make the bottom of the oval even narrower than the top. There is no uniform head shape for anime characters, so you can experiment until you find the one you like the most.
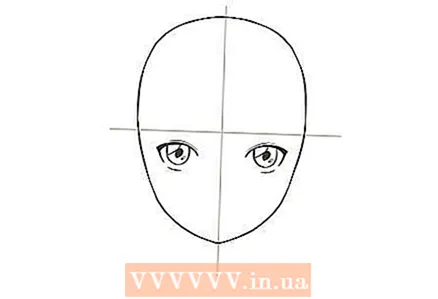 2 Draw the eyes below the horizontal auxiliary line. Anime characters always have exaggeratedly large eyes, usually about 1/4 to 1/5 of the face height. To draw the eye, start by drawing the lash line just below the horizontal line on one side of the center vertical. Then draw a semicircle going down and coming out of the lash line, and inside the outlined area draw a black pupil. Next, draw a small horizontal line at the bottom of the semicircle to indicate the lower lash line. Finally, paint in a circle for the iris around the pupil, leaving a little white space inside the eye - this will be a highlight. Do the same on the other side of the vertical line to draw the second eye.
 Advice: change the shape and size of the eyes depending on which character you are drawing - male or female. For a female character, make the eyes look more elongated and rounded, and add some thick eyelashes at the top. For a male character, make the eyes not so elongated in height and not so large.
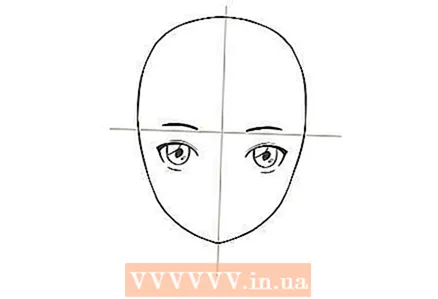 3 Draw eyebrows above the horizontal line. Draw each eyebrow in a long arc with the ends facing down. Make your eyebrows slightly longer than your upper lash lines. Then increase the thickness of the brow towards the inner corners.
 - When portraying female characters, keep the eyebrows relatively thin. For male characters, thicken the eyebrows to make them stand out on the face.
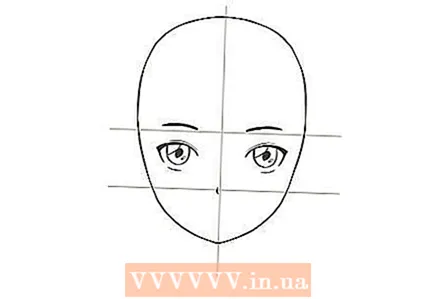 4 Add a nose halfway between the horizontal line and the chin. The noses of anime-style characters are almost invisible, usually they are clearly drawn only from the side view. To depict the character's nose, simply draw a small vertical line down the center of the face, roughly halfway between the horizontal line and the chin. If you want to indicate a big nose for your character, make the line a little longer.
 - The nose should be the smallest feature of your character's face.
- The nose will be positioned directly on the vertical line that you drew earlier. To make the nose better visible, make it darker than the vertical line, or erase the vertical line above and below the nose.
- Male anime characters sometimes have more pronounced noses, but this is not always the case. If you want to make the character's nose more visible, draw a small horizontal line under the vertical line of the nose to indicate the bottom of the nose. Also draw a triangular shadow on the side of the nose to make it appear as if the light is falling on the character from the side.
- In some varieties of anime, such as chibi, the nose does not need to be drawn at all!
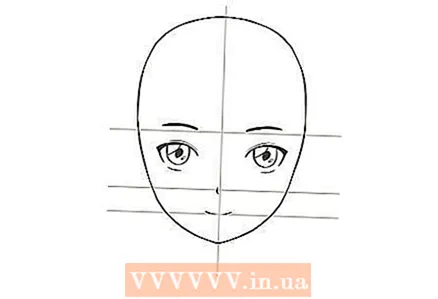 5 Draw the mouth roughly halfway between the nose and chin. Like noses, anime-style mouths are just as simple and subtle. To draw a mouth for the character, draw a horizontal line in the middle between the nose and chin, approximately corresponding in length to the distance between the eyes. Don't worry about lip depiction. The mouth should be the second largest shallow feature after the nose.
 - Bend the line so that the ends up if you want to give the character a smile, or do the opposite if you want to portray him as sad.
- If you want to show the character smiling with all his teeth, draw an arc under the horizontal line of the mouth, curving the ends up. The vertical white space between these lines should be about half the length of the mouth. It is this space that will be the teeth.
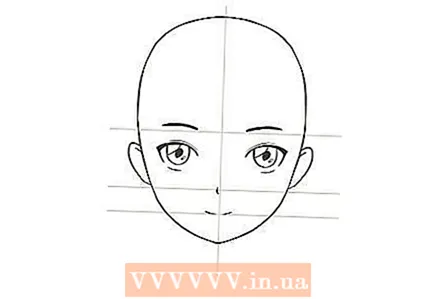 6 Draw the ears on the sides of the head. If you want to depict the character with long hair that covers the ears, skip this step. However, if the character has short hair, draw in a narrow oval on the sides of the head. The upper edge of the ears should be level with the horizontal line in the middle of the face, and the lower edge should be level with the lower edge of the nose. Next, draw the inner part of the ears in ovals.
 - Experiment with the size of the character's ears if you want to make them larger or smaller.
 7 Draw hair on the character's head. You are free to choose the hairstyle yourself, but usually in anime style, hair is depicted in pronounced sections with pointed ends of strands. You can depict short hair, medium length hair, or long flowing hair. Whichever hairstyle you choose, try not to depict individual strands. Instead, draw large sections of hair with 4-5 pointed ends.
 - If your character has long hair, you can draw two pointed ponytails on the sides of his head. Alternatively, you can draw hair gathered in a bun. Alternatively, you can draw a bang for the character, depicting 3-4 pronounced strands descending to the forehead.
- For a relatively short hairstyle, you can draw 3-4 expressive strands descending from the forehead and combed to the side. Alternatively, you can leave the character without bangs and just draw a few lines from the hairline towards the back so that it looks like the character's hair is pulled back. Alternatively, you can depict a chin-length bob, while identifying several large sections of hair.
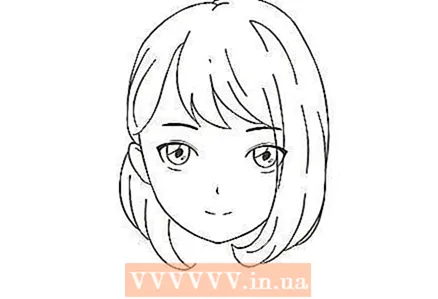 8 Erase the horizontal and vertical guidelines for the sketch. Erase them carefully so as not to accidentally erase your character's facial features. Use a small eraser to keep errors to a minimum.
 - Once you erase the guide lines of the sketch, the head and face drawing is ready!
Method 3 of 3: Drawing the Body of an Anime Character
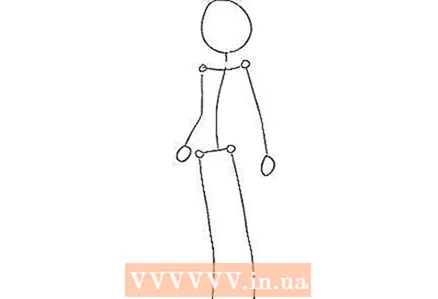 1 Draw a linear sketch of the character's body. Use straight lines for the arms, body, and legs. Make your arms and torso about the same length, and your legs about a third longer. Then mark the hands and feet with ovals or triangles. The size of the hands should be approximately 1/5 of the total length of the arms, and the feet should be approximately 1/6 of the length of the legs.
 - For the proportions to be correct, the full body of the character should be about 7 times longer than the height of his head.
- The arm lines should begin at 1/5 the length of the torso.
- Give the linear body sketch the position you want your character to be in. For example, if you want the character to sit, draw his legs bent. Or, if you decide to depict that the character is waving his hand, draw one of his arms bent.
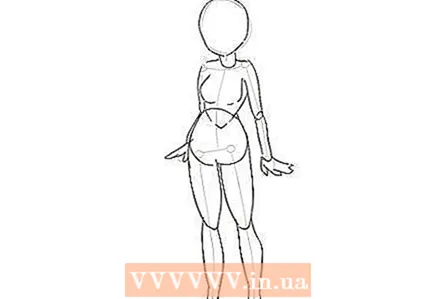 2 Indicate general outlines character body. Using a linear sketch of the body as a basis, sketch out the rough outlines of the torso, arms, thighs and legs. Don't worry about the accuracy of these outlines just yet. At this stage, you only need to outline the basic shapes of the various parts of the body.
 - Draw ovals for the upper and lower parts of the arms and legs, and then draw small circles around the elbows and knees. As for the proportions, make the upper and lower arms the same length and size. The top of the legs should be thicker than the bottom.
- For the torso, draw a rectangle that widens at the top and tapers at the bottom. Its top corners will eventually become your character's shoulders.
- To outline the outlines of the thighs, draw an oval over the area where the torso meets the legs.
- Anime characters are usually tall and skinny, but you can experiment with characters of different heights and shapes!
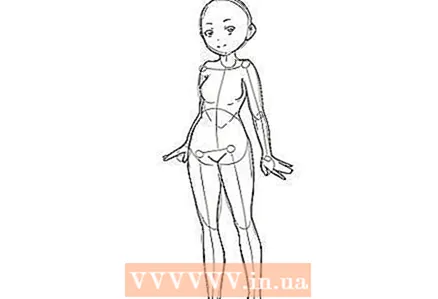 3 Connect the lines and draw the final outlines of the body. Draw a continuous line around the outer contours of the character's body. At this point, you need to tweak the connecting lines between the different body parts a little to make them look more realistic. This includes the character's arms, shoulders, hips, legs, and neck. When you're done, you will have a more detailed body image on top of the previously created abstract sketch.
 - To connect and outline the final lines of the legs, circle the outer outlines of each shape of which they are composed (ovals at the top and bottom, circles at the knees and ovals of the feet). You need to create one continuous path for each leg. Make sure the contours are smooth and without breaks so that the legs look realistic.
- For the upper body, do the same for the torso and arms. Round off the top corners of the torso additionally to draw the shoulders, and add two smooth arcs from the top of the torso to the head to create the neck. Also connect your upper legs, thighs, and torso together.
Advice: if you are drawing a male anime character, expand your chest, waist and shoulders. If you are drawing a female character, make it wider than the hips and add the outlines of the female breast. Reduce the waist further so that it is narrower.
 4 Erase the construction lines and shapes. Be careful not to accidentally erase the final drawing lines you just drew. When you're done, you should be left with a neat, continuous outline of the character's body on the sheet without any of the auxiliary lines and shapes that you drew before.
  5 Draw an anime character clothes. Draw clothes over the body outlines. For example, if the character is wearing a shirt, draw the sleeves over the arms and the base over the torso. Then erase the outlines of the body, which will be inside the outlines of the clothes, as they are simply hidden underneath. For example, if the character is wearing shorts, erase the outlines of the upper legs that are inside the outlines of the shorts, since they should not be visible under the clothes.
 - When drawing clothes, analyze where they tend to wrinkle when such clothes are worn by people in real life. Then reflect these folds in the drawing to make the clothes look more realistic. You can also take a closer look at the drawings of clothes from the Internet in order to understand how folds are depicted on it.
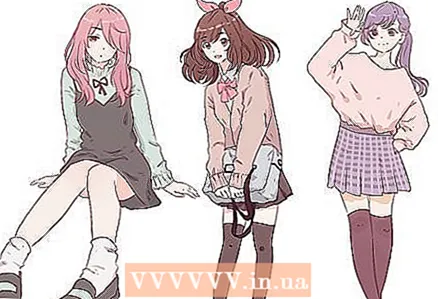
- Any clothing can be used for an anime character. Among the traditional options, we should mention school uniforms, business dresses and suits, as well as the national Japanese kimono.


