Author:
Bobbie Johnson
Date Of Creation:
4 April 2021
Update Date:
26 June 2024

Content
Illustrator software from Adobe Systems is used to create graphics, typography, high quality print and web documents. It is especially appreciated by graphic designers as it is "adept" at creating 3D logos and rich text blocks. After you've added an object or text box to your Illustrator document, you can add glitter, reflections, shadows, and other effects to your work to show its "depth". A drop shadow in Adobe Illustrator is called a "drop shadow" because the shadow of an image falls below the image or text to make it appear as if the object is being lifted. This article will show you how to add a drop shadow in Illustrator.
Steps
 1 Open the Adobe Illustrator application.
 2 Open an existing document or create a new print or web document in the dialog that appears.
 3 Select the layer containing the object you want to add a shadow to. You can select a layer on the Layers Palette. To access this palette, go to the Window menu on the top horizontal toolbar. Click on "Layers" in the dropdown list.
  4 Click on the object or text box to which you want to add a shadow.
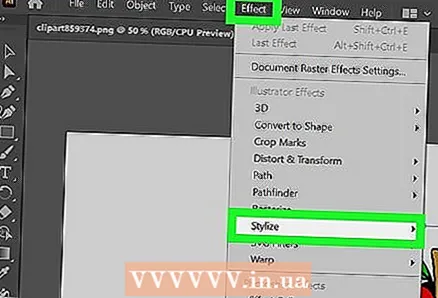 5 Select the "Effect" menu from the top horizontal toolbar. Choose "Stylize" from the drop-down menu under the "Illustrator Effects" heading. (There is also a "Stylize" option under "Photoshop Effects," but it won't create a shadow).
 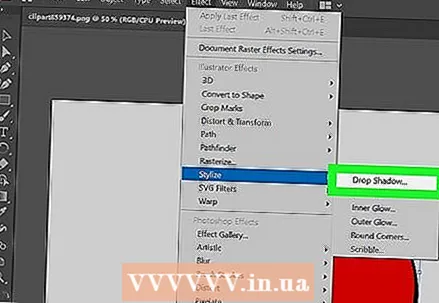 6 Select "Drop Shadow" from the drop-down menu. It can also be listed as "Drop Shadow or Filter". In this case, you must again select "Stylize" and then "Drop Shadow."
 - If you are using an older version of Illustrator, you can find the Drop Shadow dialog by selecting "Object" from the top horizontal toolbar and choosing "Drop Shadow" from the drop-down menu. The Drop Shadow dialog should appear.
 7 Select "Mode" for your drop shadow. This is the way the shadow will blend. This includes options such as "Hard Light, Multiply, Soft Light, Color Burn, Overlay" and more. Experiment with these modes if you don't know how your shadow should blend.
  8 Choose a percentage for "Opacity". The higher the percentage, the more your shadow will stand out.
  9 Select offsets along X and Y. They determine how far the shadow will move, or from the image itself. They are measured in points (pt), which is the standard unit of measurement in a print shop (1pt approx ==> 0.035 cm). For example, the font size is measured in the same way on a computer, that is, 12 pt.
  10 Select the blur area. This is similar to offsets along X and Y in that it determines the distance from the end of the shadow where you would like the blurring to start. For example, if you have 7 pt offsets along X and Y, your blur value might be 5 pt.
  11 Choose the color of your shadow. Although many shadows are black, you can choose a different color from the color scale.
  12 Select to change the darkness of the shadow instead of its color. If you click the circle next to "Darkness," you can choose how much black appears in the shadow. If you choose 100% darkness, there will be a completely black shadow. If you choose 0%, then the shadow will be the same color as the object itself.
  13 Click on the "Ok" button, or enable the "Preview" option to see what you have done before making any changes to the object.
 14 Modify the drop shadow you just created by choosing the Window menu from the top horizontal toolbar and choosing Appearance from the drop-down menu. The "Appearance Palette" window will appear, which lists the possible effects for this object. Click on "Drop Shadow" to make changes.
 - If you repeat the steps to create a shadow from the Effects menu, another drop shadow will be created at the top of your current shadow.
 15 Save the document to have Illustrator write the drop shadow you just added to the file.


