Author:
Mark Sanchez
Date Of Creation:
28 January 2021
Update Date:
1 July 2024
Content
- Part 2 of 3: Whipping the cream and separating the butter
- Part 3 of 3: Mixing and Storing the Oil
- Tips
- What do you need
- You can buy unpasteurized milk at the farmers' market.
- It is better to use a jar with a wide neck, because it is inconvenient to remove cream from a jar with a regular neck.
 2 Sterilize liter jar, lid and ladle. When you are ready to cream the milk, sterilize the quart jar, lid, and small scoop. Submerge them in a pot of water, bring the water to a boil and let it simmer for 10 minutes. Then turn off the heat and take out the jar, lid, and ladle.
 - If you want, you can sterilize the jar, lid, and scoop in the dishwasher.
3 Use a scoop to scoop the cream over the top. Remove the can of milk from the refrigerator. Very slowly, dip the scoop into the cream and very gently transfer to the measuring cup. Continue skimming until you've skimmed everything. - In winter, milk is usually less fatty than in summer. Overall, you should have about 1-2 cups (230-470 ml) cream.
4 Ferment the cream with buttermilk or kefir if you want to get a butter enriched with bifidocultures. If you want a slightly more acidic, bifidoculture-enriched butter, add 1/2 tablespoon (7 ml) buttermilk to each cup (240 ml) of skimmed cream. - If you want classic butter, skip this step.
- For example, if you received 2 cups (470 ml) cream, then add 1 tablespoon (15 ml) buttermilk or kefir.
5 Transfer the cream to a jar. Pour the cream slowly into a sterilized jar and close the jar with a lid. - It's okay if the jar is still warm after sterilization. This will only make the cold cream a little warmer.
 6 Leave them to ripen for 5-12 hours. Place the jar in an airtight container and fill with warm water until it reaches about the middle of the jar. Leave the cream warm until it reaches 24 ° C.
 - Use a thermometer to check the temperature, or simply touch the jar to see if the cream has warmed up.
- If you have not used buttermilk or kefir, then the cream should be left for about 12 hours, and the cream with bifidocultures will mature in about 5 hours.
7 Chill the cream jar by placing it on ice for 5-10 minutes. Fill a suitable container halfway with cold water and ice and place a jar of cream in it. Leave the jar in the ice bath until it feels cold to the touch. Save the ice water - you will need it a little later. - The temperature of the cream should be between 10 and 15 ºC.
- Chilled cream will be easier to whisk into butter.
Part 2 of 3: Whipping the cream and separating the butter
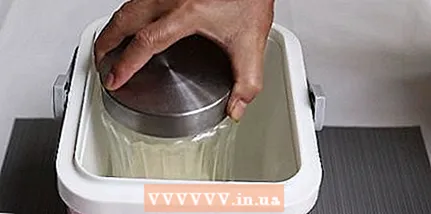
- 1 Shake the jar for about 5-12 minutes. Place the lid on the jar and shake it well until it feels heavier. You should be able to see the pieces of butter collecting around the edges of the jar.
- You can use a submersible mixer for whipping. Pour the cream into a mixer bowl and whisk the cream on a low speed. When the butter begins to separate from the buttermilk, increase the mixer speed.
- 2 Place cheesecloth or muslin napkin in a fine colander. When you are ready to separate the buttermilk from the butter, place the colander in a bowl of suitable size. Place several layers of cheesecloth or muslin napkin in a colander.
- The muslin napkin will help you catch even the smallest pieces of oil.
- If you can't find a muslin napkin, simply fold the gauze in several layers.
- 3 Pour the buttermilk oil onto a muslin napkin. Open the jar and pour all of the liquid, along with the hard pieces of oil, into a colander lined with muslin napkin or gauze. The buttermilk will pass through the napkin, and all the butter will linger in it.
- The resulting buttermilk can be used to make ricotta cheese or bake cakes, muffins, cookies or pancakes.
- 4 Collect all the oil in a tissue and rinse in ice water. Gather the ends of the napkin so that the oil stays in the center. Holding the ends of the napkin, dip the oil into the ice-cold water you used earlier. "Rinse" the oil by swirling it back and forth for about 30 seconds.
- The water will become cloudy as milk residues are washed off the butter.
- 5 Rinse the oil in fresh ice water. When the first water turns cloudy, pour it out and prepare fresh ice water. Continue flushing the oil until the water turns cloudy again, then change the water again.
- Continue rinsing the oil until the water is clear. This means that you have washed away any milk residues that could cause the butter to turn rancid.
Part 3 of 3: Mixing and Storing the Oil
- 1 Remember the butter with a wooden spoon. Open a napkin filled with butter and transfer the butter to a small bowl. Take a wooden spoon and spread the butter along the bottom and sides to knead it.
- 2 Drain off excess water and remember the oil again. As you churn the butter, you will see moisture accumulating at the bottom of the bowl. Pour it out and keep crushing it.
- Continue churning the oil until the moisture stops coming out.
- 3 Add spices and herbs to the oil to your liking (optional). If you like salted butter or butter with specific flavors, add about 1/2 teaspoon (2 g) of salt, herbs, or other spices as you stir. Then taste and add more spices if desired. Try any of the following:
- chives;
- zest of orange, lemon or lime;
- rosemary or cumin;
- ginger or garlic;
- parsley;
- honey.
- 4 Store oil in an airtight container for up to three weeks. Transfer the oil to a small container with a lid. Store it in the refrigerator and try to use it within three weeks.
- The oil can be frozen so you can store it for up to 6-12 months.
- If you haven't rinsed off the milk residues well enough, the butter will be stored for no more than 1 week.
Tips
- If you prefer to use a food processor to separate the butter, pour the cream into the bowl of the food processor and beat on medium speed until the butter separates from the buttermilk.
What do you need
- Liter jar with lid
- Glass beaker
- Small scoop
- Forceps
- Beaker
- Fine sieve
- A bowl
- Muslin or gauze napkin for oil
- Wooden spoon
- Small storage container
- Thermometer (optional)


