Author:
Joan Hall
Date Of Creation:
5 July 2021
Update Date:
1 July 2024
Content
1 Collect all materials. To make a delicate paper flower that looks like carnations, you need a few simple materials:- 3 napkins of the same color
- Scissors
- Ruler and pencil
- Pipe cleaner
- Transparent tape
- Tape tape for flowers
 2 Cut a rectangle out of the napkin. Use scissors to cut a rectangle from the napkin 30.48 cm long and 7.62 cm wide. 3 Draw lines on the rectangle. First, draw lines using a ruler and pencil, 1.27 cm from the bottom of the napkin rectangle. Draw a diagonal line from the top corner of one side that will be connected by the first line. 4 Cut along a diagonal line. Throw away the small extra piece of napkin. 5 Create a fringe. Cut in a straight line from the top of the diagonal. The cuts should stop at the drawn line across the napkin. 6 Add a stem. Tape the top of the pipe cleaner to the short side of the napkin using tape. 7 wrap a cloth around the pipe cleaner. 8 Tape the edge of the napkin around the stem. Use clear tape to hide it. 9 Wrap the flower tape around the top of the stem and the bottom of the flower. 10 Move the napkin wings out of the center. This will finish the carnation.
  11 We finished.
Method 2 of 3: Ribbon Flowers
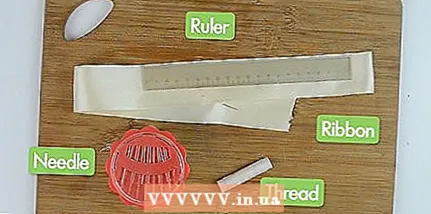 1 Select ribbon and other materials. You can make interesting, whimsical flowers using patterned ribbons or polka dot ribbons, or you can make flowers more lifelike using colors that are similar to the natural colors of petals. Here's what you need to make ribbon flowers:
 - Ribbons 30 cm long
- Needle and thread to match the color of the ribbon
- 2 Sew a running seam along the length of the tape. The seam should go through the tape, giving you the ability to create a flower shape when you're done.
- Thread the needle through. Make a knot at the end of the thread. This will keep the thread in place.
- Pass the needle through the front of the tape and remove from the back at the edge. Pull the thread until it stops at the knot. Pass a needle from the back of the ribbon to the front and thread through the ribbon. Repeat to complete the running seam.
- 3 Pull the thread to keep it tight. This will cause your flower to gather before you finish the running stitch. This step will create the basic shape of your ribbon flower: petals.
- 4 Make the last loops. This stitch, called the "back needle" stitch, will secure the shape of your ribbon flower.
- 5 Fold the tape to form a circle. The tails of the ribbon should hang from your hands as you hold the flower.
- 6 Sew from back to front, across the tails of the ribbon. Sew up first, then down. Secure the thread with a knot (or two) if necessary.
- 7 Cut off the tails of the tape. By cutting as close to the seam line as possible, your flower will retain its circular shape.
- 8 Sew a button to the center of the flower.
Method 3 of 3: Fabric Flower
 1 Choose fabric and other materials. Tulle, silk and other light, airy fabrics are great for making flowers. Here's what you need:
 - A piece of fabric 10 cm wide and 50 cm long.
- Needle and thread
- Iron.
- 2 Fold the fabric in half along its length.
- 3 Sew on short edges.
- 4 Turn the fabric inside out. The seams should now be on the inside.
- 5 Iron the edges. Do not iron the center of the fabric, otherwise the flower will have a bright fold.
- 6 Pin across the long edge of the fabric. Thread the thread through the needle and make a knot at one end. Sew along the long edge of the fabric where it folds. Continue sewing until you reach the other end.
- 7 Collect the cloth.
 8 Push the fabric through the seam so that it crumples up and resembles rose petals.
- 9 Sew on gathered edges. Use one end of the thread to sew the gathered edges together to keep the rose in shape.
 10 We finished.
Tips
- For a paper flower, try to wrap the napkin evenly so that the bottom edge is aligned with you.


