Author:
Louise Ward
Date Of Creation:
12 February 2021
Update Date:
1 July 2024
Content
- You should get enough water to cover the foam. If you are dehydrated, you can add more gradually until you have enough water.
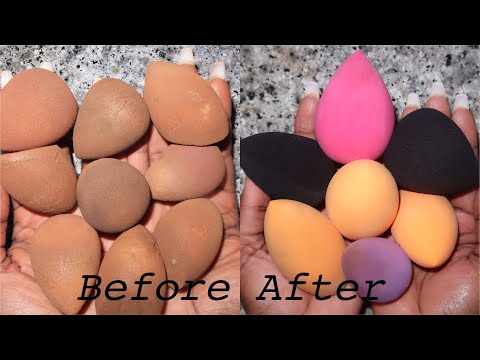
- When you soak the foam, you should see the water start to change color. Water will be dark beige or brown because foundation and other cosmetics dissolve in water.
- The foam also expands to its full extent when soaked in soapy water.

- Take 2-3 minutes to rub the soap on the sponge. Use only fingertips; Do not use brushes or other cleaning tools as this will damage the foam.
Rinse off the soap on the sponge. Wash the soap with warm water until all soap is gone. The cosmetic layer that is still on the surface of the foam will be washed off in this step.
- You may need to gently squeeze the foam under running water to remove the soap and cosmetics that have remained on the foam.


Dry the sponge with a paper towel. Use your hand to gently squeeze the foam to reduce the water, then roll the sponge into a clean paper towel to absorb the remaining water inside.
- If the sponge is still wet after blotting the water with a paper towel, place it in a dry place to continue to dry. Wait for the sucking to dry completely before applying makeup.
Method 2 of 3: Deep cleaning
Only deep clean the foam when necessary. As a general rule, you only need to do a deep cleaning if the sponge is still dirty after the basic cleaning step above.
- This usually happens when you use a foam several times a day or if you forget to suck it up after a week or so.
- You will know if you need to clean the worm by observing it. If you find that the water is still dirty when rinsing the sponge in the basic cleaning step, or if there is still dirt after it dries, perform the deep cleaning step.

Wet the sucking. Hold it under lukewarm water for about 30 to 60 seconds or until it has absorbed enough water and expanded to its full size.- Or you can place the foam in a bowl of warm water for 5 to 10 seconds. You don't need to use soapy water or wait for the water to change color before moving on to the next step.
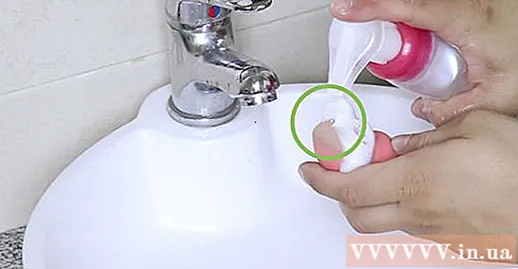
Rub the cleaning product onto the dirty area. Use a solid or liquid detergent to rub it directly onto the dirtiest area of the sponge.
- As with the basic cleaning routine, you should only use a mild detergent to clean the foam. It works best with a foam cleaner, but if you prefer other options, you can use castile soap, baby shampoo or organic shampoo with sensitive skin formulas.
Rub it into the palm of your hand. Rub the soap-lathered surface into your palms in small circles. Continue rubbing for about 30 seconds.
- You should scrub harder and harder than you would when doing the basic cleaning. Note, however, that you should still be careful not to deform or tear the foam.
- While rubbing, the cosmetic layer deep inside the foam will float on the surface. You should see foam in the palm of your hand that is the color of the foundation you are using.
Wash the foam while continuing to rub. Rinse the foam thoroughly under warm running water while continuing to rub it into your palm in a circular motion. Continue to foam until the foam is gone.
- You may need to rinse for a few minutes before you wash off all the soap. It's important to rinse all of the soap, so don't shorten the time.
Test the sucking. Drain the foam under the tap water until the foam is gone. Make sure the water is clean and while you squeeze the foam.
- Rub more soap onto the sponge and continue rubbing into your palms. If the soap foam is white instead of gray or beige, the foam is clean.
Dry the foam. Use your hands to gently squeeze the foam to reduce the water inside. Squeeze on a clean paper towel to dry the water.
- The sucking will probably still be moist after this, so keep it in a dry place and allow to dry. Only use a sponge to make up when it is completely dry.
Method 3 of 3: Heat sterilization
Suck into the bowl of water. Pour the water level about 2.5 cm high into the heat-resistant bowl. Place the foam in the center of the bowl of water.
- Friend right suck into the water. Do not microwave dry foam as this will damage the foam or cause it to burn.
Dry the foam. Gently roll the sponge on a clean paper towel. Let it sit at room temperature until it feels completely dry.
- If you want to go through the basic cleaning routine after heat sterilization, do it as soon as you remove the foam from the microwave without drying the foam.
- Wait for the sucking to dry completely before applying makeup.
Advice
- Regular cleaning will remove any cosmetics that have been on the foam surface and possibly add a little bit of cosmetics deep inside the foam. In addition, it can kill bacteria on the surface. Leaving dirty sucking for a long time will promote the reproduction of bacteria.
- Clean the foam every 1 or 2 weeks. If you are using a foam every day, you should clear it out after a week. Even if you only use the foam a few times a week, you should still clean every two weeks.
What you need
Basic hygiene
- Small bowl
- Country
- Liquid or solid liquid mild detergent
- Sink
- Tissue
Deep cleaning
- Liquid or solid liquid mild detergent
- Sink
- Tissue
Heat sterilization
- The bowl is used in the microwave
- Country
- Microwave
- Tissue


