Author:
Randy Alexander
Date Of Creation:
26 April 2021
Update Date:
1 July 2024
Content
When building a brick building, you will save time and money if you know how to mix the right amount of good quality mortar. You need to mix in such a way that the grout does not dry out and is of the correct consistency. Once you know the proportions of the ingredients as well as the mixing and application of the grout, it won't take long to get good batches. Then you just have to start building.
Steps
Part 1 of 4: Learn the formula
Measure 3 parts sand and 1 part construction cement. To get a standard mortar mix, you need to mix sand and cement at a ratio of 3 parts sand and 1 part cement. If you mix a whole bag of cement, the amount of sand used will be 3 times that, and the result will be a large batch of mortar. You should only mix enough.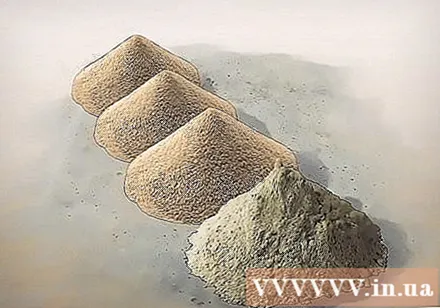
- The measurement doesn't have to be as precise as the baking recipe. Usually when mixing large volumes, sand will be calculated as the number of "full shovels" for each bag of cement, usually about 15 to 18 shovels, depending on the shovel size. Mixing the correct ratio is important, but you can make an estimate with your eyes, not the exact spoonful.

Use the right amount of water. A mortar bag needs to be mixed with about 12 liters of clean water to achieve a suitable consistency. The amount of water used depends significantly on the weather, the wetness of the sand and the type of mixture used, so read the instructions carefully before adding water.- The ambient conditions (temperature and humidity) will affect the mixture and should be taken into account.
- The drier mixture will have a stronger adhesion. Wetter mixes may be easier to build. This depends on your experience.

Use the right amount of sand and cement. Using a fine grained building sand is preferable to other types, and using a new, unopened, building cement bag is more effective than using an old bag. Cement blends with brands such as Quikrete, Sakrete, and several others are suitable for construction.- Some come in a premix form, which means you don't need to mix sand. They are usually more expensive than Portland cement, but better for small constructions. Read the labels on the packaging to see what you need to add. Even if no additional sand is required, the mixing process is the same.
- Portland Cement is not a cement mark. It is the name of a material most commonly used to mix mortar, concrete, and other binder mixes.
- Store the dry mixture of sand and cement as dry as possible. Materials will deteriorate easily if wet. Try to mix just as much as you want, but use up the dry mixture to make the most of the material.
- Check the cement bag for lumps. Cement bags with lumps or hard blocks that are exposed to moisture and adhesion will not be good and should be discarded.
- Different brands may instruct slightly different mixing ratios. Read and follow the instructions on the package for the product you have chosen to buy. In general, a 3: 1 ratio is usually appropriate and effective.
- Some come in a premix form, which means you don't need to mix sand. They are usually more expensive than Portland cement, but better for small constructions. Read the labels on the packaging to see what you need to add. Even if no additional sand is required, the mixing process is the same.

Consider using lime as an additive. In some areas where walls are subjected to strong winds or other weather factors, lime is often added to mortar to increase the cohesion and strength of the building. If you add lime, you also need to add sand to balance the ratio, creating a firmer, more cohesive mortar.- If you want to add more lime, the appropriate ratio is 6 parts sand mixed with 2 parts lime and 1 part cement.
Remember that a mixture with added lime will set more quickly. This means you need to work faster or mix less batches.
Adjust mixing recipe for weather. In cold, humid climates, grout will behave differently than in hot, dry climates. You may find that it is more effective to use less sand and more water in this case. You may need to experiment several times to find the right blend and consistency.
- In general, it is easier to use grout in moderate and dry weather than when cold and humid. While this is not always the case, you can learn to recognize the right consistency and use the right amount of water.
Mortar of the correct consistency will have to stick on a plane when it slopes down to 90 degrees, but should also be wet enough to be easily manipulated during construction, and be able to be emptied and poured into a bucket.
If working in cold weather close to freezing, try adding more lime; In hot / warm weather, you need to add more water to increase the hydration reaction of the cement and help it set quickly. Remember that finished product must be kept from freezing prior to freezing. advertisement
Part 2 of 4: Mix a batch of mortar
Wet the mixer, wheelbarrow and / or bucket. Before you start adding dry ingredients, you need to wet any equipment where you will mix the grout, load the grout, and come in contact with the grout so that the grout can slip off easily and waste less. Fill the mixer or tray with about half the amount of water required, and pour some water into a wheelbarrow or mortar bucket.
- Depending on the workload, you can use a small mixing tray or a gasoline-powered mortar mixer to mix a large amount of mortar. A multi-blade mortar mixer that holds 3 36 kg mixed bags can save you effort. You can hire a machine to do the work, especially if you have to work for several days.
Add the dry ingredients and start mixing. If you are using a mixer, operate it so that the blades are stirring and gently add the dry ingredients. Take care not to throw the ingredients into the machine to splash or damage the cement and cause waste.
- The order in which the ingredients are placed in the machine is not that important, but many people usually add cement first, then sand if not pre-mixed mortar is used. In general, just open the bag of cement on the mixer, throw it away and shovel the required amount of sand.
Look away, wear breathing protection and do not breathe dust. Silicate mortar mixtures can cause chronic obstructive pulmonary disease or cancers.
Add more water if needed. When mixing the grout, or when mixing the grout, pay attention to its consistency. If it feels too dry, add a small amount of water to keep it sticky and wet. Pay attention not to add too much water, otherwise the batch will be lumpy, non-sticking and useless. advertisement
Part 3 of 4: Mixing the grout by hand
Pour a pile of sand and place the corresponding number of cement bags right next to the sand pile. The sand pile will look like a small mountain.
Cut one end of the cement bag, press it on the bag using a shovel. Lift and pull the bag to remove the cement.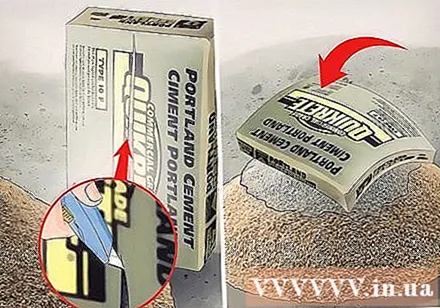
Use a small shovel or hoe to mix quickly, ensuring evenly distributed and uniform color. If the mixture is not evenly distributed, the batch will not have the correct consistency.
Create a "crater" and fill it with water. The water will start to settle and seep through the mixture.
Use a shovel or a hoe to scrape the outer dry mixture into the center of the water hole. Continue adding the required amount of water, making sure the mixture is smooth and wet. Mix well to distribute all ingredients evenly.
Mix for 3-5 minutes and let stand for another minute. Some brands like Quikrete recommend waiting a while for the particles to absorb moisture, increasing the effectiveness of the mixture. It is important not to wait too long; otherwise, the mixture will harden. Likewise, over mixing often dries out the mixture and reduces the shelf life of the grout.
- A good way to check the consistency of the grout is to "flip" the plane. Scoop a little mortar onto the trowel and shake your wrists so that the grout spreads flat on the trowel, then flip the trowel at a 90 degree angle. If the grout is still in the fly without slipping, you have a good batch.
Part 4 of 4: Using mortar
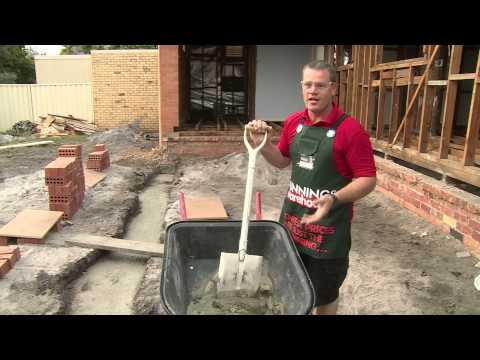
Construction begins. Check the consistency of the grout and pour it into a wheelbarrow or bucket, pour it into a chute and start building. Make sure all tools are wet first, otherwise you will be in trouble with grouting. If you do this properly, the grout should slip off easily ..
Always wear protective clothing when working with mortar. Dry concrete can be very painful and can be dangerous if it gets in your eyes, lungs or gets into hands. It is important to wear gloves each time the mortar is used, as well as to wear goggles and a mask when mixing dry cement. Cement can fly in the face and is very harmful to the lungs. You need to be careful and always wear safety protection.
Occasionally add a little more water. Mortar has the ability to dry quickly, which is also one reason that it is so effective and easy to work with. You need to act quickly to keep up. After a while, the grout in the trough will begin to dry, then you can slowly pour in a small glass of water and mix it up with a trowel to keep the appropriate consistency.
- Very dry mortar will result in a weak masonry wall, and this is especially problematic when you build the foundation. It is important that you keep the grout wet enough and easy to build for it to work.
Never mix more mortar than you can make in 2 hours. The mortar often becomes too dry and becomes unusable even when you add more water. Plan well for the job and mix just the right amount of mortar to make it right away, as you won't be able to use the leftover mortar afterwards.
- If you add lime to the mortar and won't build it quickly, or this is your first time building a wall, try mixing in small batches that will last for 45-60 minutes.
- If possible, ask someone to mix and bring the mortar to help you.
Rinse the mixer and all tools at the end of the day. After a day of hard work, you still have something important to do: knock out all hard objects and dry mortar to drop out of the mixer, chute, wheelbarrow and other tools. There are many different methods of doing this, but the most effective is also the simplest: Knock the tools with a hammer, collect the dry mortar and pour it out properly.
- Don't forget to wash the tools. An electric mortar mixer can sluggishly if the dry cement is not washed off. If you mix the grout properly there will not be much dry cement that will need cleaning, however there will be.
It is better to mix less mortar and mix a small batch than to let the excess ingredients harden on the tool or form a large, hard mass that you have to clean. advertisement
Advice
- A wall that has a white, salt-like layer when built is usually due to drying too quickly. This situation will make the building weak. Cover a wet cloth, rag, and canvas for a day or two to slow dry the wall, increasing the strength and longevity of the building.
- Fill the bucket with water before filling, so you won't have to dig to the bottom of the bucket to mix.
Warning
- Take care to protect your eyes when working with sand, lime, and cement as dust from dry and lime cement is extremely toxic, and the mixer can also splash the mixture out while rotating. You should use goggles.
- Use a respirator. You can find this tool from a paint shop. Cement is alkaline, which burns the sinuses and lungs. You need to be on guard against getting sick. The wind will also help the dust fly away from people when mixing.
What you need
- Sand
- Lime (hydrated lime)
- Cement
- Country
- Shove
- Cement mixer


