Content
Everyone wants to look good in their photos, but sometimes you wonder how to look your best. Fortunately, there are a few quick tips that can help you gain more confidence in any photo. Whether it's taking selfies or having a professional photographer, you'll be more confident in front of the camera if you practice a bit.
Steps
Method 1 of 4: Real life photography
Avoid cluttered background scenes. Take a glance at the scenery behind to make sure nothing is distracting from you. If so, adjust the angle of the camera so that nothing is behind, or choose a different location to shoot. No matter how beautiful you are, if the background contains distracting images, people will only look at it.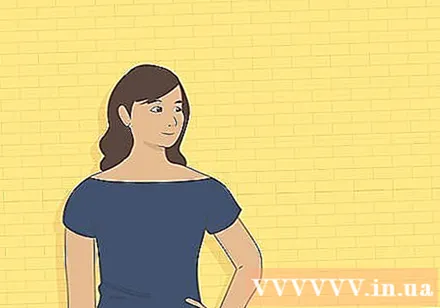
- For example, don't let anything in the background show up in the image as if it "grew" above your head, such as a stop sign or a tree branch. You should also look out for the people around you, the trash cans or cluttered beds.
- For a stylish and artistic look, try standing in front of a wall painted in bright colors. However, you should avoid background scenes with complex patterns, as they can be distracting.

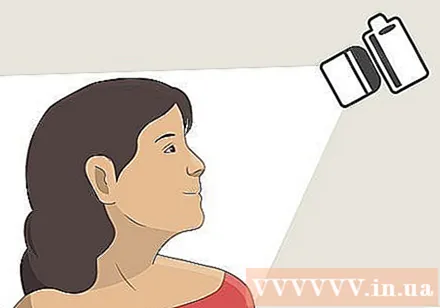
Face towards the light. Before taking the photo, rotate your body so that your face is facing the light source. This way your face will be bright and clear. Conversely, if you stand with your back facing the light, your face will be shadowed with ugly shadows.- For example, if you are taking pictures indoors, you can face the center of the room, or stand near a window and look out.
Curve the camera lens down a bit for a clear contour of the face. The photographer will stand with the camera slightly above your eye level, then you'll look up at the lens for a beautiful angle that focuses on your wonderful eyes!- This tip works for close-ups as well as full body shots.

Relax your face and mouth. Close your lips gently, then visualize your lips lifted into a slight smile. This will relax your facial muscles, and when combined with eye contact, this creates an image that captures the viewer and makes them curious about what secrets you are hiding.- For a mischievous look, try smirking one side of your mouth.
Rotate shoulders back. Before taking the photo, straighten your back, raise your neck, and turn your shoulders back. Whether it's a face shot or a full body photo, a good posture will make you look more confident, and this will show in the photo.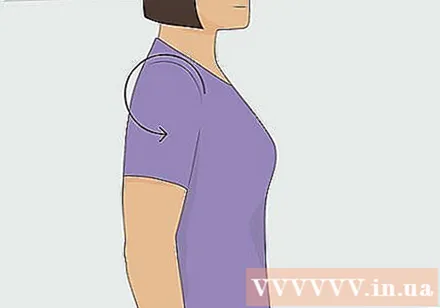
- The tilting posture also makes the neck appear taller, and the chin and jaw look sharper.
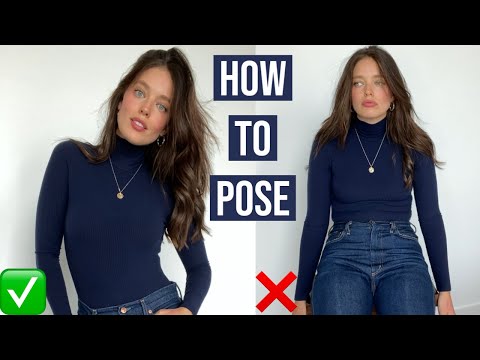
Rotate 30-45 ° from the lens for a slimmer pose. The front-end photo will highlight shoulder, chest and waist widths. If you want to look somewhat thinner, tilt it slightly in front of the lens.
- If there is a "nice angle", be sure to rotate your body so that it is facing the camera.
Place one leg at a angle to the other while standing. Standing with the legs parallel will make the rest of the body look stiff and square. Instead, place one foot slightly diagonal from the other.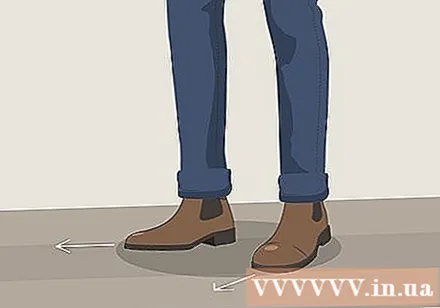
- If you like, you can stand with one leg crossed in front of the other. Pictures taken at the right time it looks like you are walking is also very graceful.
- Raise your heels a bit to look taller.
Let your arms curl slightly. For a comfortable and natural look, you should bend your elbows slightly. If you prefer, you can rest one or two hands on your hips, but make sure to point your elbows back to still appear comfortable.
- If you want to give the impression of a more muscular arm, put your arm close to your body. If you want your arms to look slimmer, keep it a bit away from your body.
- If you are posing with your arms crossed, make sure you do it halfway to avoid the tension.
Interact naturally in photos taken with others. When taking a couple photos or group photos, everyone needs to relax and try to pose each person a little differently. Don't be afraid to interact with others when taking photos - poses like looking at each other, holding hands, or hugging your arms around them all add a warm touch to the photo.
- For example, when taking a photo with a group of friends, put your arm around the person next to you. When taking a couple photo, you can hug your lover and look into the camera lens.
- If you're not sure what to do, pose it as comfortable and natural as possible.
Method 2 of 4: Look good in selfies
Hold the camera slightly above eye level for a nice angle. When taking selfies, your face usually looks most photogenic when you hold the camera up high and slightly downwards. Look up at the camera and raise your eyebrows slightly. That way you will have a perfect and fresh look with big round eyes.
Try rotating from different angles for more options. While the top-down angle looks good for most people, try shooting with different angles, especially if you're planning to post lots of selfies! For example, you can try holding the camera sideways or standing in front of a mirror to show off your stylish outfit.
- Your followers will start getting bored if you post all the pictures taken from just one camera angle.
Face towards the light. Similar to when someone else takes a photo for you, your face will look its best if you point it towards the nearest light source. The only thing you need to remember is to avoid direct sunlight, as the sun can create dark shadows on your face.
- If you are in the middle of the sun, find a shady spot nearby when taking selfies.
- If there is no good light, try using your camera flash.You can also buy portable ring light if you want great lighting for your selfies anywhere!
Raise your neck and straighten when standing or sitting. Imagine a string from the top of your head that pulls your torso up. Raise your head and neck, push your shoulders back.
- This pose creates a long line that accentuates the curves of the neck and shoulders.
Breathe out gently to make your lips look more comfortable and full. Regardless of whether you're smiling, frowning, or pouting, it's easy to purge your mouth when you're photographing without knowing it. To make your mouth appear more comfortable, you can gently blow out your lips slightly before you shoot.
- Don't let your cheeks puff up when you do this, otherwise your face will appear rounder than it really is!
Tips: Try squinting to emulate the tail wrinkles when you smile naturally.
Take multiple photos and review them to find your best angles. Take as many photos as possible, slightly change the facial expressions, rotate your head and torso to different angles, then review the photos in the camera roll folder. See pictures to find out what you like and dislike. As you get more experienced, you will know which shooting angles make your face the most photogenic and you will be more natural when posing for selfies.
- Everyone has a different perfect angle, and it may take a little experimentation to find the best angle. For example, you can shoot from top down if you have a large chin, but if you have a wide forehead, you should shoot sideways or shoot from below.
Find cool background scenes for your selfies. Don't just take one frame over and over again. Shoot in a variety of locations, and try to include at least a little bit of the background in the frame. This way, each of your photos will give your visitors a fresh touch - and a great way to preserve your experience!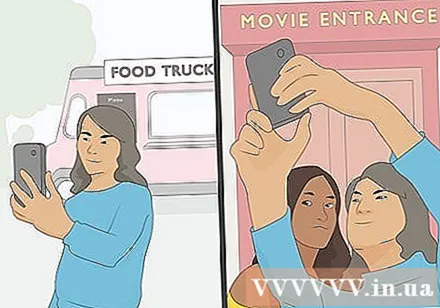
- For example, one day you might stand in front of your favorite fast food truck, and another day post a photo of your best friend and friend waiting in line in front of the cinema.
Tips: Try using the selfie stick for full body shots or animations, or when you want to capture a lot of background scenes.
advertisement
Method 3 of 4: Pose for a professional portrait
Choose a single-color or simple backdrop. When taking professional portraits, you will be the main focus in the photo. Ask the photographer to use a plain background. If you prefer, you can also shoot in the office or in the work scene. Make sure the photo is framed so that nothing distracts the viewer from you.
- For example, if you are a doctor looking to take professional photographs in the clinic, clean up brochures and sample products so that the image will not be cluttered.
Take a few deep breaths to relax. If you are nervous or stressed it will be reflected in your body and facial expressions in the photo. To feel more comfortable, take a few deep breaths to relieve the tension.
- For example, try inhaling for 4 counts, holding for 4 counts, then exhaling for 4 counts. Repeat 2-3 times or until you are calm again.
Face the nearest light source. When shooting professional portraits or looking for a professional look in your photos, you should sit or stand facing the brightest part of the room so that there is no shadow cast on the face in the photo.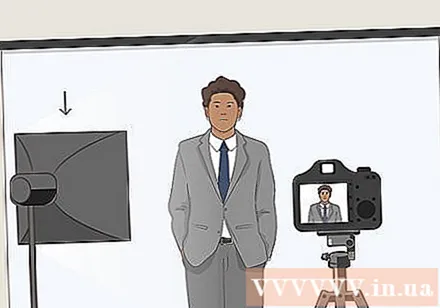
- If you invite a professional photographer to shoot, they usually have their own light or use a reflector to reflect light on your face.
Push your tongue close to your teeth for a natural smile. If you want yourself to look happy, extend a smile across your mouth, then press your tongue against the upper front teeth. This will lift your cheeks and make your smile look more natural.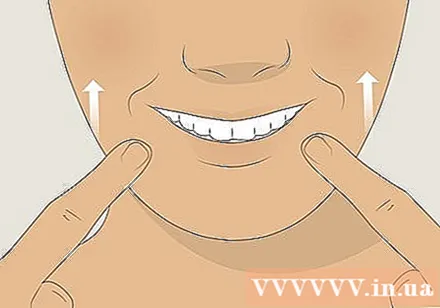
- If you want to have an even more natural smile, you can think of someone or something that you really love while posing.
Experiment with looking at the camera lens or looking away. When you look at the camera, you will feel confident and strong. Keep your eyes gentle, but don't be afraid to look directly. However, if you want to look more carefree, try looking into the space in between.
Try this tip when preparing to take a photo: To feel more comfortable in front of the camera, spend 10 minutes standing in front of the mirror practicing posing and facial expressions to know which angle you shoot best.
Hold a prop if you don't know what to do with the hand. Hold a cup of coffee, phone, or even handbag before taking a photo. This way, you won't have to worry about how you should hold your hands, and you will look more natural when taking pictures.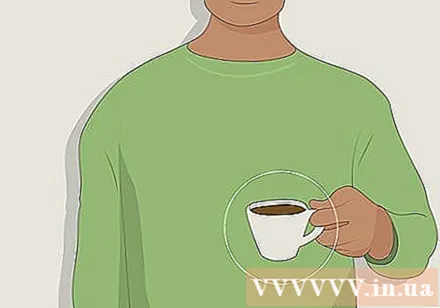
- If there is nothing nearby to make a prop, try gently holding one hand to the other wrist.
- You can also fix your cuffs or tuck your hair behind your ears.
- If you're posing with your hands in your pockets, point your elbows a little back.
Stand up straight and push your shoulders back. Correct posture helps you not only look taller and take better angles, but also appear more confident. When you feel satisfied with yourself, you will exude a professional manner and customers will also trust your abilities more.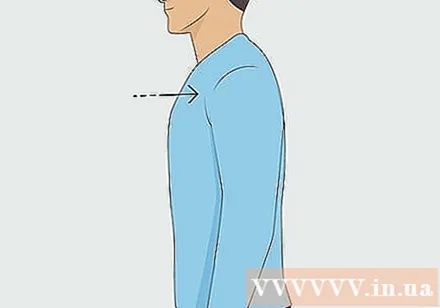
- One trick that can be helpful is to imagine a wire running from the last vertebra through the top of your head. Imagine someone pulling on the end of a rope to lift you up.
Tilt your body in front of the lens to look thinner. Instead of taking a frontal shot that makes you look bigger, try rotating around 30 ° -40 ° in front of the lens. When combined with good posture, this pose will make you look taller, slimmer and more confident, and this will enhance your professional image.
- If you prefer to shoot head-on but still want to create an effect that looks thinner, stand leaning in front of the camera, then turn your shoulders back toward the lens. This pose will help your waist and hips look slimmer.
Tips: If you have a wide chest with muscular arms and want to show off to make your shots look more powerful, fold your arms across your chest and stand directly in front of the camera lens.
Slightly bend your arms and sag your legs for a more natural look. If you straighten your arms and legs while standing or sitting, you will have a stiff and uncomfortable posture. Instead, pose with your hands and feet at natural angles, such as standing with one knee bent with one hand on your hips, or sitting with your legs crossed.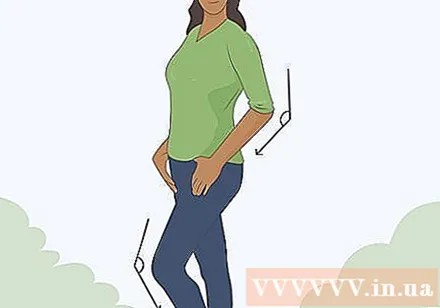
- Keep your arms a little further away from your body if you want your arms to look slim, or squeeze your arms against your torso if you want your arms to look more muscular.
- If you need to do something with your hands, try holding a props that is relevant to your profession. For example, you can hold a pen if you're a teacher, and hold a cooking shovel if you're a chef.
Ask the photographer to take a slightly bottom-up shot if you want a more powerful look. If you plan to shoot full-body portraits and want to look taller and thinner, ask the photographer to hold the camera just below your eye level, then tilt the lens up slightly so your whole body is in the frame. . This will make you appear stronger and more powerful, so be sure to pose with confidence!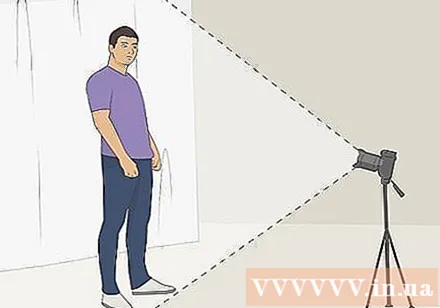
- Usually, it is best to stand a little further from the camera in this type of shot.
- This angle of shot can bring out the chin area, so it is recommended that you keep your head up.
Tips: This pose produces a stylish shot, but not everyone takes it well. Try taking some of these and look back to see if you like it!
advertisement
Method 4 of 4: Outdoor photography
Avoid taking photos in direct sunlight. The bright sunlight will squint your eyes, and the shadow will fall on your face. Instead, stand in a slightly shady spot, then face out toward indirect sunlight.
- If strong sunlight from the sun cannot be avoided, you can create indirect light by turning your face away from the sun. If you have a reflector, ask someone to hold it up (even a white board will do) to reflect the light on you and avoid the shadows on your face.
- Sunrise and sunset are the best times of the day to take pictures, as the light creates a gentle warmth in your photos.
Include natural scenery in the background of the photo. Another great thing about outdoor photography is that you often have a lot of interesting things around to include in your photos. Try taking a photo in front of a beautiful scene, or just sitting next to a tree for a simple and natural shot.
- Make sure there is nothing in the background that spoils the natural beauty in the photo, such as trash or power lines.
Interact with whatever is around you. When shooting outdoors, you will have the opportunity to bring the natural world into style. Try taking a photo when you are smiling in front of a beautiful flower, or climb on a large rock nearby.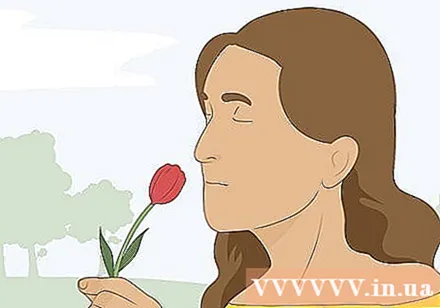
- Safety must always come first! Don't climb over barriers or other protective barriers just to take a photo, and always keep an eye on everything around you, including people, animals and vehicles.
Try out wide and bold poses to take advantage of the space. When taking photos in a room, you may not have a lot of space to move around and experiment with different types of shots. But when outdoors, you can run, jump, spread your arms, and interact with the world around you. Get out in the sun and get in motion to see what inspires you in the styles!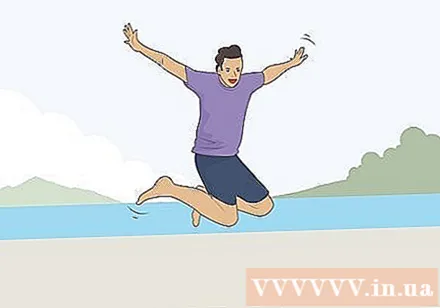
- Shoot several styles with safe poses first. This way, you will know what points you have to lean on and can gradually create a more creative pose.
Advice
- If possible, check the mirror or camera on your phone before you take a photo.
- Wear clothes in contrasting skin tones for a good photo.
- Try taking multiple photos at once so you can choose the photos you love.
- If someone takes the photo to help you, you can ask them for suggestions on which poses are best for you.


