Author:
Lewis Jackson
Date Of Creation:
14 May 2021
Update Date:
1 July 2024

Content
Part 2 of 3: Installing the sewing machine
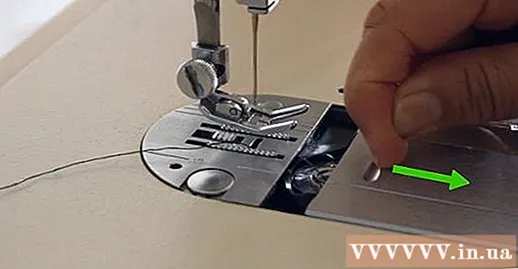
Insert the needle tightly. The needle has a flat side so it can only move in one direction, usually the plane facing back. One side of the needle has a longitudinal groove, usually facing the plane of the needle stalk - when inserting the needle, the groove should be opposite the direction in which the needle was inserted (only run in the groove when the needle is inserted and down the face. fabric). Push the needle into the post completely and tighten the screw knob. If you cannot install it, please refer to the instruction manual of the machine.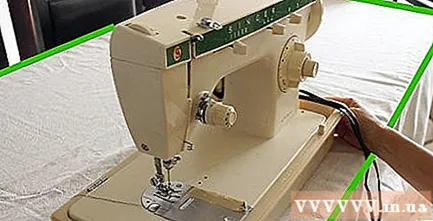
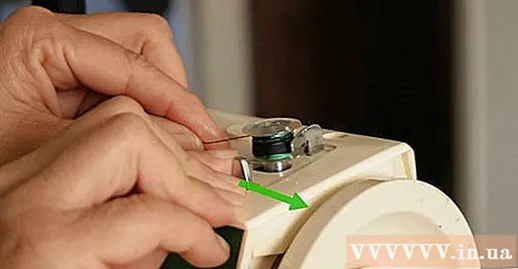
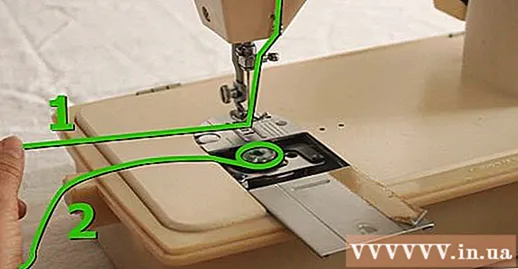
Hit the bobbin and insert the bobbin into the machine. The sewing machine uses two thread sources, one that is fed from above and one that feeds from below, and the bobbin is feed from below. To roll the bobbin case, you place the bobbin core on the spindle on top of the machine. Following the instructions printed on the machine, you pull the thread from the spool to wrap the loop through the guide and go to the bobbin. Run the turret all the time and wait for it to stop automatically when the bobbin fills up.- After the bobbin is finished, you place the bobbin in the boat under the needle, located in the lower half of the sewing machine. Sometimes the bobbin simply falls on itself (the boat is integrated into the machine). In this case you must insert the thread through a small slot in front of the boat and pull the thread to the left. Leave the head just outside. You will have to pass the thread head through the hole in the throat plate after inserting the thread into the upper needle.
- Click the link above to see detailed instructions on bobbin winding and bobbin mounting.
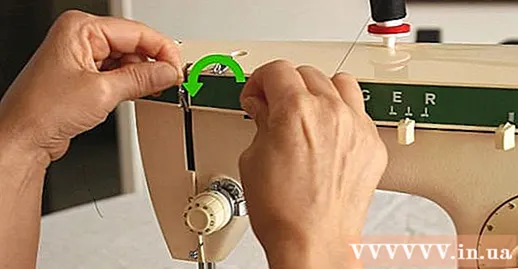
Thread the thread into the sewing machine. The spool is located on the top of the sewing machine but you must remove the thread and pull it to the needle. To thread the thread into the machine, you take the thread from the tube and pull it through the guide hook located on top of the machine, then thread it down and walk around the trigger. On the machine often have printed numbers and small arrows to guide how to thread the machine.- You can also follow the instructions to print on the machine.
- Usually the thread will be pierced in the following general form: "left, down, up, hooked, through the needle". You can rely on another way to learn how to thread the thread, which is "Spool holder, tension wheel, trigger, needle, and following threading instructions between these parts".
- The needle can be threaded from left, right, or front to back. If the machine is threaded, you should remember the direction of threading; otherwise, pay attention to the last guide before reaching the needle, which is closest to the direction of needle insertion.
Pulled out both ends. Use your left hand to stretch the thread tip from the needle towards you. Use your right hand to turn the handwheel towards you so that the needle goes through a complete down / up turn. Now pull the thread from the needle that is still in your left hand. The bobbin thread will be caught when the needle goes down and up, and it is currently hooked to the thread thread of the needle. Pull one side of the thread ring to pull the bobbin thread end up, or you release the needle thread end and thread the scissors between the presser foot and throat plate to pull the bobbin thread from the bobbin case out. You should now have two thread ends, one from the needle and the other from the bobbin below.
Select straight stitch and medium stitch length. See the instruction manual for the selection of your sewing machine. With this type of sewing machine, the stitch is set by turning the lower knob, located on the right-hand side of the machine, until it clicks into the lever. Always set the sewing point when the needle is on and off the fabric side, because needle adjustment can move.
- The most commonly used straight stitch. The second most popular is the zigzag stitch, often used to prevent fraying the fabric edge.
Lower the presser to the fabric surface. Presser foot lifter is located at the rear or side of the needle mechanism, it helps you to raise and lower the presser foot.
- If you gently pull the fabric when the presser is lowered, you will feel the machine holding the fabric quite firmly. While sewing, the machine uses trick table under the presser foot to pull the fabric in at a suitable speed.You do not need to pull the cloth into the machine; In fact, if you pull on the fabric, the force can warp the needle or damage your item. You can adjust the sewing speed and stitch length of the machine.
Hold two ends only. In the first stitches, you must hold the ends so that they do not retract into the fabric. After sewing a section, you can release them and control the fabric and the machine with both hands.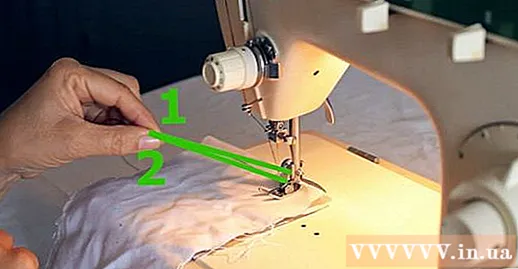
Depress the pedal. The pedal is the speed controller. Like the accelerator pedal in a car, the harder you press it, the faster the engine will run. Initially, you should press lightly enough for the machine to start running.
- The sewing machine can be equipped with a knee bar instead of a pedal. In that case you have to use your knee to push it to the right.
- You can use the flywheel above, on the right side of the camera body, to rotate the camera or move the needle without electricity.
- The machine will automatically pull the fabric in. You can "orient" the fabric in a straight line or a curve by guiding it into the machine with your hand. Practice sewing in a straight line and try sewing some curves. The only difference is the way the fabric is fed into the machine.
- Do not pull the fabric while the machine is running. This can cause the fabric to stretch or break the needle, or cause the transparent thread to jam. If you feel the fabric running slowly, you can press the pedal harder, adjust the stitch length or (if necessary) buy a faster sewing machine.
Find the good button to reverse and try it out. It helps reverse the direction of drawing the cloth into the machine, so the fabric will be pulled towards you as the machine runs. Usually the button or the inversion lever has a spring, so you have to hold it down while reverse sewing.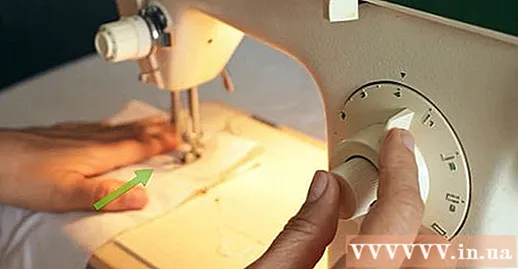
- At the end of stitch, sew several reverse stitches on top of the last stitches you have sewn. This is how the seam ends to prevent the thread from coming out.
Use the handwheel to move the needle to the highest position. Then raise the presser foot. You can then pull the fabric out easily. If the thread is pulled again when you try to remove the fabric, check the needle position.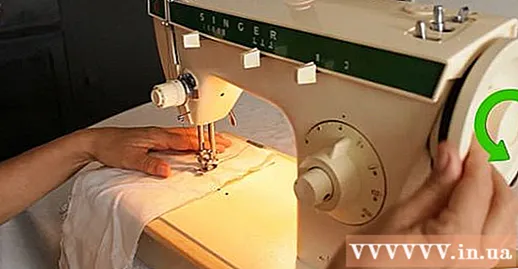
Cut. Many sewing machines have a small V-notch behind the presser foot holder. You can grab the ends of the thread and pull it down this V-notch to cut it. If the machine does not have a V-notch or you want a tidier cut, use the thread trimmer. Leave a thread on the machine for next stitching.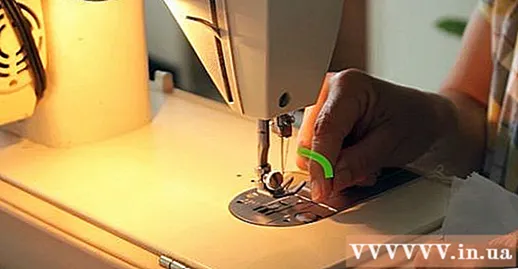
Practice sewing a complete line. Pin two pieces of fabric with the right side pressed together, positioned near the edge. The seam will eat a 1.3-1.5cm segment on the edge. You can sew on a single piece of fabric (say to prevent fraying the edges of the fabric) but the main purpose of sewing is to stitch two pieces of fabric together, so you should get familiar with how to sew multiple layers. together.
- The fabric is stapled with the right side pressed together so that the seam stays in after completion. The "right" side is any fabric that you want to lay outward after finishing. For textured fabrics, usually the darker side is the right side. Single-color fabrics that may not be present must be distinct.
- Place the pin perpendicular to the edge of the fabric where the seam will run. You can sew over the straight staples and then remove them without damaging the machine, the fabric or the needle itself. But it is safer to remove the needle before it can run into the machine, as the sewing needle may break or become dull when accidentally bumping the needle. However, you need to avoid sewing on the top of the staples.
- While observing the fabric, keep an eye on the direction in which the fabric runs. The seam can run in any direction, but most sewing projects are cut so that the main seam goes parallel to the weave. You also need to watch out for the direction in which the pattern is printed, and align it to "correct the direction", such as a flower or animal print, or so that the stripes or patterns run in a certain direction.
Move to another part of the fabric. Use the flywheel above, on the right side of the machine body to move the needle to the highest position before starting a stitch, and to remove the fabric from the machine after completion of stitching. When the needle is lifted, you can move to another part of the fabric.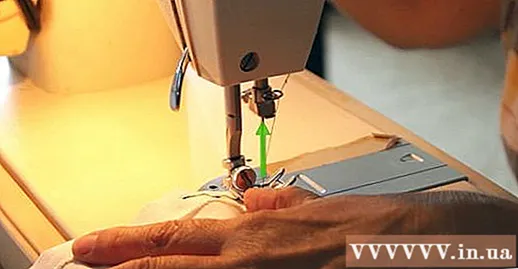
- If the needle is not in the highest position, the thread may not move when you pull the ends of the thread.
- Find the lines on the machine to determine the seam edge distance. This is the "normal" distance between the edge of the fabric and the seam. Usually you should use a 1.5cm or 1.3cm seam edge. Use the ruler on one side of the needle. This gauge is usually already engraved on the machine throat plate (the sheet of metal through which the needle passes). If not, mark yourself with tape.
Learn how to sew at tight corners. When sewing to the corner, lower the needle as deeply as possible into the fabric. You can use the handwheel to lower the needle. Raise the presser foot. Continue with the needle in the lowest position. Then rotate the fabric to the new position while the needle remains in the fabric. Finally lower the presser foot when the fabric is in the new position and continue sewing.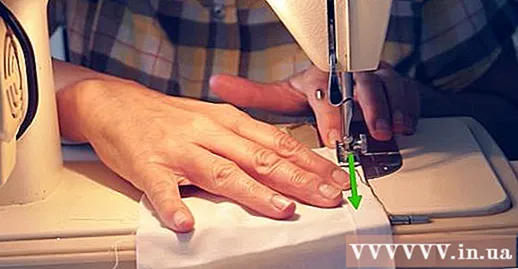
Try sewing a simple project. After sewing a few lines and getting used to the basic sewing skills, try making pillows, pillowcases, or gift bags. advertisement
Advice
- It takes practice before you can simultaneously control the pedals, adjust the fabric under the needle, and maintain the right speed. Even the best tailor has to test the machine before starting sewing.
- Spend time trying out sewing a variety of stitches designed on the machine. This is especially important if you want to sew shirts or seams. If the machine does not have many types of stitches, don't worry. You can perform a lot of stitches with straight stitch, or combine straight stitch with zigzag stitch (Zigzag stitch is not as difficult as you think. You just need to set it on the machine and let it do the rest again!)
- Poor quality sewing needles can cause problems, but you certainly cannot use old or poor-quality threads. Choose only according to the weight and roughness of the fabric - a standard cotton-coated polyester thread is best suited for medium-weight fabrics (sizes around 40-60). Cotton thread should be alkaline soaked for higher strength, otherwise it will break when the machine is running at high speed. Use leather threads for heavy fabrics, such as stuffed items (cotton), leather and vinyl laminate. Anything that incorporates multiple ingredients will need thicker thread.
- If you still do not understand or do not have the manual and your sewing machine looks completely different from the machine in this article, ask someone who knows how to sew, or find a local sewing machine repair shop or fabric shop. They may organize sewing classes, charge a support fee or teach tailoring, or if you are socially good then they might help you learn basic sewing skills. If they help you learn how to sew then you should buy something for them as well.
- Sometimes the stretch thread is okay and you need a new needle replacement. A needle should not be used to sew more than two clothes. Thin knit fabrics require different metals than knitted fabrics, jeans require thick needles, while handkerchief linen may use thinner needles. You will determine the needle size depending on the fabric to be sewn.
- Observe the stitch. Only have to hook between the two layers of fabric. If the gap between the stitches can be seen from above or below the fabric layer, you need to adjust the thread tension.
- Only the red contrasting color of the fabric is used throughout this article for easy visibility; in practice, however, it should be the color that suits the fabric as much as possible, unless you want it to stand out against the fabric.
Warning
- Keep your finger away from the sewing needle. Disconnect the power while threading the machine, and do not put your fingers underneath during sewing.
- Don't force the machine to run. If the needle can't seem to pierce the fabric, the fabric is probably too thick.
- Do not sew on the cloth staple as this will weaken the seam and possibly break the needle.
What you need
- Sewing machine
- Spare sewing needles; But choose the right one for the fabric
- Straight pin; mattress or magnet to keep the needle from getting lost
- Fabric
- A sturdy desk, counter or work surface
- Just
- The bobbin is suitable for sewing machines
- Thread release tree (probably not needed when sewing but indispensable when sewing on real clothes)
- Fabric scissors


