Author:
John Pratt
Date Of Creation:
18 April 2021
Update Date:
1 July 2024

Content
Making sculptures with clay is great fun on a rainy day. You can make the clay together with your children, then watch them play for hours on end. Self-drying clay is non-toxic, cheap and can even be painted once it has completely dried. Make it from scratch with baking soda and cornstarch or try the faster version using school glue. For adult crafts, you can try cold porcelain clay, which you can use to make finer sculptures.
To step
Method 1 of 3: Make clay from scratch
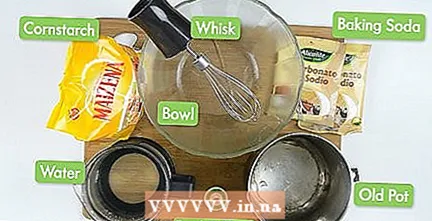 Gather your supplies. This self-drying clay recipe can be made with ingredients you probably already have at home. Check your pantry and collect the following supplies:
 - Two cups of baking soda
- A cup of cornstarch
- One and a half cups of cold water
- Food coloring (gel or liquid)
- Old pan
- Whisk
- Come on
 Gather your supplies. This quick no-cook recipe is a great choice if you don't want to spend too much time putting your clay together. All you need are the following ingredients:
 - Two cups of cornstarch
- A cup of white school glue
- Food coloring (gel or liquid)
- Come on
 Gather your supplies. Cold porcelain clay is a great alternative to self-drying polymer clay, for craft projects such as candle holders, jewelery and other small crafted items. It is a fine clay that shrinks slightly as it dries. This is what you need:
 - A cup of cornstarch
- A cup of white school glue
- Two tablespoons of white vinegar
- Two tablespoons of canola oil
- Plastic foil
- Bowl that is suitable for the microwave
- Extra oil so that the clay doesn't stick to your hands
 Wrap it in plastic wrap for storage. If you can't use it right away, keep it tightly wrapped in plastic wrap to keep moisture levels high.
Tips
- Add food coloring to the mixture if you want the clay to be colored yourself!
- Be patient while you wait for your creation to dry. The bigger you make it, the longer it will last.
- Clean your work area as soon as you're done so you don't have dried-on bits of cornstarch and glue all over your counter.
- When it dries, it hardens and can crack and break.
- Keep it in a cool or dry place.


