Author:
Judy Howell
Date Of Creation:
1 July 2021
Update Date:
1 July 2024

Content
- To step
- Method 1 of 6: Prepare for the injection
- Method 2 of 6: Selecting the needle
- Method 3 of 6: Draw medication into the syringe
- Method 4 of 6: Give a subcutaneous (SQ) injection
- Method 5 of 6: Give an intramuscular (IM) injection
- Method 6 of 6: Give an intravenous (IV) injection
- Tips
- Warnings
- Necessities
Knowing how to inject livestock, subcutaneously (SQ-under the skin), intramuscularly (IM-directly into the blood supply of the muscle) and intravenous (IV-directly into the vein, usually the carotid artery), is necessary to treat livestock with vaccines and other medications. Visit the vet for vaccines and medicines for your livestock and to receive instructions on how to inject your animals correctly. Seek the vet's help if intravenous injection is required as it is much more difficult than injecting SQ or IM.
To step
Method 1 of 6: Prepare for the injection
 Restrain the cow before giving the injection. It is much easier and safer to give injections to livestock that have been restrained. You can use a front gate or a drift gate to restrain the cow. Whatever method of restraint you use, always make sure that the cow is secured so that you or anyone else cannot be injured.
 - A drift fence is a narrow barn with adjustable walls, which is large enough for one adult cow. The panels prevent the animal from moving. It may also have a calming effect on the animal. There are also fences at the front and back to keep the animal still. This makes it easy to reach the neck for injections.
 Read the label. Always read and follow the instructions on the medication or vaccine label for the correct dose and method of application. The manufacturer of the product is required by law to include instructions on the label, as well as warnings, information about the targeted micro-organisms and other important information.
 - If you can choose between injecting intramuscularly (IM) and subcutaneously (SQ), always choose the SQ. It's less invasive, which means it's less likely to damage valuable meat. Some medications really need to be applied by IM injection to be properly absorbed by the body.
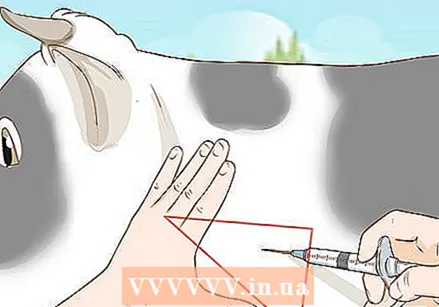
 Find the injection site. The place where the injection is to be given, especially in cattle, is a place called the injection triangle. This triangular area can be found on each side of the cow's neck and contains few vital structures (such as blood vessels and nerves). The injection triangle is widest at the shoulder and tapers up towards the ear. The resale value of this meat is less than that of the hull, making it less likely that you will lose money if you want to sell the meat. The landmarks for finding the triangle are:
 - The upper boundary is below the vertebra, along the line of bend in the neck.
- The lower, or angled, border runs along and above the line of the carotid artery, which is in the center of the neck.
- The rear boundary (closest to the rear of the cow) follows the line above the tip of the shoulder, which runs up towards the top line or top of the shoulder.
 Choose the syringe or dosing syringe. The difference between the two is that with a regular syringe you manually control how much of the medicine is injected into the cow. The dosing syringe delivers a preset amount of the drug, which is useful when administering to more than one animal.
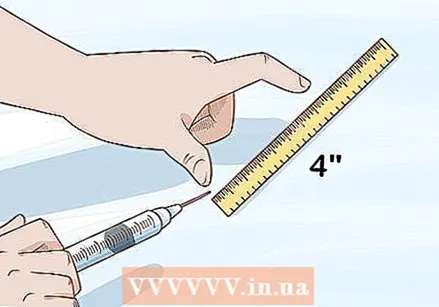
 - A syringe consists of three parts: the housing (which contains the medicine), the plunger (which fits tightly into the housing), and the needle. Syringes are plastic and cannot be used more than once or twice, after which they should be thrown away. Plastic syringes come in 1, 2, 3, 5, 12, 20, 35 and 60 cc (1 cc = 1 ml) sizes. Use the appropriate size syringe for the dose you will be applying. A dose in one syringe should be used for one animal only.
- A dosing syringe or dosing gun has a glass housing (containing multiple doses) and a plunger that contains a thick rubber washer on the end to create a vacuum. It also includes a needle and trigger handle similar to the handle of a caulking gun. A bottle can optionally be attached to some syringes. Dosing syringes come in sizes of 5, 12.5, 20, 25 and 50 ml.
 Vary the injection sites. If you need to give more than one vaccination or medicine, the next injection should be done on an area at least 10 cm (about the width of your palm) from the site of the first injection.
 - If the medication is always injected in the same place, it is more difficult for the body of the cow to absorb it. The medications can also interact with each other and become ineffective or cause an adverse reaction that can kill the animal.
Method 2 of 6: Selecting the needle
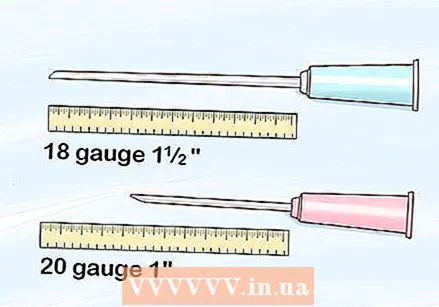 Choose a needle based on the weight of the animal. The size of the needle is shown in measures. The size of a needle is inversely related to its diameter, so the smaller the size, the larger the needle. For example, a calf's skin is thinner than that of an adult cow, so you can use a thinner, larger size needle. Use the thinnest size possible to ensure the cow feels as little pain as possible, but not so thin that there is a high risk of needle breakage.
 - To give an injection to a calf weighing less than 225 kg, an 18-20 (g) needle with a length of 2.5 cm is ideal.
- For larger animals weighing more than 225 kg, you will need a needle with a size of 16-18 g, with a length of 3.75 cm.
- Breed can also play a role in determining needle size. White Angus cattle, for example, have thinner skin than Herefords. So you don't need a 16 g needle to pierce the thinner skin of the Black Angus.
 Choose the length of the needle based on the type of injection you are going to give. You will need a shorter needle for subcutaneous injections and a longer one for intramuscular injections.
 - You do not need a needle longer than 1.25-2.5 cm for SQ injections, as you only need to pierce the skin.
- For IM and IV injections needles with a length of 3.75 cm or more are best.
 Use a new sterile needle for every 10-15 injections. You can use the same needle for up to 15 injections as long as it stays straight and sharp. Always replace the needle when applying a new medication, as the old one can cause contamination.
 - Never try to straighten a bent needle or a needle with burrs, as it is likely to break off on straightening or injecting. This needle must be disposed of with the chemical waste.
Method 3 of 6: Draw medication into the syringe
 Take a syringe and put a needle on it. The needle has a cap when you attach it to the syringe, at least it should if it is a new, clean needle. Push the needle onto the syringe so that it stays put and does not come off easily.
  Remove the cap from the needle. Take the cap off the needle so that it is ready to draw medication into the syringe. You cannot draw medication into the syringe while the cap is still on the needle.
  Take a new bottle and remove the aluminum cap. The aluminum cap protects the opening of the bottle and prevents the liquid from leaking out if, for example, it falls or is turned upside down. Use your fingernails to remove the cap. Never use a knife or other sharp object as this can damage the rubber cap and lead to contamination.
  Push the needle through the rubber cap. Before doing this, draw the same amount of air into the syringe as you would like to draw medication from the bottle. This makes it easier to draw the liquid into the syringe. Then insert the needle into the rubber cap.
 - The rubber cap acts as a vacuum to keep air out of the bottle. When the needle is pushed through, the vacuum is not broken.
 Draw the medication into the syringe. After pushing the air into the syringe into the vial, hold the vial up so that it is positioned almost vertically above the syringe, then slowly pull the plunger back. Draw the desired amount of liquid into the syringe.
 - It is important to hold the bottle over the syringe so that gravity helps to draw up the liquid and you don't draw air into the syringe.
 Lower the bottle and slowly remove the needle. Lowering the bottle causes the liquid to move (by gravity) to the bottom of the bottle and the needle into the skypart of the bottle. Subsequently removing the needle ensures that no liquid leaks out.
  Put the bottle upright in a safe place for future use. Store the bottle in a cool, dry place where it will not be damaged, such as in a cooler or tool box designed specifically for storing livestock injection supplies.
  Point the needle upwards so that any air bubbles float upwards. Tap the syringe with your finger to dislodge any bubbles that won't float up on their own. Then slowly and gently push the plunger to expel the air bubbles from the syringe.
 - This is especially important if you are going to use IM or IV injections.
Method 4 of 6: Give a subcutaneous (SQ) injection
 Use the tent-Technic. If you are right-handed, hold the syringe in your right hand (and vice versa if you are left-handed). Identify the injection triangle and pick a spot in the center of this imaginary triangle. Use your left hand to pinch some of the animal's skin between your thumb and your index and middle fingers. Lift this patch of skin up from the animal's neck to make a tent to shape.
 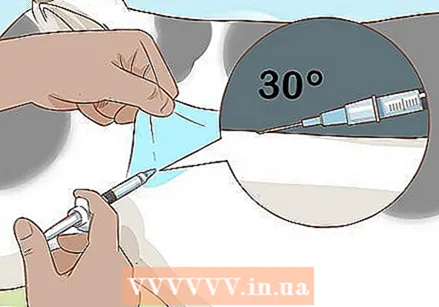 Bring the needle at an angle of 30 to 45 degrees to the surface of the neck. The tip of the needle can be placed under your thumb. Where you place the tip of the needle depends on what you are comfortable with and where you are least likely to prick yourself.
 - Make sure you do not touch the plunger (with a syringe) or trigger (with a dosing syringe).
 Guide the needle into the injection site. Use the index finger of the hand holding the needle to guide the needle in the center of one side of the tent. This ensures that you only insert the needle halfway, rather than all the way into the fold of skin, reducing the chance of hitting a muscle or blood vessel.
  Give the injection. Once the needle is at the required depth, let go of the skin and push down on the plunger or trigger the syringe. Apply slow, but steady pressure to the syringe. Once your injection is done, withdraw the needle, replace the cap and place the syringe on a dry, clean surface for future use, such as injecting the next animal.
  Reduce any bleeding. Push your hand down on the injection site and rub it for a few seconds to keep the site from bleeding excessively and to make sure the injection fluid does not leak out. An SQ injection should not bleed as much as an IM or IV injection, if there is bleeding at all. However, there is a greater risk of the injection fluid leaking out. This leakage can be severe if the skin is very tight or if too much liquid has been injected into one area.
Method 5 of 6: Give an intramuscular (IM) injection
 Reduce the pain of the penetrating needle. Since intramuscular injections are more painful SQ injections, you should try to reduce the pain that cow feels when the needle is inserted. To reduce pain, most vets strike the cow's neck two or three times firmly with the palm of their hand before inserting the needle. It is strongly recommended to follow this method.
 - Hitting the cow's neck with your hand desensitizes the nerves, so the cow is unlikely to feel the needle penetration and so will not be startled.
 Choose a location to administer IM injection. Hold the syringe in your dominant hand (right, if you are right-handed). Then identify the injection triangle and choose an area in the center. Then get ready to insert the needle at a right angle to the skin.
  Push the needle into the cow's neck. Hold the needle perpendicular to the surface of the skin and forcefully push the needle through the skin into the muscle. This should be done immediately after a pair has been hit on the neck. The cow may recoil at this point, so be prepared for the cow to move a bit between the gates. If he is not used to contact with people, this can be a bit more intense.
 - Check if you have hit a vein or artery. To do this, pull back the plunger of the syringe slightly and see if blood gets into the syringe. If you see blood entering the syringe, you have hit a blood vessel. You will need to withdraw the syringe and try again in a different location approximately 1 inch (2.5 cm) from the current location.
 Apply the drug. Once you know you haven't hit a blood vessel, you can apply the drug. Slowly push the plunger until the cow has received the correct dose. If you are applying more than 10 ml of IM, make sure you do not give more than 10 ml per injection site.
 - After removing the syringe, push your fingers briefly on the injection site to prevent bleeding.
Method 6 of 6: Give an intravenous (IV) injection
 Seek the help of a vet to administer an IV injection. An IV injection requires a lot of skill and practice. It is a specialized technique not usually performed by the livestock owner. If you are unable to properly administer the IV injection or are unsure how to do it, contact your vet and have him perform the procedure.
 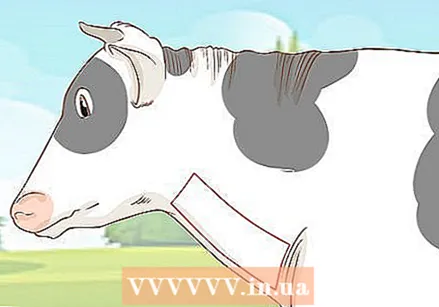 Find the carotid artery. You can do this by groping the side of the neck with your fingers (it is below the imaginary triangle), above the dewlap. You will feel the throbbing of the carotid. Once you find it, push the bottom of the vein to push it out. This will help you find the vein better while you are using the injection.
 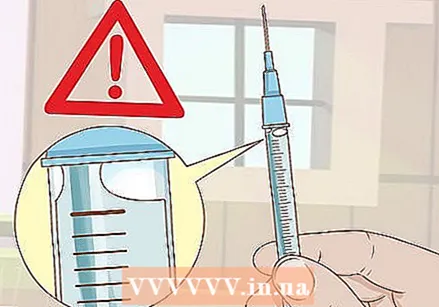 Make sure there are no air bubbles in your syringe. Air bubbles, when injected into the carotid artery, can cause serious health risks and even death. If there is air in the syringe when the medication is in, hold the syringe straight up and tap it with your fingers until the air bubbles float up. Remove the bubbles by slightly pushing the plunger until all air bubbles are visibly gone. Some of the medicine will come out of the needle while you do this.
  Insert the needle at an angle of 30 to 45 degrees to the skin on the neck. Slowly but firmly insert the needle into the protruding carotid artery. You know if you hit the artery properly when just a little pull on the plunger draws blood into the syringe, which mixes with the contents. Unlike SQ and IM injections, this is a good sign here.
  Apply the drug. Push the plunger very slow so that the liquid gradually enters the vein of the cow. Once you have applied the required amount of medication, gently remove the needle. Place your hand over the injection site and push for a few seconds to reduce the bleeding associated with these types of injections.
Tips
- Always consult a vet before giving a cow an injection. He can give specific tips for your cow.
- Store vaccines appropriately. Vaccines that need to be kept cool should be kept in a cool box with ice packs (especially on hot summer days); vaccines that need to be kept at room temperature should be kept in a cool box with warm bottles during the period of use, especially in winter.
Warnings
- Do not stand on the inside of the fence with the livestock unless you want to be squashed. Always work with the livestock from the outside, never from the inside.
- Avoid putting your head between bars or gates as this could result in serious or fatal injury to you.
Necessities
- Needles (clean and disinfected)
- Syringes (of the correct size)
- Vaccine or medication
- Head fence and floating fence (or other means of restraint) with handling facilities
- Livestock to be treated or vaccinated


