Author:
Roger Morrison
Date Of Creation:
23 September 2021
Update Date:
1 July 2024

Content
- To step
- Part 1 of 3: Planting sugar cane
- Part 2 of 3: Growing and harvesting sugar cane
- Part 3 of 3: Making sugar cane syrup
- Tips
- Warnings
Sugarcane belongs to the same family as grass, and it grows in the form of long, thin stakes, or reeds. Sugarcane is planted in grooves, on their side, in the fall. It requires no maintenance during the winter and in the spring you will be greeted by sugar cane seedlings that grow as high as bamboo. You can make a delicious syrup from harvested sugar cane.
To step
Part 1 of 3: Planting sugar cane
 Choose healthy sugar cane plants. Sugarcane is easiest to find during the harvest season, late summer and early fall. If you can't get sugar cane plants at your garden center, you can still try it at farmers' markets. Tokos also often offer sugar cane plants.
 - Look for long, thick stems that are more likely to produce healthy new plants.
- The stems have knots, and a new plant will sprout from each of those knots. With this in mind, buy as many stems as you need to get the yield you want.
 Divide the sugar cane stems into 30 cm pieces. Make sure there are three to four knots each to make it more likely that each piece will produce a few offshoots. If the stems have leaves or flowers, remove them.
  Dig grooves in a sunny spot for planting. Sugarcane stems are planted horizontally, on their sides, in four-inch deep grooves or trenches. They need full sun, so choose an area where there is no shade. Dig grooves long enough to fit each piece of sugarcane, leaving 12 inches between the grooves.
 - Use a shovel or hoe to make it easier to dig the grooves.
- Large-scale sugar farmers usually have more sophisticated tools for digging these quarries.
 Wet the grooves. Use a garden hose to slightly dampen the grooves and prepare them for the sugar cane. Before planting, make sure the water is drained and there are no residual pools.
  Plant the sugar cane. Place the stems horizontally in the grooves. Cover them with soil. Do not plant the stems upright or they will not grow.
  Wait for the sugar cane to grow. In the spring, usually in April or May, suckers will start to form from the nodes of the stems. You will see them breaking through the ground to form individual sugarcane stems, which are quite tall by the end of summer.
Part 2 of 3: Growing and harvesting sugar cane
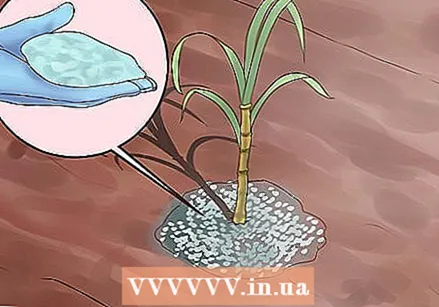 Fertilize the sugar cane with nitrogen. Since sugar cane is a type of grass, it thrives on fertilizers rich in nitrogen. You can fertilize the sugarcane plants with standard grass fertilizers or use an organic option: chicken manure. Fertilizing only once, when the shoots first appear, will help the sugar cane to grow strong and healthy so that you have a good harvest in the fall.
  Weed the planting bed regularly. Sugar cane grows under difficult conditions and requires little maintenance, other than weeding. Don't neglect the planting bed, as the weeds can choke out the new offshoots before they have a chance to develop. It is necessary to weed regularly until the cane is large enough to shade and choke most weeds on its own.
  Wait until fall before harvesting. Sugarcane plants should be allowed to grow as long as possible before the first frost of the year. If they are left in the ground until after the first frost, you cannot use your plants to make sugar syrup.
 - If you're expecting a harsh winter, play it safe and harvest your sugar cane by the end of September.
- If you expect a mild winter, you can grow your sugar cane until the end of October.
 Use a machete to cut the reeds close to the ground. The mature stems will be long and thick, similar to bamboo, so simple garden pruners will not be able to cut it. Use a machete to cut the sugar cane as close to the ground as possible so that you are able to use as much of the plant as possible.
  Do not chop the ground. You don't want to damage the roots of the already-rooted sugarcane plants. If you leave the roots in the ground, your sugarcane will reappear next year.
  Remove the leaves from the chopped sugar cane. Make sure to wear gloves as the leaves are quite sharp. Use them to cover the planting bed. The leaves will act as an organic mulch that will protect the sugarcane roots throughout the winter. If you don't have enough leaves to cover the entire area, use some extra straw to top it off.
Part 3 of 3: Making sugar cane syrup
 Rub the stems clean. After a season outside, there will be mildew and dirt on it. Use warm water and a brush to scrub dirt and grime off the stems until they are completely clean.
  Chop the stems into 1-inch pieces. The stems will be quite stiff, so a meat chopper is a better tool for this job than a knife. Chop the stem into small pieces and chop it in half again, so that you have a mountain of small pieces of sugar cane.
 - If you had a commercial sugarcane press, it wouldn't be necessary to chop the stems. On large farms, the juice is extracted from sugar cane using gigantic, heavy presses. There is no such machine suitable for home use, so we use the chop-and-cook method instead.
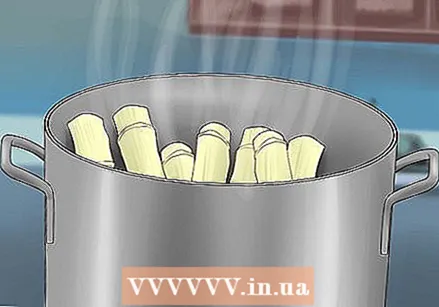 Boil the sugarcane pieces in a large stockpot with water. The sugar is extracted through a long process where you let the pieces cook for about two hours. The sugar water is ready when it has the same taste as a piece of raw sugar cane. You will have to trial test it to determine if it is ready.
 - Another indication is to look at the pieces of sugar cane. After a few hours, the color will change to a light brown, indicating that the sugar has been removed.
- Check the pan every half hour to make sure the pieces are still submerged; if not, add more water.
 Pour the water through a colander into a smaller pan. Use the colander to get out all the fibrous pieces of sugar cane. You don't need them anymore, so you can throw them away.
  Boil the sugar water to turn it into a syrup. Boil the sugar water until it has reduced considerably and has taken on the structure of a thick syrup. This can take anywhere from one to two hours, so make sure to keep an eye on the pan to make sure it doesn't boil over. To test if the syrup is ready, you can dip a cold spoon in the pan and examine the structure.
 - If you want your syrup to stay on the thin side, you can remove it from the heat if it still slides easily off the back of the spoon.
- For a thicker syrup, do not remove it from the heat until it sticks to the back of the spoon instead of sliding off.
 Pour the syrup into a glass canning jar. Cover the jar and let the syrup cool completely before storing in a cool, dry place.
Tips
- Fresh sugar cane can also be crushed or squeezed so that the juice can be extracted.
- Sugar cane juice makes a refreshing drink and can be served hot or chilled.
- Store-bought sugar is often made white with bone char, so growing your own sugar cane is a good idea for those who are vegetarian or vegan.
Warnings
- The leaves of sugarcane plants can scrape or injure your skin. Always wear gloves or other hand protection when removing leaves and flowers from the plant.


