Author:
Roger Morrison
Date Of Creation:
3 September 2021
Update Date:
21 June 2024

Content
- To step
- Part 1 of 4: Collecting shells
- Part 2 of 4: Extracting tissue from living shells
- Part 3 of 4: Cleaning dead shells
- Part 4 of 4: Protecting shells
- Tips
- Warnings
Shells can be a nice reminder of a great beach holiday. You can use them as decoration in your home or for crafts. When collecting shells on the beach, it is important to clean the shells inside and out and treat them with oil or lacquer to keep them in good condition. To find out how to do that, go to Step 1 below.
To step
Part 1 of 4: Collecting shells
 Find shells at your favorite gathering place. This could be a beach near you or one that you visit during your vacation. You can also buy shells at hobby shops and on the internet.
  Do not bring shells with live sea creatures in them. Don't destroy nature and just leave shells with live animals in them on the beach. You can tell if a shell is still inhabited by turning it over and see if you see an animal in it.
 - When you go on vacation, check the rules for collecting shells. This way you can be sure that you are not collecting illegal shells. For example, in North American waters it is illegal to collect pink wing horns. This is a protected shell species that is threatened by overfishing. You are also not allowed to bring certain shells into the Netherlands or only if you have a permit, so check the rules in advance.
 Check whether it is a living or dead shell. In shells, a living shell is a shell that still contains animal tissue. That does not mean that the shell itself is alive, because the animal tissue in a living shell is dead. A dead shell is a shell without animal tissue.
 - The way you clean the shells depends on whether they are dead or alive. For example, with living shells you have to remove the animal tissue from the shells.
Part 2 of 4: Extracting tissue from living shells
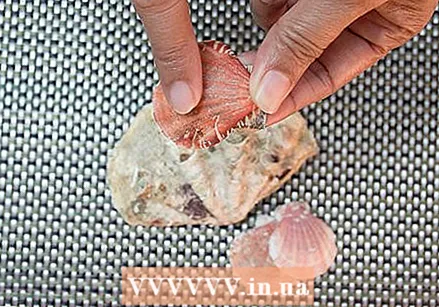
 Boil the shells to remove the animal tissue. Cooking a live shell will soften the animal tissue in the shell and be easier to remove. You will need a pan and tweezers or some other tool such as a toothpick or similar to remove the animal tissue. To cook live shells for cleaning, do the following:
 - Place the shells in a large pan with room temperature water. Cover the shells with about 2 inches of water. It is important to use water that is at room temperature and put the shells in the pan before boiling the water as the sudden heat can cause the shells to crack.
- Bring the water to a boil. Let the water boil for about 5 minutes. Boil the water longer if you are cooking more than one shell. You may also need to cook longer shells.
- Remove the shells from the pan with tongs and gently place them on a soft surface like a warm towel.
- Using the tweezers or other tool, gently pull and discard the animal tissue from the shells.
 Bury the living shells. This cleaning method can take the longest of all methods, but many people choose this method to avoid damaging the shells. Shells can crack if you cook them, freeze them, and pull out the animal tissue by hand. Burying live shells in a safe place will not damage them. In addition, this is a natural way to get rid of the animal tissue. Ants, beetles and other insects eat the animal tissue and clean the shells. To clean your shells in this way, do the following:
 - Dig a hole in the ground. Make sure the hole is big enough for all of your shells. Also make sure that you can place the shells at a good distance from each other. Make the hole about eight to two feet deep to prevent animals from digging up your shells or people from stepping on them and crushing your shells.
- Place the shells evenly spaced in the hole.
- Cover the shells with soil.
- Wait several months for insects, larvae, worms and bacteria to remove the animal tissue in the shells. The longer you wait, the cleaner the shells will be.
- Dig the shells back up and see if all the animal tissue has disappeared from the shells.
 Freeze live shells. Freezing your shells will kill the animal tissue in the shells and make it easier to remove. To clean your shells in this way, do the following:
 - Place the shells in a resealable plastic bag. If you have a lot of shells you may need several bags.
- Pour water into the bag until all of the shells are submerged.
- Place the bag in the freezer.
- Leave the bag in the freezer for several days to allow the water to freeze completely.
- Remove the bag from the freezer and let the ice thaw completely.
- Remove the shells from the bag and pull out the animal tissue.
Part 3 of 4: Cleaning dead shells
 Soak the shells in water for a week. The water will wash away any dirt in and on the shells and keep your shells clean and shiny by the end of the week.
 - Change the water every other day. Changing the water will make your shells even cleaner.
- You can also choose to boil your dead shells after a week to make sure all dirt particles and bits of animal tissue have been removed.
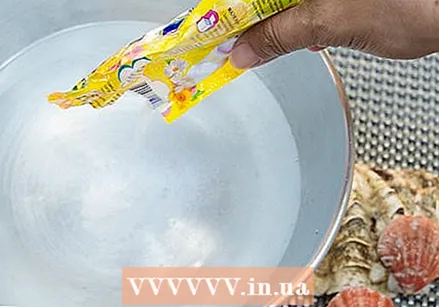 Clean the shells with bleach. Bleach will certainly remove the dirt, as well as other impurities and animal tissue residues. However, some shell collectors warn that the bleach can affect the color of the shells and cause the shells to always smell like bleach. To clean your shells in this way, do the following:
 - Fill a saucepan with equal parts water and bleach. Add enough to cover all of the shells completely.
- Soak the shells in the mixture. You may notice flakes of leathery tissue coming off the shells. This is the periostracum, or the biological protective layer or skin of the shells.
- When this protective layer has been removed, you can remove the shells from the mixture. You can also use a toothbrush to get dirt out of the shells.
- Rinse the shells thoroughly and let them dry completely.
- Spread baby oil or mineral oil on the shells to bring them back to shine.
 Clean the shells with toothpaste. Toothpaste is not as strong as bleach for cleaning your shells. To clean your shells with toothpaste, do the following:
 - Spread a thin layer of toothpaste on one side of the shells.
- Let the toothpaste-covered shells sit for at least 5 hours, so that the toothpaste can absorb into the shells. You can leave the shells like that overnight so that you can be sure that the toothpaste is doing its job.
- The toothpaste will become tacky and / or hard, depending on how thick the layer you put on it is. When that happens, grab an old toothbrush and a glass of warm water and scrub the shells thoroughly. Make sure to cover all the cracks and awkward nooks and crannies.
- Make sure you remove all the toothpaste from the shells, even if you have to rinse the shells under the tap after scrubbing. This will remove the grains and other particles in the toothpaste, or all rough and sharp parts. The surface becomes very smooth and has few irregularities.
 Remove the barnacles from the shells. If you see barnacles on the shells, use a brush, soft toothbrush, or wire brush to remove them.
 - This is easiest if you've cleaned the shells first, whether you've soaked them in water or bleach.
Part 4 of 4: Protecting shells
 Spread mineral oil on the shells to give them a deep shine. Let the shells dry for at least a full day and then smear oil on them
 - Mineral oil not only ensures that the shells shine again, but also ensures that they are well preserved.
- You can also use WD-40. Make sure to put on gloves when using this drug.
 Spray lacquer on the shells. You can use a semi-gloss polyurethane polish or a coat of clear nail polish. In this way, the shells look like they do in nature and you let them shine extra strong.
 - First, treat one side of the shells and let them dry completely. The next day you treat the other side. Both sides should dry for about a day.
Tips
- Leave live shells on the beach. Animals use them to live in and there are a lot of shells that you don't have to take animals out of. Carefully throw shells with animals in them back into the sea and look for shells without animals instead.
- You can also place the live shells near a trash can or garbage container. Find a garbage can with fly larvae or maggots, and arrange the shells so that the larvae and maggots can get inside. The flies can lay eggs in the shells and the young flies will eat the dead tissue in the shells. This process takes at least a week.
- It is best to collect dead shells on the beach instead of taking live shells from the sea, even if dead shells look less beautiful. This is a lot better for nature and you don't have to remove the animal tissue from the shells.
Warnings
- Always wear eye protection and gloves when working with bleach.
- Some shells don't take it well when cooked. This mainly concerns delicate and soft shells. If you are concerned that the shells will break, do not bring the water to a full boil.
- Be careful not to burn yourself when removing the hot shells from the boiling water. Always wear gloves to protect your hands.
- By soaking the shells in bleach, they sometimes lose their color. If you'd rather not have white shells, check them regularly or dilute the bleach mixture (you can always add more bleach to the pan if needed).
- Some shells (especially cowrie shells) are actually damaged if you clean them with bleach or other cleaning agents. If you have a shell that means a lot to you, find out what type of shell it is and how best to clean it. You can also experiment with other shells of the same kind that you don't like as much.


