Author:
Charles Brown
Date Of Creation:
1 February 2021
Update Date:
1 July 2024

Content
- To step
- Method 1 of 3: Growing roses from cuttings
- Method 2 of 3: Sharing rose plants
- Method 3 of 3: Keeping your roses healthy
- Tips
Roses are flowering perennial plants much praised for their beautiful flowers with delicate petals. One of the best ways to get new roses is to take a cutting from an existing plant and let it grow into a new rose bush. If you are growing roses from a cutting, you will need to cut the stem of a healthy plant and let it shoot in root so it can become an independent plant. However, you can also propagate roses by dividing an existing plant, but this requires a bit more effort than working with a cutting. To propagate by dividing, dig up the entire rose bush, cut the root system in half and replant the two halves as two separate bushes.
To step
Method 1 of 3: Growing roses from cuttings
 Choose the right time. Planting cuttings from the stem is one of the most popular ways to propagate roses. The best time to take and plant cuttings is when it is warm outside but not too hot. Choose a time when the rose bush is growing strongly. The ideal time for this is in late spring or early summer.
 - It is possible to grow roses from cuttings when the weather is cold, but it will take longer and you will have less chance of success.
- If you don't have your own rose bush that you can use for cuttings, you can ask a friend or neighbor if they have a plant that you can use.
- You may also find wild rose bushes that you can use for propagation.
- You can also ask a local nursery or garden center to let people take cuttings from their plants.
 Gather your tools. To propagate roses using this method, you need a healthy rose bush to cut a cutting. You'll need some tools for this, including:
 - Clean pot (5 cm)
- Potting soil
- Sharp, sterilized cutting tool
- Rooting powder
- Transparent plastic bag or a preserving jar
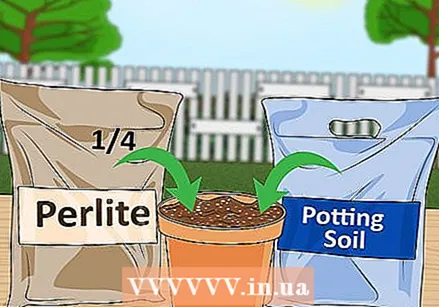 Prepare a jar. Fill the small pot with potting soil. For best results, replace a quarter of the soil with perlite, peat moss, or vermiculite (or a combination of these). This will encourage air flow and drainage, giving your cutting more chance to take root. If the soil is dry, then you should water and let the excess water drain until the soil is evenly moistened.
 - Instead of a jar you can also use a small weck jar or the bottom half of a large plastic bottle (cut off the top part).
 Choose a stem for the cutting. Choose a healthy and established plant from which to take a cutting. The stem should come from the top and side of the plant and it should have at least three leaves on it. The ideal is to find a stem that has recently bloomed. Look for a stem that is young but sturdy, ideally about 6 inches (15 cm) long.
 - It is better to take cuttings from the top and side of the plant as they will take root better than cuttings from the center or the bottom.
- It is okay if the stem you have chosen is currently bearing buds or flowers, but look for a stem with flowers that are starting to wither. This indicates that the stem has recently bloomed.
 Cut off part for cuttings. The best tool for doing this is sharp pruning shears or a razor blade. Cut the stem of the plant at a 45-degree angle, just below one of the lower leaf nodes (where the leaf attaches to the stem).
 - Make sure the cutting tool is sterilized to prevent the spread of disease.
- To sterilize your tools, either heat it with fire until red and hot, or boil it in water for 30 minutes.
 Remove flowers, buds and some leaves. Using the same cutting tool, cut off any wilted flowers and new buds where they attach to the stem. If fruit has already formed from it, you must also cut it away.
 - Cut off all leaves on the bottom half of the stem.
- Leave two to three higher leaves hanging to help with photosynthesis. Cut these leaves in half to limit moisture loss.
 Make incisions in the cutting. You need to make cuts in the bottom of the stem as this will encourage rooting. Using the same cutting tool, make 1-inch cuts in the bark at the bottom of the stem.
 - Make three or four cuts in the bark to give the roots more room to grow.
 Dip the cutting in rooting powder. Make sure that the bottom 5 cm of the cutting, including incisions and the bottom of the stem, are covered with rooting powder. Shake gently to remove any excess powder.
 - Rooting powder is not necessary in the process of taking and propagating cuttings, but it will increase the likelihood that your cutting will grow effectively.
 Plant and water the cutting. With your fingertip or a pencil, make a 5 cm hole in the potting soil in the center of the pot. Place the cut end of the cutting in the hole. Push soil around the stem and use your hands to get the soil firmly in place.
 - Water the soil so that it is thoroughly moistened.
 Cover the stem with plastic or with a preserving jar. To cover the stem with plastic, you need to stick two 8 inch (20 cm) laths or wires into the ground on either side of the stem to hold up the plastic. Cover the pot and stem with a clear plastic bag and attach the bag to the pot using an elastic or twine. With a weck jar you can simply place a large weck jar over the stem.
 - Covering the stem with glass or plastic will create a mini greenhouse. In addition, the shelter will help keep in heat, moisture and UV light, all of which the cutting needs to take root and grow.
 Provide plenty of sunlight and moisture for the cutting as it grows. The plant will need a lot of direct sunlight throughout the day. However, to avoid overheating, place the plant in a bright place that gets a lot of indirect sunlight, especially around noon.
 - The mason jar or plastic will help keep the soil and cutting moist, but you can always add more water when the cutting or soil starts to dry out.
- By placing a heat mat under the plant you can stimulate the growth of the roots.
Method 2 of 3: Sharing rose plants
 Choose the right time. The ideal time to divide perennials is in the early spring or late fall. At these times, the plants are in a dormant period, minimizing shock to the plant and stimulating root growth.
 - It is also important to divide perennials during dormant periods as this will keep them from blooming. Avoid sharing rose bushes that are in bloom.
- Sharing roses is less popular than taking cuttings because it is more difficult and time consuming. Dividing requires digging up an established plant, cutting it in half, and replanting both halves.
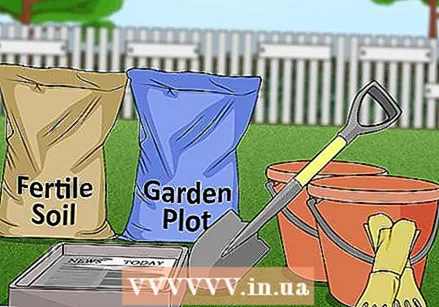 Gather your tools. To propagate roses through division you will need a healthy and established rose plant and some gardening tools such as:
 - Sharp and sterilized knife or razor
- Shovel or spade
- Garden gloves
- Two large buckets
- Damp newspaper
- A prepared piece of land in the garden
- Fertile soil
 Choose a healthy plant to share. In order for your shared rose bushes to thrive and produce healthy flowers, choose a healthy and established plant to share. A healthy plant will:
 - Have a lot of leaves
- Have leaves that are evenly distributed on the plant
- Produce lots of flowers
 Water the rose bush. To minimize shock to the plant, water the rose bush thoroughly before digging and dividing it. This will also loosen the soil around the roots, making it easier to get the plant out of the ground without damaging the roots.
 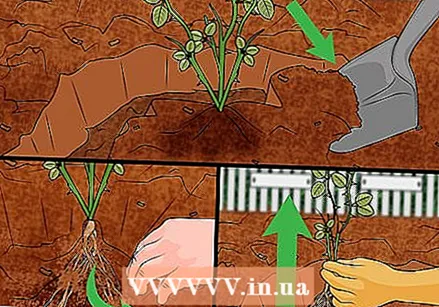 Dig up the rose bush carefully. With a spade, you need to start digging in the ground a few feet away from the stem of the bush. You should dig up the plant but try to avoid digging it from damaging the roots. Once you've cleared the area around the plant, use your hands to sweep away the soil and expose the roots.
 - When the roots are exposed and the area around the plant has been dug up, gently pull the plant out of the ground.
 Cut the plant into equal halves. Place the rose bush on the ground or put it in a wheelbarrow. With a sterilized pruning saw or knife, divide the plant into equal halves by cutting the roots under the center of the plant.
 - To sterilize your cutting tool, heat the metal on fire until red and hot, or boil it in water for 30 minutes.
 Keep the roots moist. Once the plant is divided, place each half in a bucket and place these buckets in a shady spot so that they are protected while you prepare the spot in your garden. To keep the plants moist, cover them with damp newspaper.
 - Ideally, you should provide about 50 percent humidity to keep the plants moist without getting them too wet.
 Prepare your garden. In the area where you dug up the original rose bush, replace the soil you dug up with fertile soil or organic matter so that there are plenty of nutrients in the soil for the new plants. Use your hands or a shovel to mix and spread the new soil into the soil.
 - Good organic matter to add to the soil includes old compost or manure.
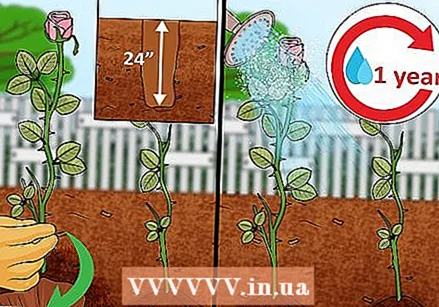 Plant both halves. Dig two holes in the area of your yard that you have prepared. Choose the same depth as with the original plant. Make holes with a distance of about 60 cm from each other. Plant the individual rose bushes in the holes and cover the roots with soil. Push the soil around the roots with your hands.
 - Water the plants thoroughly.
- Keep the rose bushes moist during the first year as they become established.
Method 3 of 3: Keeping your roses healthy
 Make sure they get a lot of light. Roses need between six and eight hours of sunlight daily. When choosing a location for your roses, make sure it gets plenty of full sun.
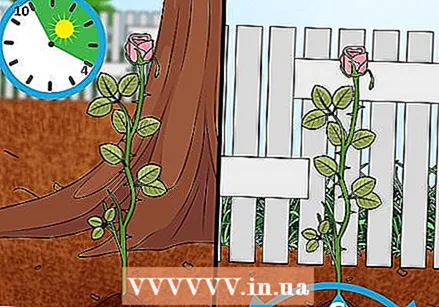
 - In very hot climates, you should choose a location that receives indirect sunlight when the sun is at its hottest, so between 10am and 4pm. This could be near a tree that provides shade during the hottest hours of the day.
- In colder climates, plant the roses in front of a south or west facing wall or fence to give the plants some extra protection from the reflected heat.
 Water the roses regularly. Roses need plenty of water, especially during the first year and during the warmer summer months. During the summer, water a lot twice a week so that the soil remains constantly moist.
 - The best way to water roses is to use an irrigation system or a garden hose that concentrates the water near the roots and bottom of the plant. If the flowers or foliage get wet, it can lead to disease, fungus and rotting problems.
 Work the soil with a fertilizer. In addition to plenty of water and sunlight, roses also need regular nutrition, especially before and during the flowering periods. In the spring and summer, between the months of April and July, you should provide the roses with nutrients on a monthly basis, such as:
 - Granular 5-10-5 or 5-10-10 fertilizer
- Fish emulsions
- Seaweed extract
- Old manure or compost
- Alfalfa flour
 Prune often. Roses will flourish when pruned regularly, as pruning removes diseased stems, flowers and leaves, stimulating circulation throughout the plant. In the spring, use scissors or loppers to remove dead flowers, diseased stems, and old leaves.
 - Continue to remove dead flowers and leaves throughout the spring and summer as needed.
Tips
- Propagating roses from cuttings is easier than growing roses from seed.


