Author:
Charles Brown
Date Of Creation:
10 February 2021
Update Date:
1 July 2024

Content
- To step
- Method 1 of 5: Add subtitles to a video file
- Method 2 of 5: Upload subtitles to a YouTube video (Creator Studio Classic)
- Method 3 of 5: Upload subtitles to a YouTube video (YouTube Studio Beta)
- Method 4 of 5: Create subtitle files with Aegisub
- Method 5 of 5: Manually create a subtitle file
Video subtitles are useful for displaying dialogue and sounds on the screen for people with hearing difficulties or for translating. Subtitles are saved in a separate file. The most common subtitle file format is Subrip Subtitle Format or an SRT file. You can create these files manually in a word processing program such as Notepad or TextEdit, or you can create them in subtitle creation software such as Aegisub. Many media players can detect an SRT file or let you select one and display the subtitles while playing a video. These can only be displayed when the SRT file is selected. To permanently add subtitles to a video file, you need to use video encoding software such as Handbrake. You can also upload SRT files to YouTube videos.
To step
Method 1 of 5: Add subtitles to a video file
 Download and install Handbrake. Handbrake is a free video encoding tool that also allows you to add subtitles to videos. You can download Handbrake at https://handbrake.fr/downloads.php.
 - To add subtitles to your video, you need an external SRT file that contains the subtitles for your video. If you don't have an SRT file, you can create one with the free Aegisub app, or you can manually code one in Notepad or TextEdit.
 Open Handbrake. Once you've downloaded and installed Handbrake, you can open it from the Windows Start menu or the Applications folder on Mac.
  click on File. This is the second option in the menu on the left. This will open an explorer window.
 - You can also drag the video to which you want to add subtitles to the box on the right.
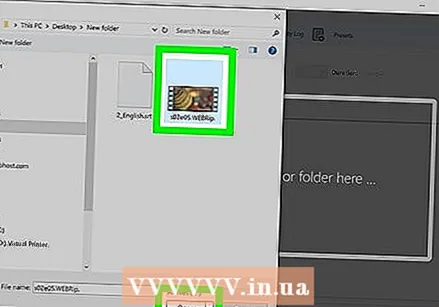 Click on the video you want to add subtitles to and click To open. This will open the video in Handbrake.
  click on Subtitles. This is one of the tabs in the center of the screen, below the video's source information.
 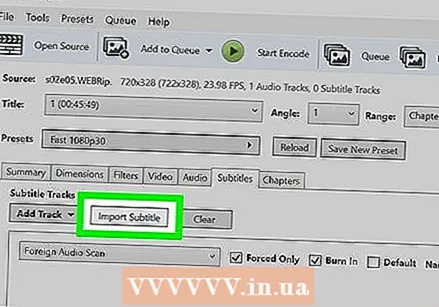 click on Import SRT. This is at the top of the box under the "Subtitles" tab.
  Select the SRT file corresponding to the video and click To open. This will import the SRT file to Handbrake.
  click on Search. This is the gray button in the lower right corner.
  Type a name for the new file and click Save. This will save a file containing the final video with added subtitles to a location.
  click on Start coding. This is at the top of Handbrake next to the green Play Triangle icon. This will encode the video with the subtitles. You can enable the subtitles in your media player by selecting the subtitles menu and enabling subtitles.
Method 2 of 5: Upload subtitles to a YouTube video (Creator Studio Classic)
 Go to https://www.youtube.com in an internet browser. You can use any browser on PC or Mac for this.
 - If you are not already signed in to your YouTube account, click "Sign In" in the top right corner and sign in with the email address and password associated with your YouTube account.
- To upload subtitles to a video on YouTube, you need to create an SRT file with subtitles for that video. If you don't have an SRT file, you can create one with the free Aegisub app, or you can manually code one in Notepad or TextEdit.
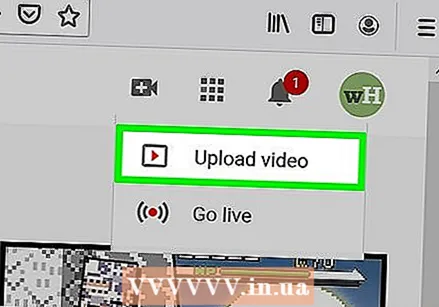
 Upload your video to YouTube. If you have not already done so, please use the normal methods to upload your video on your computer to YouTube.
  Click on the user icon. This is the circular icon with your profile picture in the top right corner. This will bring up your account menu.
 - If you haven't selected a profile picture yet, YouTube will display a colored circle with your initials inside.
 click on Creator Studio. This is in the drop-down menu that appears when you click on your profile picture.
 - If you see "YouTube Studio (Beta)" instead of "Creator Studio", use the following method to learn how to upload subtitles to YouTube Studio. You can also click "YouTube Studio (Beta)" and then "Creator Studio Classic" in the left sidebar to switch to Creator Studio Classic.
 click on Video Manager. This is in the sidebar on the left. This will display a list of all your uploaded YouTube videos.
  click on edit next to the video you want to add subtitles to. This will display an expandable menu for the video.
 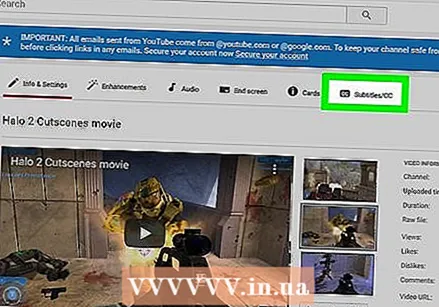 click on Subtitles / CC. This is near the bottom of the drop-down menu that appears when you click "Edit".
  Select a language and click Set language. If you have not yet selected a language for the video, use the drop-down menu to choose a language for the video. Then click on the blue button that says "Set language".
  click on Add new subtitles or CC. This is the blue button to the right of the video.
 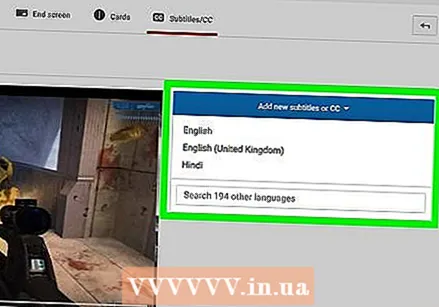 Select the language. If you add more than one language to the video, select the language the subtitles are in. Otherwise, just click on the default language you selected.
  click on Upload a file. This is the first option on the right.
 - If you don't have a subtitle file, you can select one of the other options in YouTube Creator Studio to create subtitles.
 Select "Subtitle file" and click Choose File. Click the radial button next to "Subtitle file" and then click "Choose file". This will open an explorer window that allows you to select the subtitle file.
  Select the subtitle file and click To open. Use the explorer window to navigate to the SRT file. Click on it to select it. Then click "Open" to upload the file.
  click on upload. This is the blue button in the bottom left corner. This will upload the subtitles file to your video. You can preview the subtitles thanks to the video on the left.
  click on Saving Changes. This is the blue button above the video preview on the right. This will permanently encode the video with the subtitles in the video file.
Method 3 of 5: Upload subtitles to a YouTube video (YouTube Studio Beta)
 Go to https://www.youtube.com in an internet browser. You can use any internet browser on a PC or Mac for this.
 - If you are not already signed in to your YouTube account, click "Sign in" in the top right corner and sign in with the email address and password associated with your YouTube account.
- To upload subtitles to a video on YouTube, you need to create an SRT file with subtitles for that video. If you don't have an SRT file, you can create one with the free Aegisub app, or you can manually code one in Notepad or TextEdit.
 Upload your video to YouTube. If you have not already done so, please use the normal methods to upload your video on your computer to YouTube.
  Click on the user icon. This is the circular icon with your profile picture in the top right corner. This will bring up your account menu.
 - If you haven't selected a profile picture yet, YouTube will display a colored circle with your initials inside.
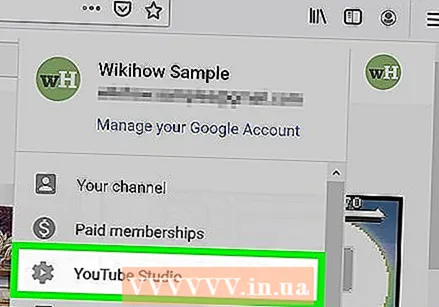 click on YouTube Studio (Beta). This is in the drop-down menu that appears when you click on your profile picture.
 - If you see "Creator Studio" instead of "YouTube Studio (Beta)", check out Method 2 to learn how to upload subtitles in Creator Studio Classic. You can also click "Creator Studio" and then "Try Studio (Beta)" to switch to YouTube Studio.
 click on Videos. This is in the sidebar on the left. This will display all the videos you have uploaded to YouTube.
 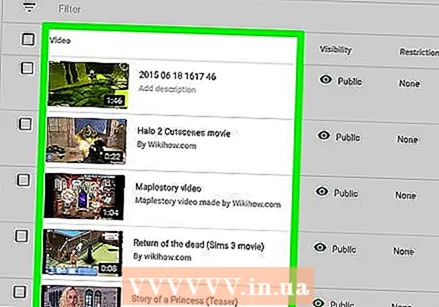 Click on the video you want to add subtitles to. You can click either the preview image or the video title. This will bring up the page where you can edit the details of the video.
 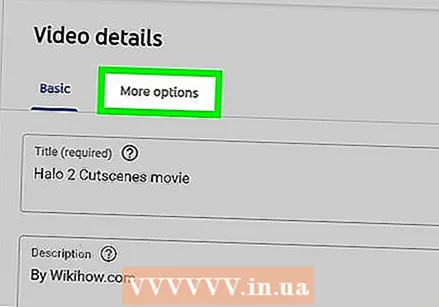 click on Advanced. This is the second tab at the top of the page.
  Select a language for the video. If you haven't already done so, use the "Video Language" drop-down menu to choose a language for the video. You cannot upload a subtitle file until you select a language.
  click on Upload subtitles / CC. This is the blue link under the Video Language drop-down menu.
  Select "With timing" and click Further. Because SRT files contain the timing of the subtitles, click the radial button next to "With timing" and then click "Continue" in the lower right corner of the window.
  Select the SRT file and click To open. Use the explorer window to navigate to the SRT file for your video. Click on it to select it, then click "Open" in the lower right corner. This will upload the file to YouTube.
 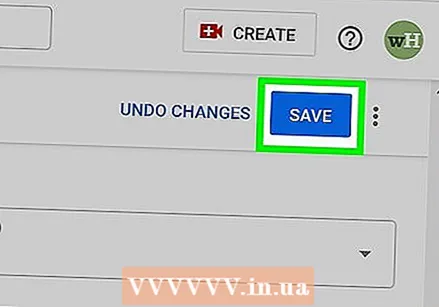 click on Save. This will save the video with the uploaded subtitles.
 - When the video is playing, you can enable subtitles by clicking the gear icon at the bottom of the video and then "Subtitles / CC". Then select the language for the subtitles.
Method 4 of 5: Create subtitle files with Aegisub
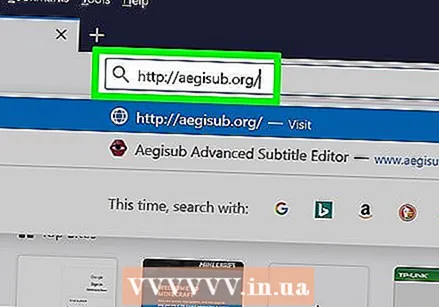 Go to http://www.aegisub.org in an internet browser. This is the website to download Aegisub, a free app you can use to create video subtitles.
 - If you prefer to type the subtitles manually, check out the method to manually create a subtitle file.
 click on Complete installation in addition to "Windows" or "OS X 10.7+". If you are using Windows, click "Full Install" next to Windows to download the installation file for Windows. If you are using Mac, click "Full Install" next to "OS X 10.7+" to download the Mac installation file.
  Double-click the installation file and follow the instructions. By default, your downloaded files are in the "Downloads" folder on both Mac and Windows. The file name of the installation file for Windows is "Aegisub-3.2.2-32.exe". The file name of the installation file for Mac is "Aegisub-3.2.2.dmg".
  Open Aegisub. The icon resembles a red eyeball with an X on it. It's in the Windows Start menu or in the Applications folder on Mac.
 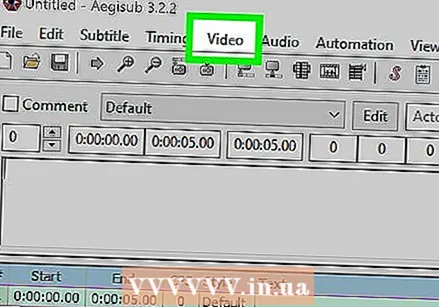 click on Video. This is in the menu bar at the top of the screen. This will display the Video drop-down menu.
  click on Open video. This is the first option in the drop-down menu under "Video".
  Select a video and click To open. Navigate to the save location of the video you want to add subtitles to and click on it to select it. Then click "Open" to open the video in Aegisub. On the left you will see the video display window. The sound display window is on the right. This is where the sound wave of the video is displayed. Below that you will see a text field where you can enter subtitles. Below all that you will see the subtitle window with a list of all subtitles and some information about each subtitle.
  Click and drag to highlight the sound you want to subtitle. Use the sound display window to highlight the audio you want to add a subtitle to. You can adjust the highlighted area by clicking and dragging the red and blue edges of the highlighted area. You can also manually enter the start and end time of the subtitle in the time boxes below the sound display window.
 - You can also click the icon that resembles a sound wave below the sound display window. This switches to Spectrum Analyzer mode which gives you a better picture of the wave file and makes it easy to see where speech begins and ends.
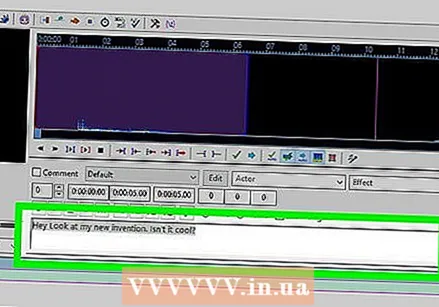 Type the subtitle in the text box. Use the text box below the display window to type the subtitle for the highlighted audio.
 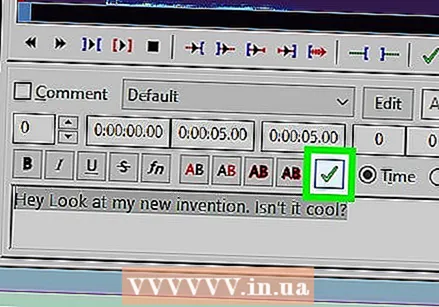 Click on the check mark icon. The green icon with the check mark is above the text field. This will save the subtitle and create a new subtitle after the end of the previous one.
  Repeat for all subtitles. You can add as many subtitles as you want by clicking the check mark icon. You can adjust the subtitles by clicking them in the subtitles display window at the bottom and then edit the text or adjust the start and end times.
 - If any of the subtitles display boxes at the bottom turn red, you probably have too many characters per line. You can create a separate line in the subtitle by typing “/ N” or pressing ⇧ Shift+↵ Enter to push.
 click on File. This is in the menu bar at the top of the screen. When you are done adding your subtitles, you need to save the subtitles file.
  click on Export subtitles. This is in the drop-down menu under "File".
 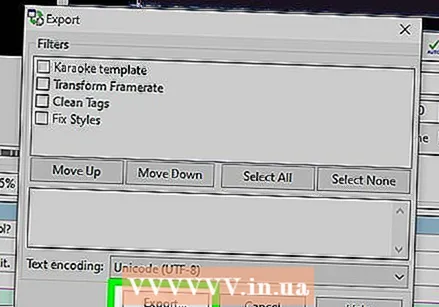 click on Export. It's in the bottom right corner of the popup window.
  Go to the location of the folder where you want to save the file. To make it easy, save the SRT file in the same folder as the video you add subtitles to.
  Type a file name for the subtitles file. Use the box next to "File name" to type a name for the subtitles file. Give it the same file name as the video it is for. If the video file name is "Introduction.mp4", name the SRT file "Introduction.srt".
 - Some media players, such as VLC, can automatically detect and display subtitles if the SRT file is in the same folder and has the same file name. Other media players, such as Windows Media Player, require you to upload the SRT file in addition to the video file. Only then can you view the subtitles. It will not add subtitles to the video file.
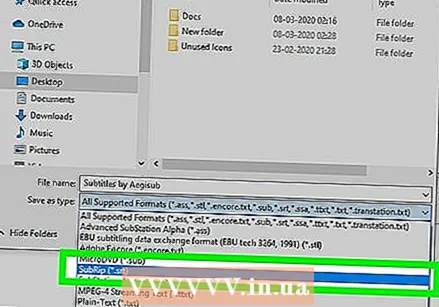 Select "SubRip ( *. Srt)". Use the drop-down menu next to "Save as type" to select "SubRip" as the file type. This will save the subtitles file in SRT file.
 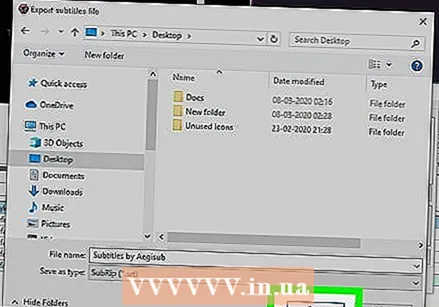 click on Save. This will save the subtitles file in SRT format. An SRT file is just like a plain text document that you can edit in Notepad or TextEdit on Mac.
 - Aegisub will "not" permanently add subtitles to a video. It can only create an external subtitle file. You can use another free program, such as Handbrake, to add subtitles to a video file. You can also upload the SRT file to a video you've uploaded to YouTube.
Method 5 of 5: Manually create a subtitle file
 Open a word processing program. The most commonly used word processing program on Windows is Notepad. On Mac you can use TextEdit. Use the following steps to open a word processing program.
 - "Windows 10":
- Click the Windows Start menu in the lower left corner.
- Type Notepad.
- Click on the Notepad icon.
- "Mac":
- Click on the magnifying glass icon in the top right corner.
- Type TextEdit.app and press ↵ Enter.
- Click on "TextEdit.app".
- Click on "New Document".
- "Windows 10":
 Type the number for your first subtitle and press ↵ Enter. Each subtitle in your SRT file has a number in the order they appear. Type "1" for the first subtitle, "2" for the second, and so on.
 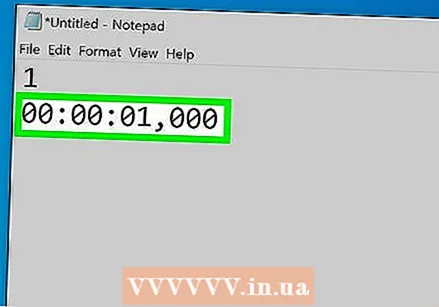 Type the start time for the subtitle. This is when the subtitle in the video starts. The start time for each subtitle should be written in the format "[hours]: [minutes]: [seconds], [milliseconds]". For example, the first subtitle that starts at the beginning of the video can 00:00:01,000 to be.
  Type --> immediately after the start time. Typing two dashes and an arrow separates the start and end time of the subtitle.
  Enter the end time for the subtitle. At this time, subtitle playback stops.The end time must be in the format "[hours]: [minutes]: [seconds], [milliseconds]". The full line with the subtitle timestamp should look something like this: 00:00:01,000 --> 00:00:05,040.
  Press ↵ Enter. After typing the timestamp for the subtitle, press the Enter key to add a new line.
  Type the subtitle. The third line usually contains the subtitle itself that is displayed on the screen.
  Press twice ↵ Enter. After typing the subtitle, press Enter twice to leave a blank line between the subtitle you just created and the next. Repeat these steps for each subtitle in the video.
  Repeat these steps for each subtitle in the video.
 click on File and then on Save as. After typing your subtitles in the word processing program, you need to save the file as a ".srt" file. The option to save is in the File menu at the top of the screen.
 - In TextEdit on Mac, click "Save" instead of "Save As".
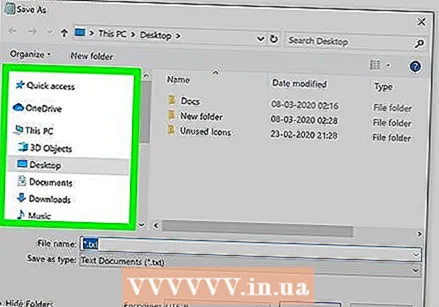 Go to the folder containing the video. You must save the SRT file in the same folder as the video it was taken for.
  Give the text document the same file name as the video. Use the text field next to "File Name" in Windows, or "Save As" on Mac to type a name for the SRT document. Both the video and the SRT file must have the same file name. If the file name for the video is "Introduction.mp4", then the SRT file should be called "Introduction.srt".
 - With VLC you can test the subtitles if the SRT file is stored in the same location and has the same file name as the video file. Click on "Subtitles", then on sub track and select a track for the subtitles.
 Save the document as an SRT file. Use the following steps to save the document as an SRT file.
 - "Windows": While saving the file in Notepad, delete the ".txt" extension at the end of the file name and replace it with ".srt". Then click on "Save".
- "Mac": Click "Save" to save the file as a ".rtf" file. Use the Finder to navigate to the location of the document and click on it to select it. Click on "File" and then on "Rename". Remove the ".rtf" extension at the end of the file name and replace it with ".srt". Click "Use .srt" when prompted if you want to keep the extension.


