Author:
Roger Morrison
Date Of Creation:
26 September 2021
Update Date:
1 July 2024

Content
- To step
- Part 1 of 4: Washing the dishes
- Part 2 of 4: Create a design
- Part 3 of 4: Painting the design
- Part 4 of 4: Baking the plates in the oven
- Warnings
- Necessities
Hand-painted ceramic plates are beautiful decorations for your home or office. They are also a beautiful gift for your loved ones. Painting your own design is an easy way to customize a set of ceramic plates. All it takes is a little creativity, patience and ceramic paint!
To step
Part 1 of 4: Washing the dishes
 Use white ovenproof ceramic plates as a blank canvas. Plain ceramic plates serve as a beautiful backdrop for many different designs. If the signs have stickers, remove them after purchase.
 - You can buy oven-safe ceramic plates at hobby or craft stores.
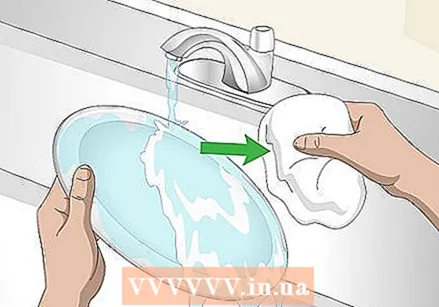 Wash and dry the dishes in preparation for painting. Use regular dish soap and warm water to give the dishes a quick wash. This way you remove dust or dirt that has accumulated on the plates. Dust or dirt particles can ruin the result of the paint job.
 - Remove any price or barcode stickers from the signs.
 Wipe the dishes with rubbing alcohol to remove any soap residue. Dip a clean paper towel or soft cloth in a small bottle of cleaning alcohol. Wipe the alcohol on the plates. This will remove any soap residue that remains.
 - Cleaning alcohol will also remove any sticker residue from the plates.
 Let the plates air dry for one or two hours. After you wipe the plates with alcohol, let them dry for one to two hours before painting them. Painting them while they are still wet can affect the paint or design on the plates.
 - Wash your hands with alcohol after working.
Part 2 of 4: Create a design
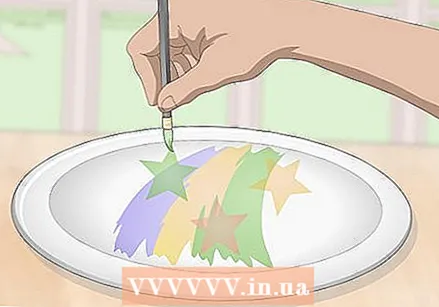
 First sketch or practice your design on paper. To avoid mistakes while painting the board, first sketch your design or practice the technique on paper. Simple basic designs are easier to paint, while more complex designs can take more time. Choose a design that you feel comfortable with.
  Draw a message on the boards using template letters. Lightly trace the template with a pencil to help you paint. You can find templates with words or messages at hobby or craft stores. You can also create your own words or sentences with one letter templates.
 - For narrow stencil letters, you'll need a fine-tipped brush or a ceramic paint pen to fill them in.
 Create a geometric pattern from dots or shapes. Make stripes with painter's tape. You can also try a dot or square pattern. If you'd rather not paint your design freehand, use a template to create a pattern of different shapes.
 - Templates with shapes can be used to create patterns of stars, arrows, hearts, flowers or diamonds.
 Experiment with different colors for an interesting layered design. On a palette or plate, quickly stir a few dots of paint in different colors together with the other end of your brush. See how the colors look when mixed and choose a combination for your plates.
 - By combining bright colors like blue, yellow and red, you create a pop-art design.
 Splash paint with a wet brush for an abstract and textured look. Dip a wet brush in paint and gently run the bristles over a large piece of paper to see the effect. This may turn into a messy design, but the signs will look artsy and fun.
 - Start with one color first, then choose another to splash on top. Splashes of different colors add even more texture and make the board more interesting.
Part 3 of 4: Painting the design
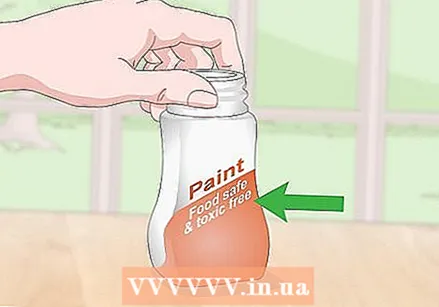 Buy food and dishwasher safe ceramic paint if you are going to use the plates for food. Make sure the ceramic paint is food safe and non-toxic if it is going to be used to serve food on the plates. If the signs are on display in a display case or just hung on the wall as decoration, you can use enamel acrylic paint.
 - Some paints are more durable and scratch resistant. If you expect the signs to be used often, choose a quality paint that will last.
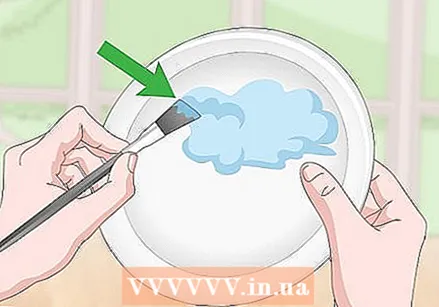 Easily paint large areas or straight motifs with a flat-tip brush. If you are painting the boards in one color or using a contrasting color along the edge of the board, use a flat-tipped brush. Flat-tipped brushes are also suitable for creating striped or geometric paint designs.
 - You can mask parts that you do not want painted with masking tape. Painter's tape helps you guide your hand and create cleanly painted lines.
- If you are applying different colors in layers on one surface, allow the paint to dry for a few hours before applying the next layer.
 Use a pointed brush or paint pen to easily create fine designs. More intricate designs with curved lines, such as hearts or flowers, can be more easily painted using a pointed brush or a ceramic paint pen. If you use a paint pen on plates that you serve food on, make sure it is non-toxic and food-safe.
 - If you make a mistake, gently wipe off the paint before it dries and try again. To avoid further mistakes, you can also let one part dry for a few hours before painting another part nearby.
 Remove the tape you used before the paint dries. Once you have finished painting your design, carefully remove any painter's tape if you used it while painting. If you remove the tape after the paint has dried, the paint may stick to the tape and come off with the tape.
 - Be careful not to touch the applied paint while removing the tape.
 Let the paint on the plates dry for 24 hours. The paint must be completely dry before you bake the plates in the oven. Depending on the instructions for the ceramic paint, you may only need to let it dry for one to three hours. If you are not sure, let it dry for 24 hours just to be sure.
 - Let the plates dry in a safe place away from children or pets to make sure they are not touched.
Part 4 of 4: Baking the plates in the oven
 Place the plates in a cold oven. Do not preheat the oven; the plates should heat up slowly with the oven. If you put plates in a very hot oven at room temperature, they can crack or shatter completely.
 - Place the plates on a baking tray or directly on the oven racks.
 Bring the oven to 160 ºC with the plates in it. The plates are thus heated to this temperature at the same time as the oven. This allows the paint to "cure", or soak into the ceramic.
 - If the directions for ceramic paint indicate a different temperature or baking time, follow that.
 Leave the oven on for 40 minutes for the plates to harden. Once the oven temperature has reached 160 ºC, leave the oven on for 40 minutes. Set a timer on the oven, phone, or a watch to keep track of the time.
 - Most ovens will beep when the chosen temperature is reached, so set a timer at that point.
 Turn off the oven to cool the plates. The plates should cool slowly and at the same time as the oven. Tackling the plates too early can break them. The cool down time depends on the oven, but wait at least two hours to check the temperature.
 - Be patient and do not touch the plates while they are cooling in the oven.
 Once the oven has cooled down, remove the plates from the oven. Since the oven must be completely cool, the dishes should also be cool to the touch. To be on the safe side, put on oven mitts to take out the dishes.
  Let the dishes rest for at least three days before using or washing them. Place the signs where no one can touch, such as children or pets. Let them rest for at least three days before using or washing them off.
 - Wash them by hand the first time. While washing, check the painted designs and check that the dishes have not been damaged during baking in the oven.
Warnings
- Use non-toxic and food-safe ceramic paint if the plates are to be used to serve food.
- Wash your hands before and after working with alcohol and paint.
Necessities
- Oven-proof ceramic plates
- Dishwashing liquid
- Cleaning alcohol
- Kitchen roll or cloth
- Paper
- Pencil
- Paint or paint marker for ceramics
- Painter's tape
- Brush
- Oven


