Author:
Tamara Smith
Date Of Creation:
23 January 2021
Update Date:
1 July 2024

Content
- To step
- Part 1 of 3: Planting a new iris
- Part 2 of 3: Caring for a growing iris
- Part 3 of 3: Maintaining an iris all year round
- Tips
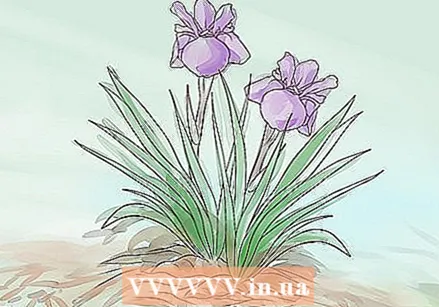
Irises are perfect plants for both novice gardeners and experienced green fingers! The robust flowers are not difficult to grow and do well in many conditions as they are relatively drought resistant and require little maintenance. When they bloom, the irises are beautiful, ranging in hues from the common purple to patterns in white and yellow. Irises are one of the easiest perennials to start and grow, so start planting them today for long lasting blooms.
To step
Part 1 of 3: Planting a new iris
 Choose a suitable kind of iris. While nearly all irises are relatively robust and easy to maintain, some are more suited to certain conditions than others. Depending on the conditions in which you will be planting your irises, a particular variety may be a better choice. Below is information on some of our most common iris varieties:
 - Siberian iris: Despite its name, this iris is native to central and eastern Europe and Turkey. One of the most adaptable irises; very easy to grow and maintain. Does especially well in temperate climates.
- Louisiana Iris: Native to the hot, humid Southeastern United States. Despite this, it grows well in a wide variety of conditions. But they won't bloom if they don't get enough water during the growing season.
- Beardless Iris: Native to central and southern Europe. They do well if they get at least half a day of full sun. They can also survive full sun, but this is not preferred.
 Plant in late summer. Most irises are best planted in late summer (early autumn at the latest). This gives the iris a chance to root well as long as there is enough sunlight to survive the winter. July and August are the best months to plant for most iris varieties.
 - If the late summer lasts for a long time, you could even try planting irises in September, or even October; as long as the days are long enough and there are enough sun hours to give the plant a chance to root well before winter.
 Choose a spot with about 6 to 8 hours of full sun per day. Most irises do really well when they get a generous amount of light sunlight. You won't necessarily want your iris in full sun all the time (although they will still do well), but they can take more sun than most flowers of this size. Try planting your irises in a flower bed that is shaded by a tree later in the day, or on the sunny side of your house so it gets plenty of sunlight.
  Plant in slightly acidic soil with good drainage. Irises prefer soil that is neutral to slightly acidic; a pH of about 6.8 to 7.0 is best. In addition to this, irises need soil with good drainage and ventilation. This is important to prevent root rot, which irises are susceptible to if given too much water.
 - For heavy clay soil with poor drainage, try adding humus or organic matter to improve soil permeability.
- Planting on a slope or in a raised flower bed can help with drainage. In these cases, any excess water will naturally drain from the iris.
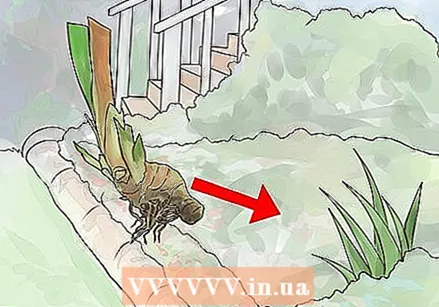
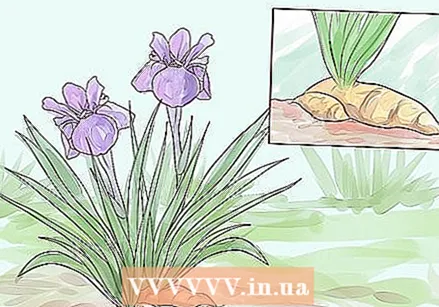
 Plant the rhizome so that the top is exposed. A common mistake beginners make when planting irises is to plant them too deep. Unlike most plants, irises do best when their rhizome; the brown, root-like structure on the underside, resembling a potato; slightly exposed to the air. The roots of the plant should be placed so that they spread downwards, under the rhizome.
 - In very hot climates, the rhizome is covered with a thin layer of soil (no more than an inch) to keep it from drying out.
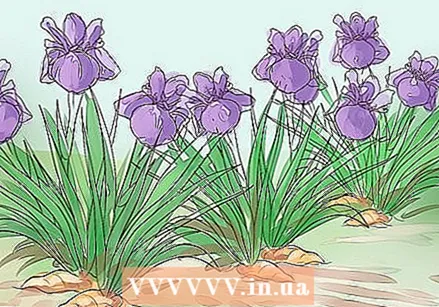
 Plant the rhizomes so that they are spaced apart. More than other plants, irises tend to grow together when planted close together. When this happens, the plants can compete for the same soil, water and nutrients, stunting each other's growth. To avoid this, try to plant the rhizomes of your irises at least 30 to 60 cm apart.
 - Even with this preventative measure, your irises can still grow together after a few years. Don't worry if that happens; you can fix this by digging up some of the rhizomes and planting them a little further away to "thin out" your flowers.
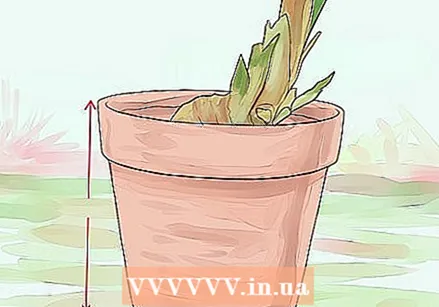 If growing conditions are unfavorable, put the iris in a pot. Depending on where you live and the time of year, outdoor conditions may not be suitable for growing new plants. Instead of putting your plants outside in the ground, where they probably won't thrive, you can also grow them in a pot. This gives you a chance to control how much time the plant will be exposed to the weather until the weather improves and you can still plant them in the ground. If the weather is very bad, for example when it is freezing, you can even keep your plant indoors day and night.
 - For most irises, a 12 inch pot is fine. Very small irises can also do well in pots of 15 to 20 cm.
- Regardless of the size of the pot you use, make sure it has good drainage; at least one large hole in the bottom (or several smaller holes) so that the water can drain out.
Part 2 of 3: Caring for a growing iris
 Water generously after planting. After you have planted your irises, you should give them plenty of water. If the weather is dry, water the plant every 7 to 10 days or as needed. Do this during the morning or evening. Assuming you planted your irises in late summer or early fall, you can stop watering as soon as the weather cools and it starts to rain.
 - A common mistake to avoid with your irises is overwatering. If the rhizome or roots remain in contact with moisture without being able to drain, root rot can develop. This fungal condition has the potential to kill your iris and spreads easily to nearby plants, so it is very important to prevent it.
 Decrease watering when the plant is well rooted. After a while, your plant will need less water. If the weather starts to get cooler in the fall, you can stop watering until the next growing season. In general, your iris needs less water every year.
 - There is, of course, an exception for particularly hot, dry summers. In these cases, it may be necessary to water anyway to prevent the iris from drying out. While irises are quite strong, they cannot survive in extreme conditions without assistance.
 Keep rhizomes uncovered and roots well ventilated. As the iris grows, you should occasionally check that the rhizome is not covered with dirt, organic matter, or other debris. If it does, brush it off gently without moving the plant or disturbing the roots. In addition, make sure that the soil still has good ventilation and drainage; if not, add as much humus or organic matter as needed.
  Trim brown or dying foliage and the flower stem. Unlike other high maintenance garden plants, iris leaves do not require pruning or cutting for proper growth. In fact, not disturbing the leaves, even after the growing season, will allow the iris to accumulate more nutrients through photosynthesis for next year's growth. In general, the only trimming you should do on iris leaves is to remove brown, dead leaf parts; this has no benefits for the plant.
 - Make sure you also want to cut the flower stem short before winter. If the flower dies in winter and falls at the base of the plant, it can spread rot to the rhizome as it digests.
Part 3 of 3: Maintaining an iris all year round
 Protect the plants in preparation for winter. While the roots of the plants grow well throughout the late summer and early fall, you may already be wondering how you plan to protect your irises when the weather turns colder. Snowfall can naturally protect the soil from cracking and swelling, which occurs in very cold weather, and dislocates the rhizomes.
 - Because it is not self-evident that snow falls in the Netherlands, you can consider spreading a loose layer of mulch (such as pine branches) over the soil to protect the soil. Do not apply a thick layer; this can in fact trap moisture in the soil and cause rot.
- Destroy irises that have been exposed to heavy frost; when they rot, these plants can become breeding grounds for borer beetle eggs.
 In the spring, remove weeds and protect against pests. When the weather gets warmer, the snow will disappear on its own, and you can remove any protective mulch you used in winter. While new plants are sprouting, watch out for weeds near your irises and pull them out as early as possible. Use eco-friendly weed killers to keep grass and weeds away from your irises.
 - In addition, you should be on the lookout for any intrusive pests, especially slugs. There are many, many ways to attract slugs, with commercial products, as well as homemade home remedies. A very easy way to attract snails is a beer trap; fill a wide-mouthed jar halfway with beer and bury the jar in the ground to the brim. Snails, attracted by the beer, will fall into it and drown.
 Monitor growth and provide nutrients in the spring. Irises can benefit from a small amount of fertilizer every now and then during the growing season after you plant them. Do not use fertilizer with a high nitrogen content; this can cause excessive leaf growth (and, eventually, rot). Water after sprinkling the fertilizers to prevent fertilizer 'fire'. Below are a number of fertilizers that are good to use with irises:
 - Universal "5-10-10" fertilizer
- Universal "5-10-5" fertilizer
- Bone meal
- Superphosphate
 Repeat the cycle as needed! As the iris matures further, the amount of time spent on maintenance will be drastically reduced. Still, even if your plant has been rooted for years, it's a good idea to check it every few weeks just to make sure there aren't any problems. As long as the plant gets enough sun during the growing season, regular rainwater, and nutrients from the soil, it should all be fine. Irises are perennial plants, so they will propagate gradually through the roots over many growing seasons.
 - Every three to five years divide and transplant the irises in full flower beds to keep them from competing for water and soil.
Tips
- Irises are relatively resistant to deer.


