Author:
Eugene Taylor
Date Of Creation:
12 August 2021
Update Date:
1 July 2024
Content
- To step
- Method 1 of 3: Using a plastic bottle
- Method 2 of 3: Making a piggy bank from a preserving jar
- Method 3 of 3: Using papier-mâché
- Warnings
- Necessities
- Using a plastic bottle
- Making a piggy bank from a preserving jar
- Using papier-mâché
It's never too early to start saving. With a piggy bank you can make sure that all your money is in a safe place in a fun way. You can of course just buy a piggy bank in the store, but nothing will stop you from making one yourself. There are a few different ways you can make your own piggy bank and you can use materials you may already have at home.
To step
Method 1 of 3: Using a plastic bottle
 Rinse the plastic bottle with plain tap water. There are no restrictions on the size of your piggy bank, but try to use a plastic bottle with a capacity of half a liter to a full liter. Rinse the bottle with water and let it sit for 10 minutes to allow it to dry.
 - Keep the cap on the bottle. This will be the pig's snout.
 Attach the legs to the other side of the bottle. Cut four egg cups from an egg carton with scissors. Then have an adult use a hot glue gun on a low setting to stick the caps to the bottle by applying glue to the edges of the egg cups. Then stick the legs on the other side of the bottle, so opposite the side with the slot for the coins.
 - The coin slot should face up when the piggy bank is upright.
 Decorate the pig with the remaining materials. Now that you've made a simple pig, it's time to get creative with your craft. Make a tail by twisting a spiral in a piece of pink pipe cleaner. Draw nostrils on the pig's snout with a black marker. Cut two triangles from pink paper or felt to make ears and stick them on the bottle.
 - You can make eyes for the pig by sticking wiggle eyes on the snout, or by drawing, cutting and sticking eyes yourself.
WarningMany of these require a hot glue gun, so have an adult around to help you decorate the pig.
Method 2 of 3: Making a piggy bank from a preserving jar
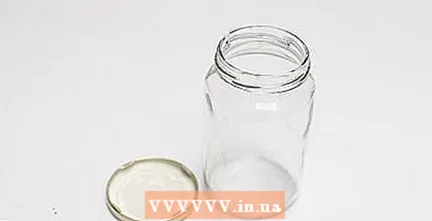
 If you are just starting out, choose a preserving jar with a capacity of 500 ml. If you want to save more money, choose a preserving jar with a capacity of 1 to 4 liters. If you don't have canning jars at home, you can buy them on the internet, at a hobby store or a household goods store. Make sure the jar has a lid.
 - If you don't have a preserving jar, use a jar that had spaghetti sauce in it. Make sure to rinse the jar thoroughly before turning it into a piggy bank. You can just put the pot in the dishwasher.
 Using soap and water, peel the label off the jar. Remove the label from your new piggy bank before putting money in it. To do this, first pull as much of the label off the jar with your fingers. Then squeeze a few drops of soap on a sponge and hold the pot under the hot tap. While the water is running on the label, scrub the paper off with the sponge to remove the label completely.
 - Let the pot sit for 15-20 minutes so that it can dry. When the pot is dry you can use it as a piggy bank.
 Decorate the pot however you like. There are a number of ways in which you can do this, because you can decide for yourself what your piggy bank will look like. A nice idea is to put colorful, decorative tape called washi tape on the jar and then put stickers on the parts of the jar that are not yet covered. Then write your name with relief paint on the pot or make drawings with it on the pot.
 - Washi tape, stickers, and relief paint can be purchased at craft stores and online.
- Stick the tape and stickers on the jar before you start using relief paint. After dyeing, let the pot sit for 6 hours so that it can dry completely.
Method 3 of 3: Using papier-mâché
 Blow up a balloon. Make it as big as you want to make your piggy bank. Button the balloon when it is the desired size.
 - It does not matter what color the balloon is, as it is intended as a texture to apply the papier-mâché to and will not be visible.
 Decorate the piggy bank with paint and accessories. Paint the piggy bank with spray paint or acrylic paint, making sure to apply an even coat of paint to the surface. Then make a tail by twisting a spiral in a pink pipe cleaner. Have an adult help you glue the tail to the pig's butt with hot glue. You can stick wiggle eyes on the pig to give it eyes, or draw eyes yourself, cut them out and stick them on the pig. You can know what you are doing yourself.
 - There are other ways to decorate the pig by drawing nostrils on the pig's snout with a black marker and cutting two triangles from pink paper or felt and gluing them to the pig to serve as ears.
- If you don't want to use paint, you can also color the piggy bank with markers.
Warnings
- You may need to cut a piece out of the piggy bank when it is time to take the money out. If you only make a slot for the coins in the piggy bank and not an opening to get the money out, you will have to damage part of your piggy bank to get to your money.
Necessities
Using a plastic bottle
- Empty plastic bottle
- Creasing knife
- Scissors
- Hot glue gun
- Cardboard egg carton
- Pipe cleaner
- Markers
- Acrylic paint
- Googly eyes
- Craft Cardboard
- Felt
Making a piggy bank from a preserving jar
- Weck jar or jar that used to contain spaghetti sauce
- Creasing knife
- Labels
- Adhesive tape
- Washi tape
- Pen or pencil
- Relief paint
- Stickers
Using papier-mâché
- Flower
- Glue
- Water
- Bag of balloons
- Pan to mix in the pasta
- Newsprint
- Brown paper bags or butcher paper
- Cardboard egg carton
- Creasing knife
- Hot glue gun
- Pipe cleaner
- Googly eyes
- Markers
- Scissors
- Spray paint or acrylic paint
- Pen or pencil


