Author:
Charles Brown
Date Of Creation:
10 February 2021
Update Date:
1 July 2024
Content
- To step
- Part 1 of 3: Cutting the back
- Part 2 of 3: Cutting the sides and top
- Part 3 of 3: Cutting the bangs
- Tips
- Necessities
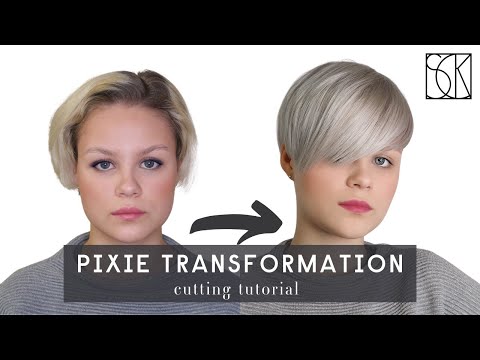
Long hair is beautiful, but it requires a lot of maintenance and effort. Short hair is much easier to care for, and it can both beautiful as well as nice. It is suitable for most face shapes (especially long and heart-shaped faces!) And hair textures, including curly. It's great for both thin and thick hair too! This wikiHow focuses on cutting someone else's hair, but you can also apply it to your own hair; you may need to adjust some techniques so that you can perform them more comfortably.
To step
Part 1 of 3: Cutting the back
 Start with damp hair that has already been cut to at least shoulder length. It is a lot easier to work with hair that is already cut slightly short than with long hair. If the client's hair gets below the shoulders, make it a ponytail and cut it. This is known as a rough cutting and makes the length more manageable.
 - Don't worry if it looks uneven. In the following steps you will remove more length and make everything more even.
- Do not cut too close to the person's head.
- The ponytail makes cutting easier because the hair stays tied together. It also gives the customer the opportunity to donate it to her.
 Refine the hairline along the neck. Run a comb through the hairline and pull it up. Place your fingers just behind the comb, make a V shape with your index and middle fingers and close them against the hair on the neck. Then you cut the hair just under the fingers. Repeat this along the hairline, keeping your fingers at a slight angle.
 - Work with a thin strand of hair, no longer than the length between your first and second knuckle.
- If you cut curly hair, you should cut it 3.5 to 5 cm long.
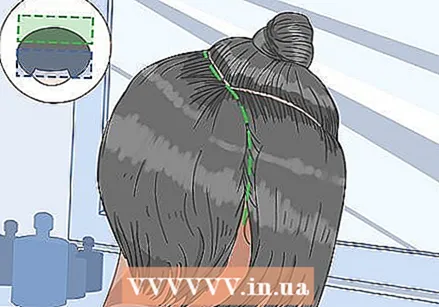 Separate the front part of the hair from the back part. Use the handle of a pointed comb to make a vertical part on each side of the head, just behind the ears. Both separations should meet at the top of the head. Brush the hair in front of the ear forward, out of the way.
 - If the hair doesn't stay forward, secure it with hair clips.
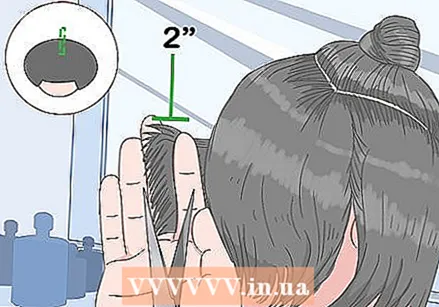 Cut a vertical section of hair down the center back of the head. Take a vertical strand of hair from the center of the client's head, comb it through and pin it between your index and middle fingers. Slide your fingers down to where you want to cut, then trim the hairs that stick out in front of your fingers.
 - Pixie cuts are short - no longer than 5 cm.
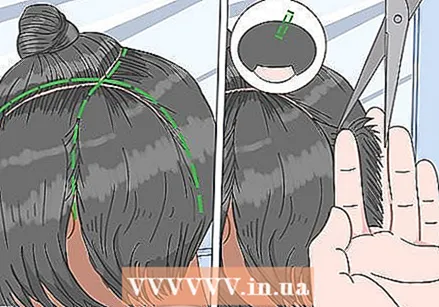 Cut a horizontal section of the hair across the vertical. Pinch a horizontal section of the hair right over the section you just cut. Slide your fingers down until you see the cut points of the vertical section. Cut the horizontal section to align with the vertical.
  Continue to cut the hair in vertical and horizontal sections. Work towards the right side of the head and repeat on the left. Always alternate vertical and horizontal sections. With this technique you can measure the not yet cut strands with the already cut strands.
 - Stop when you reach the vertical parts just behind the ears.
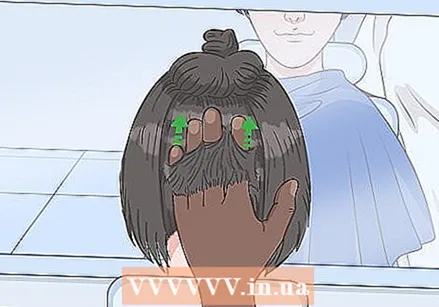 Connect the hair by combing and cutting it upwards. Comb the hair upwards with a fine-tooth comb. Trim the hair that is sticking through the teeth as you comb upward. Create a soft and rounded line that follows the curve of the client's head. You will not cut everything in front of the comb, which is actually the intention.
 - At this point, you only need to remove small pieces of hair. If you realize that you still need to cut a lot of hair, then you should cut again using the techniques discussed above and then try to reconnect the hair.
Part 2 of 3: Cutting the sides and top
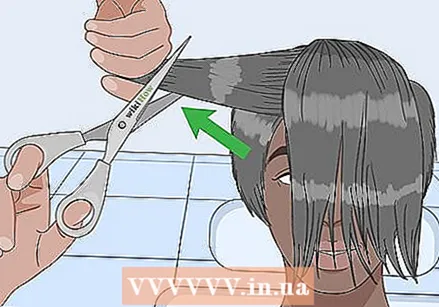
 Cut the hair on the sides using the same technique as on the back. Hold thin vertical and horizontal sections of hair between your index and middle fingers, then cut them with the hairdressing scissors. Do one side first, then the other.
 - Hold some of the cut strands against the uncut strands so you know how much to cut.
- To make sure the sides are even, straighten the hair on both sides, then compare them in the mirror.
 Trim the hair around the ear. Comb the hair down over the ears. Gently cut the hair around the ears, scissors pointing up. Use the natural hairline around the ears as a guide. Work back to front and then front to back.
  Consider an undercut to give it a twist. Start by combing the hair up at the back, then trim off anything sticking out of the comb. Work your way across the back and up the sides. Finish it off by pulling the hair away from the head with a comb and then going over it with clippers.
 - Finish the haircut by running the clippers at the hairline along the neck and ears.
- If you're doing an undercut, consider blow drying the hair straight first.
 Cut the top part of the hair. Hold a vertical section of the hair between your index and middle fingers. Pick up a few strands of hair cut from behind, and tilt your fingers outward, away from your head. Trim the hair sticking out of your fingers.
 - How far you tilt your fingers up depends on how long you want the top. The further you tilt your fingers up, the longer the top will be.
 Continue to cut the top, connecting it to the back and sides. Work across the back of the crown using the same technique as before and do the same on the sides. If you have hair left on top, measure it against the already cut strands at the tip of the corners.
 - For the top of the head, gather the hair parallel to the hairline and cut it straight. Next, you need to compare the hair on the top of the head with the other sections and sides of the head. If you don't cut enough from the top, you can end up with a mushroom shape.
- Leave the bangs alone for now.
Part 3 of 3: Cutting the bangs
 Comb the bangs forward and then cut them to the length you want. Hold part of the hair between your index and middle fingers. Slide your fingers down to where you want to cut (e.g. just below the eyes), then trim the hair under the fingers. Work your way through the bangs from side to side.
 - Choose a length and style for the bangs that you think would suit your client's face shape (or your own face). For example, many stylists recommend long and feathery bangs for a square face, and side-swept bangs for a heart-shaped face.
- Remember that the hair shrinks after drying, so be careful when cutting the bangs. Leave the bangs longer than the desired length, because if the hair is too long, you can trim it after drying.
- Measure the uncut strands against the cut strands.
 Join the bangs at the top of the hair. Hold a vertical section of the bangs between your index and middle fingers. Pull the hair upwards and measure it against the already cut strands on top of the head. Tilt your fingers and cut the hair that is sticking out. Work from one side of the bangs to the other.
 - Bring your fingers down into the bangs. In this way, the hairs at the top of the bangs connect to the hairs at the top of the head.
 Consider thinning the hair along the top and bangs. Pull up a thin strand of hair and then gently slide the scissors along the hair shaft to make short and small cuts. Repeat this technique wherever you think the hair needs to be thinned (usually along the top and bangs).
 - This technique works especially well for undercut pixies.
- Join the thinned hair by holding the lock between your front and middle fingers and then cutting up into the hair with the scissors.
- You can also use thinning scissors on the ends of the hair to create texture and remove the volume. However, do not use the scissors in the center or at the roots, as this can make your hair frizzy.
 Comb, dry, and style the hair as you wish. Pixie hair is fun and sassy, so a simple blow dry is all most people need. You can further put the hair in spines with a little hair wax or pomade.
 - If your hair looks frizzy after you dry it, use a styling cream or foam to tame it.
- Check the hair after styling it. If necessary, you can trim strands that are too long.
- You can also add volume to a pixie by spraying a little dry shampoo at the roots. Work it through to the ends to give the style a bit of a messy texture.
Tip: you can spice up a pixie by adding a little color! Paint your entire hair or add some beautiful highlights to create more dimension and depth.
Tips
- Comb through the hair from time to time while cutting. This will remove all tufts of hair.
- You can cutting your own hair, but it will be more difficult. Consider buying a three-way mirror so you can see what you're doing from the back.
- Provide reference photos, especially if you cut your own hair.
- Place a hairdressing cape around the client's shoulders. Cutting your own hair can also be a good idea.
- Cut curly hair longer; it gets shorter as it dries.
- Cut curly hair in the direction of the curl, not against it.
- Short haircuts such as a pixie need to be cut more often than longer haircuts. You may need to trim it every four to six weeks.
- If you decide to grow your pixie, cut your hair only around your ears and the back of your neck as it grows. Then you can make the transition to a bob.
Necessities
- Hairdressing scissors
- Pointed comb
- Hair clips (if needed)


