Author:
Christy White
Date Of Creation:
10 May 2021
Update Date:
25 June 2024

Content
With a drop-down menu you create a clear and hierarchical overview of all important parts on the page and the subsections that the page contains. You just have to move your mouse over the main sections to make the sub sections appear. You can create a dropdown menu using only HTML and CSS.
To step
Part 1 of 2: Writing the HTML
 Create your navigation section. Normally, you'll use nav> for the website-wide navigation bar, header> for smaller link sections that are page-bound, or div> if no other option seems to fit. Place this in a div> element so you can adjust the style of both the container and the menu itself.
 - div>
- nav>
- / nav>
- / div>
 Give each section a class attribute. We will use the class attribute later to modify the style of these elements with CSS. Give both the container and the menu their own class attribute.
 - div>
- nav>
- / nav>
- / div>
 Add a list of menu items. The unordered list (ul>) contains the items of the main menu (list items li>), if the user moves his mouse over it, he / she sees the dropdown menus. Add the class "clearfix" to your list element; we'll get to this later in the CSS spreadsheet.
 - div>
- nav>
- ul>
- li> Home / li>
- li> Employees
- li> Contact
- / li>
- / ul>
- / nav>
- / div>
 Add links. If these top-level menu items also link to their own pages, you can now insert the links. Link to a nonexistent anchor (such as "#!"), Even if they don't link to anything, so the user's cursor will look different. In this example, Contact leads nowhere, but the other two menu items do:
 - div>
- nav>
- ul>
- li>a href = "/">Home/ a>/ li>
- li>a href = "/ Employees">Staff members/ a>
- / li>
- li>a href = "#!">Contact/ a>
- / li>
- / ul>
- / nav>
- / div>
 Create sublists for the dropdown items. After the style has been created, these lists form the dropdown menu. Place the list in the list item that the user will mouse over. Add a class attribute and a link just like before.
 - div>
- nav>
- ul>
- li> a href = "/"> Home / a> / li>
- li> a href = "/ Employees"> Employees / a>
- ul>
- li> a href = "/ borsato"> Marco Borsato / a> / li>
- li> a href = "/ titulaer"> Chriet Titulaer / a> / li>
- / ul>
- / li>
- li> a href = "#!"> Contact / a>
- ul>
- li> a href = "mailto: [email protected]"> Report a problem / a> / li>
- li> a href = "/ support"> Customer Support / a> / li>
- / ul>
- / li>
- / ul>
- / nav>
- / div>
Part 2 of 2: Writing the CSS
 Open your CSS stylesheet. Post a link to your CSS stylesheet in the head section of your HTML document if the link is not already there. In this article, we will not cover the basics of CSS, such as setting a font and background color.
  Add clearfix code. Remember adding the "clearfix" class to the menu list? Normally, the elements of the drop-down menu have a transparent background, which allows other elements to be moved. A simple adaptation to the CSS can solve this problem. Here's a nice, quick fix, although it won't work in Internet Explorer 7 and earlier:
 - .clearfix: after {
- content: "";
- display: table;
- }
 Create the basic design. With this code you can place your menu at the top of the page and hide the dropdown elements. This is very simple on purpose so that we can focus on the relevant code. You can modify it later with additional CSS code, such as padding and margin.
 - .nav-wrapper {
- width: 100%;
- background: # 008B8B;
- }
- .nav menu {
- position: relative;
- display: inline-block;
- }
- .sub menu {
- position: absolute;
- display: none;
- background: # 555;
- }
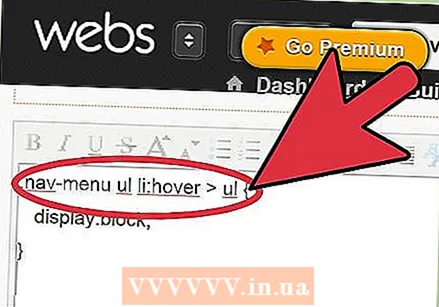 Make the dropdown items appear when you hover your mouse over them. The elements in the dropdown list are now set so that they are not shown. Here's how to make an entire sublist appear as soon as you hover over the "parent":
 - .nav-menu ul li: hover> ul {
- display: block;
- }
- Note - if additional menus are hidden in the menu items in the dropdown menu, the properties added here will apply to all menus. If you only want the style to apply to the first level of the dropdown menus, use ".nav-menu> ul" instead.
 Indicate with an arrow that there is a dropdown menu. Web designers normally show with a down arrow that an element opens a dropdown menu. This code adds that arrow to every element in your menu:
 - .nav menu> ul> li: after {
- content: " 25BC"; / * escaped unicode for the down arrow * /
- font-size: .5em;
- display: block;
- position: absolute;
- }
- Note - Adjust the position of the arrow with the properties top, bottom, right or left.
- Note - If not all of your menu items have dropdowns, do not change the appearance of the entire class nav menu. Instead, add another class (such as dropdown) to each li element where you want an arrow. Refer to that class in the code above.
 Adjust the padding, background and other properties. The menu should work now, but it's not very nice yet. With the properties in CSS you can customize how each class or element looks and where they are located.
Tips
- If you want to add a dropdown menu to a form, it is very easy in HTML5 with the element select>.
- The link a href = "#"> scrolls to the top of the page, and a link pointing to a nonexistent anchor, such as a href = "#!">, Does not scroll. If that feels too sloppy, you can change how the cursor looks with CSS.
- When you copy and paste the sample code, remove all bullets.


