Author:
Morris Wright
Date Of Creation:
25 April 2021
Update Date:
1 July 2024
Content
Did you ever think you could use a potato as a battery? Batteries produce electricity by moving electrons back and forth between two metal plates. What if you don't have a battery at home, but you do have a potato? Potatoes contain phosphoric acid, a substance that can act as the chemical needed to move electrons back and forth between the metal plates. By sticking something made of metal into a potato, you can make a battery with just a few household resources. Let's start.
To step
Method 1 of 2: Making a potato battery
 Gather your supplies. To make a single potato battery, you need a potato, a galvanized nail, a copper coin, two alligator clips with clamps on each end, and a voltmeter.
 - Galvanized nails are ordinary nails with a zinc coating. You can buy them at any hardware store and DIY store.
- Use a fresh potato, because the potato must contain juice for the test to be successful.
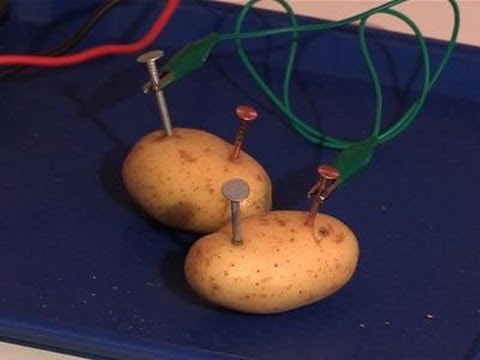
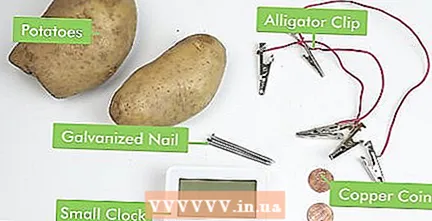 Gather your supplies. To make a potato battery you will need two potatoes, two galvanized nails, two copper coins, three alligator clips with clamps on both ends and a small clock.
 - Galvanized nails are ordinary nails with a zinc coating. This layer of zinc is necessary for this experiment to succeed. You can buy these nails at any hardware store and DIY store.
- Copper coins can also be purchased at a hardware store or DIY store if needed.
- It doesn't matter what color your alligator clips are, as long as they have clips on both ends.
- Use firm, fresh potatoes. The potatoes must contain juice for this test to be successful, so it will not work with dried potatoes.
- Before you start, remove the battery from the clock.
 Attach one clamp to the copper coin and the other clamp to the positive pole in the battery compartment. Look at the battery compartment and see which side the plus sign is on. Attach the clamp to the positive terminal at one end. Attach the clamp at the other end to the copper coin in the first potato.
 - Make sure the clip is securely attached to the coin and battery compartment.
- This is the first connection in the circuit for the battery.
 Attach the second clamp to the galvanized nail in the second potato and the negative pole in the battery compartment. There is a minus sign on the other side of the battery compartment. Attach a new clamp to this negative terminal. Attach the clamp at the other end to the galvanized nail in the second potato.
 - Again, make sure to tighten the clamps securely.
- Both potatoes should now be clock-connected, but not to each other. One clip should be connected to the copper coin in one potato and a second clip should be connected to the galvanized nail in the second potato.
 See if the clock works. The second hand of the clock should now move. It is fully powered by the potato battery. If the clock does not work, make sure you have attached the correct clamps to the battery compartment. The copper coin must be connected to the plus pole and the galvanized nail to the minus pole.
 - If it still doesn't work, reverse the clamps.
- Also make sure to use fresh potatoes.
- When you're done, loosen all clamps and put the battery back into the clock.
Tips
- You can also try this with other fruits and vegetables, such as lemons.
Warnings
- Make sure that children only perform this experiment under supervision. Nails and wires are sharp and can cause injury if not handled properly.
Necessities
- Two galvanized nails
- Two copper coins / pieces of copper wire
- Two potatoes
- Three alligator clips
- Working clock


