Author:
Frank Hunt
Date Of Creation:
20 March 2021
Update Date:
1 July 2024

Content
- To step
- Method 1 of 4: Use Artboards to crop an image
- Method 2 of 4: Use vector graphics to cut out simple objects
- Method 3 of 4: Using a clipping mask to crop an image
- Method 4 of 4: Using an opacity mask to crop an image
- Tips
Adobe Illustrator is used by graphic designers to design logos, images and documents. Unlike photo editing programs such as Adobe Photoshop, Illustrator does not have a tool to crop (crop) an image. This is a guide for cropping in Illustrator using a number of different methods.
To step
Method 1 of 4: Use Artboards to crop an image
 Place the Artboard around the piece you want to crop and adjust the size to your liking. This makes it possible to select an area that you can save as a file. You can then use it as is or load it into another Illustrator document.
 - Select the Artboard tool from the Illustrator toolbox. Alternatively, it is also possible to use a keyboard shortcut: "Ctrl + O" or "Cmd + O."
- Resize the Artboard by dragging the Artboard frame handles.
- Hit enter when you're done to confirm cropping.
 Save the image with the “use artboard” option checked. From the menu select “File”, “Export” or “Save for web”, then make sure the “use artboard” option is turned on.
 - Choose the file format you want to use from the “Export” or “Save for web” dialog box.
- This makes it possible to save the cut-out part as a raster image.
- The original image will not be kept, so anything you did not include when cropping will be lost. Save the original file as a backup, if necessary.
Method 2 of 4: Use vector graphics to cut out simple objects
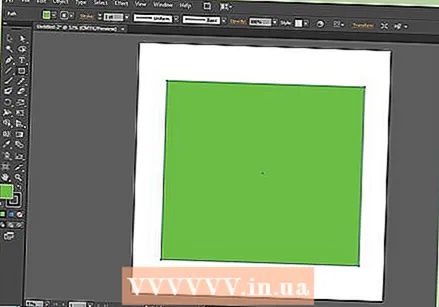
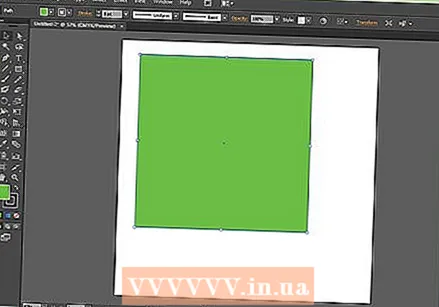 Draw a rectangle or other vector image. We will use this vector shape to cut out part of the area where the shape overlaps your image.
 - Depending on what shape you want the cut out part of your image to have, select the shape tool you need from the Illustrator toolbox.
- Objects with a different or modified shape can also be used for this.
- It is also possible to crop with shapes you made with the pen tool.
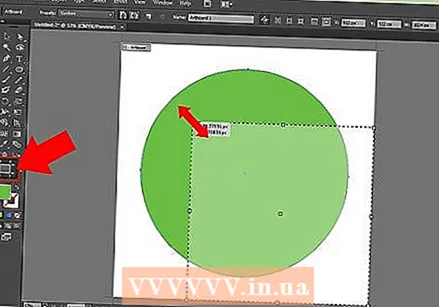
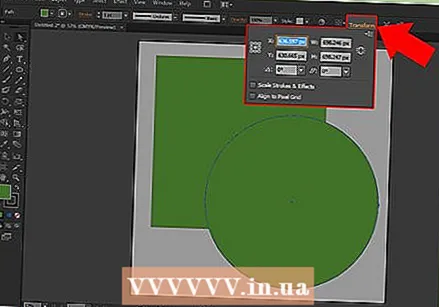
 Move and resize the shape depending on the object or image you want to crop. Click and drag the shape using the Selection tool to move it and use the bounding box handles associated with the shape to resize.
 - To resize the shape to specific dimensions, select the shape and use the “Transform” box to enter the desired shape width and height.
- To keep the proportions of a shape while resizing, press “shift” while dragging one of the shape's handles.
- To resize the shape to specific dimensions, select the shape and use the “Transform” box to enter the desired shape width and height.
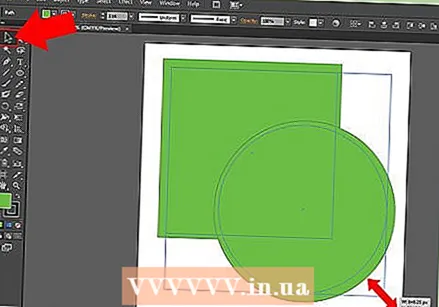
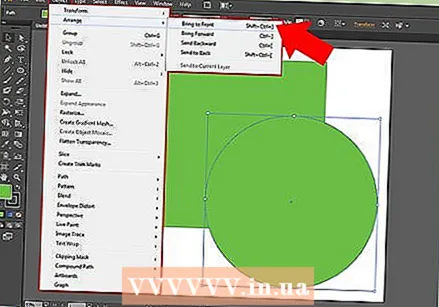 Make sure the shape is on top of what you want to cut. Select the shape and use Object> Align (the object menu in the main menu) to make sure it is placed correctly.
 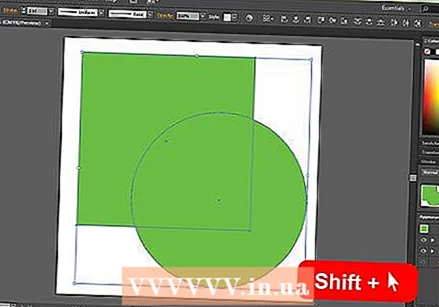 Select both the shape and the image you want to crop. With the selection tool you can either drag both objects or hold down the “shift” key and then click on the shape.
 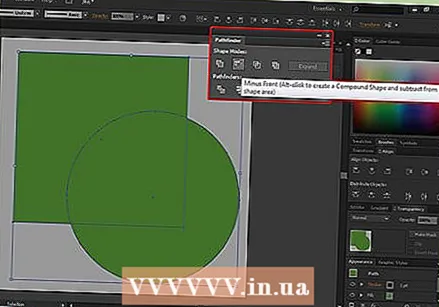 Go to the "Pathfinder" menu and click on "Min Front". This cuts the shape of the top object from the underlying image.
 - “Min Front” is the second option in the panel.
- The Pathfinder window can be opened by selecting Windows> Pathfinder from the main menu.
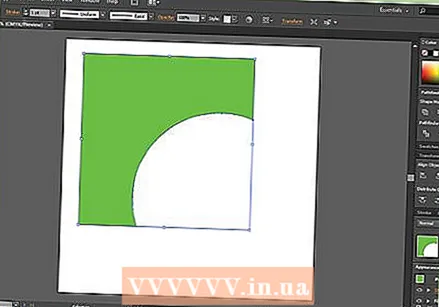 Keep in mind that this method is only for simple objects.
- For the more complex images, parts of the image may be changed.
- This is a “final edit”, which means that the cut part will be lost.
Method 3 of 4: Using a clipping mask to crop an image
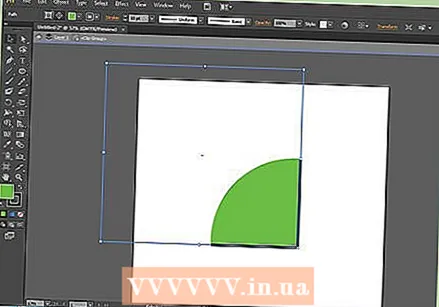
 Draw a rectangle or other object. Depending on the desired shape for the cropped image, select a drawing tool to use from the tools window.
 - Shapes that have been distorted or otherwise altered can also be used to crop an image.
- You can also crop with shapes created with the pen tool.
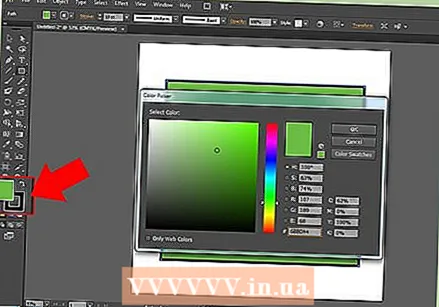 Adjust the “line” and “fill” of the shape. This makes it easier to see what you are doing.
 - A simple white line and no fill is clearly visible against a white background. Use a different line color for lighter images.
- Change the line thickness and the fill value of the shape by selecting it and clicking the colored or black / white frames in the tools window.
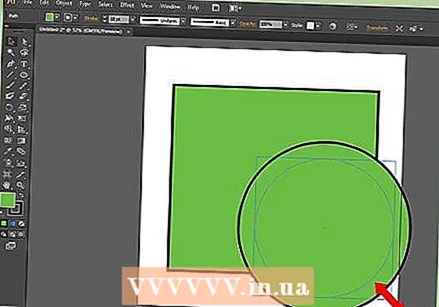 Move and resize the shape around the area you want to crop. Click and drag the shape using the Selection tool, and use the bounding box handles to adjust the size.
 - To resize the crop area to a specific size, select the shape and use the “transform” box to fill in the desired height and width of the shape.
- To keep the proportions of a shape while resizing, press “shift” while dragging the shape's handles.
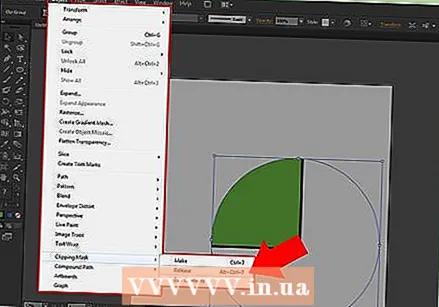
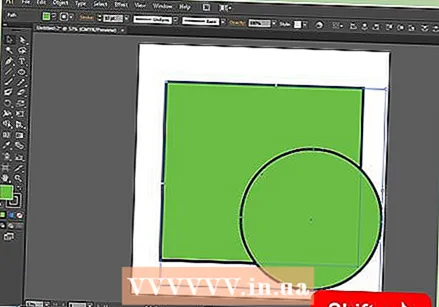 Select both the shape and the image you want to crop. With the selection tool you create a frame around both objects, or you hold down “shift” while first clicking on the image and then on the shape.
  Make a clipping mask. Click on “Object” in the top menu bar, then “Clipping Mask> Make” from the drop-down menu.
 - Alternatively, press “ctrl + 7” or “Cmd + 7” to create a clipping mask.
- The line will disappear automatically.
- The image you cropped will remain intact “under” the clipping mask.
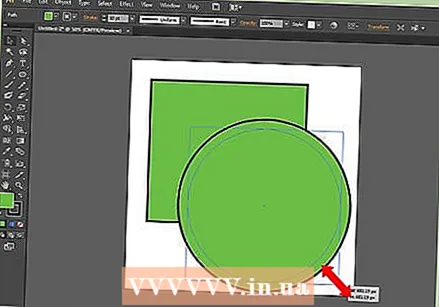
 Adjust the clipping mask as desired. You can move both the mask and the image independently.
 - Sometimes objects are misaligned and you may need to adjust something.
- You can click on the path of the mask to move the clipping mask without moving the image.
- You can click on the image and then double-click to move the image below the mask.
- You can also adjust the points in the path of your clipping mask.
 Remove the clipping mask if you want to undo the cropping. Remove the clipping mask by selecting the image, then Object> Clipping Mask> None from the top menu bar.
  Understand why we use a clipping mask when cropping. This is a good, fast, and “non-destructive” way to crop an image.
 - The original image is retained, making it easier to undo or adjust the cropping as you work with it.
- You cannot “blur” or change the transparency of the crop. The clipping mask uses the shape's path to hide parts of the image, no more than that.
- For a more flexible yet more labor-intensive cropping method, see “Using an opacity mask to crop an image”.
Method 4 of 4: Using an opacity mask to crop an image
 Draw a rectangle or other vector object. Depending on the shape you want the cropped image to have, select an appropriate drawing tool.
 - Objects that have been distorted or otherwise edited can also be used for cropping.
- You can also crop with shapes made with the pen tool.
 Move and resize the shape around the area you want to crop. Click and drag the shape using the selection tool and use the frame handles to adjust its size.
 - To resize the crop area to specific dimensions, select the shape and use the “Transform” box to specify the desired width and height of the shape.
- To keep the proportions of the shape while resizing, hold down “shift” while dragging the frame handles.
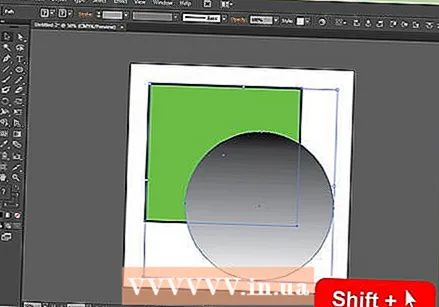
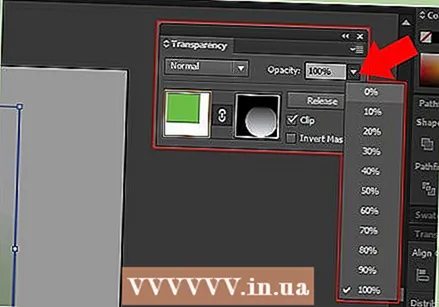
 Adjust the line thickness and fill of the shape to what is desired for cropping. The opacity mask uses gradations of white and gray to determine transparency, which is what you will or will not see in the cropped area.
 - White gives a completely opaque area while black is completely transparent, and the lighter or darker gray tones give different levels of transparency.
- Change the stroke and fill attributes by selecting the shape, then clicking the colored (or black / white) frames of the tool window. Black and white gradients may also be selected.
- For best results you can also remove all lines. “No line” will be displayed as a white rectangle (with nothing in the center) with a red diagonal line through it.
 Also consider other tools to create an even more interesting crop. More complex effects can be created by using opacity masks, using different tools that change shades of gray within the shape you use to create the mask.
 - The edges of the shape can be blurred to create a vignette.
- A black and white transition can be used to blur parts of the image.
- A black and white photo can also be used to achieve an interesting covering effect.
- The brush can be used to apply black, gray and white areas to specific areas.
 Select both the shape and the image you want to crop. With the selection tool you drag either both objects, or you click on the image, hold down “shift” and then click on the shape.
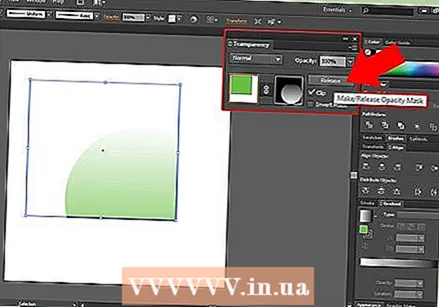
 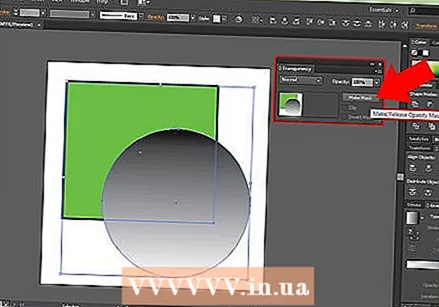 Create an opacity mask using the Transparency panel. The Transparency panel can be opened by selecting Window> Transparency from the top menu bar. Click on “Create Mask” with both objects selected to create your opacity mask.
 - If you don't see the "Create Mask" option, click the arrow at the top of the Transparency panel.
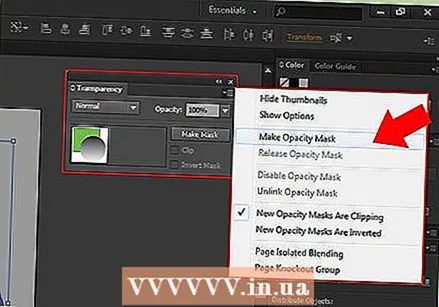
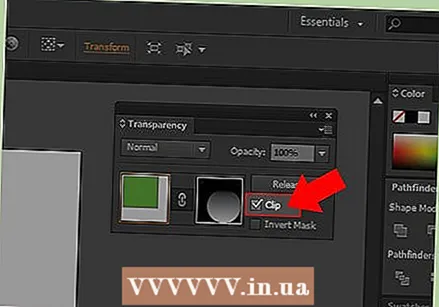
- Make sure “Cut” is checked if you want the opacity mask effect to be limited to the area of the shape.
- Make sure the "regular" blending mode is selected, unless you want to try a different one.

- The image you cropped remains intact “under” the opacity mask.
- If you don't see the "Create Mask" option, click the arrow at the top of the Transparency panel.
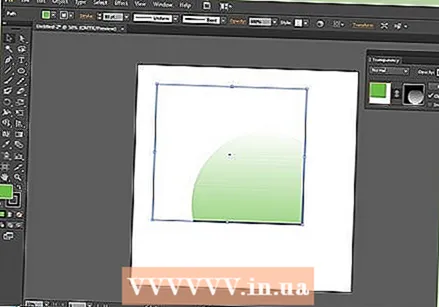
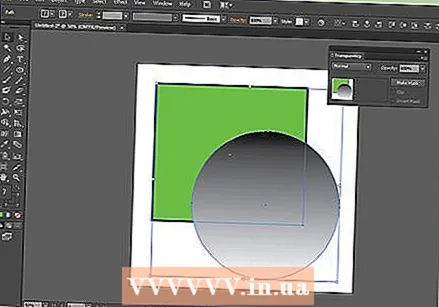
 Adjust your opacity mask as needed. You can move the mask and image independently by releasing the link icon in the center of the Transparency panel.
 - You can click on the mask path to move only the opacity mask without the image.
- You can click and then double-click on the image to move the image under the mask.
- You can also adjust the points in the path of your opacity mask.
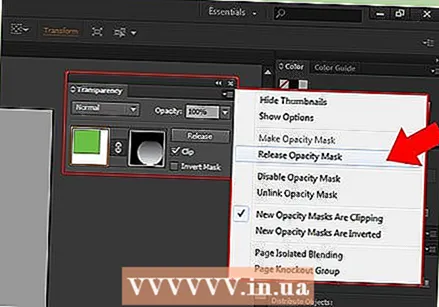
 Remove the opacity mask if you want to undo the cropping. Remove the opacity mask by selecting the masked image, and selecting “release opacity mask” from the Transparency panel menu.
 - The Transparency panel menu is found by clicking the series of small horizontal lines in the top right corner of the Transparency panel.
- Your original image will be preserved after applying the opacity mask.
- The Transparency panel menu is found by clicking the series of small horizontal lines in the top right corner of the Transparency panel.
Tips
- It is also an option to crop the image in Photoshop or MS Paint, and then load it into Illustrator by cutting and pasting.


