Author:
Charles Brown
Date Of Creation:
2 February 2021
Update Date:
1 July 2024
Content
- To step
- Method 1 of 3: Create an Apple ID on the website
- Method 2 of 3: Create an Apple ID on your iPhone or iPad
- Method 3 of 3: Create an Apple ID with iTunes
- Tips
- Warnings
With an Apple ID you get access to Apple products and services. You also need an Apple ID to make purchases from the iTunes Store or the App Store, and you can only use iCloud if you have an Apple ID. Creating an Apple ID is a piece of cake, and fortunately completely free. In this article you can read how.
To step
Method 1 of 3: Create an Apple ID on the website
 Go to Apple's page where you can create an Apple ID. You can find the page here. Click the "Create an Apple ID" button.
  Enter your email address. You need a valid email address to create an Apple ID. This will be your contact address and your username. If you later need to log in with your Apple ID, you will need to use this email address to log in.
  Come up with a strong password. All purchases will be linked to this account, as well as your personal information. A strong password is therefore very important. Use lowercase, uppercase, numbers, and symbols for a strong password.
 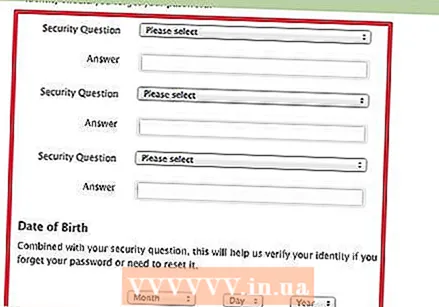 Fill in a security question and your date of birth. This is used in case you have forgotten your password and want to create a new password. Apple will then use this information to verify your identity.
 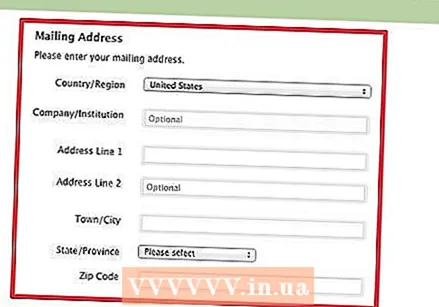 Enter your name and address. Apple needs this information for the purchases you will make with this Apple ID.
  Indicate that you do not wish to receive emails from Apple. If you do not wish to receive information about updates and newsletters, do not forget to check the ticked options.
  Enter the "Captcha". Retype the letters you see in the Captcha screen. If you can't read it, you can refresh the image.
  Read and agree to the terms and conditions. Before you can create an Apple ID, you must agree to Apple's terms and conditions. Then click the "Create Apple ID" button. You will now receive an email with a confirmation link. Click on the link in your email to complete the process. Ready!
 - If you create an Apple ID through the website, you do not need to provide billing information. But if you then log in to iTunes with your new Apple ID, you will still have to enter this information (billing address and credit card information).
Method 2 of 3: Create an Apple ID on your iPhone or iPad
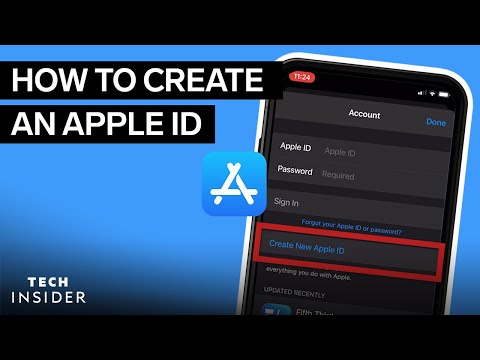
 Tap "Settings" on the Home screen. Scroll down until you see "iTunes and App Stores". Tap "iTunes and App Stores". If an Apple ID is already signed in, tap the name of the Apple ID, then tap "Sign Out".
  Tap "Create New Apple ID". Choose the desired store by tapping "Store" and selecting the Netherlands (or another country). Tap "Done" to confirm your selection, then tap "Next" to go to the next screen.
  Read the iTunes Store Terms. By tapping "Send by email" you can receive the terms and conditions by email for easier reading. To do this, enter a valid email address and tap "Send". If you accept the terms and conditions, tap the "Agree" button at the bottom right of the page. Tap "Agree" again when the confirmation appears.
  Enter your email address, a password and three security questions with the corresponding answers. The password must consist of at least 8 characters (including a number, a lowercase letter and a large letter), spaces are not allowed. Also, it cannot contain three identical characters (eg ggg), it cannot be the same as your Apple ID, and it cannot be a password that you have already entered in the last year. After registration, your email address will become your Apple ID.
 - Enter your billing information. To choose a different type of credit card, tap one of the available options, then tap "Done".
- You can also scroll down and choose "none". Now you go to the next screen without entering your billing information. However, you cannot purchase anything with your Apple ID until you provide the necessary information.
 You will now be directed to a secure page where you will need to enter your Apple ID and password to complete the verification of your account. You should now be the proud owner of an Apple ID.
  Verify your account. After creating your account, a verification email will be sent to the email address you provided as your Apple ID. It contains a link that you must visit to activate your account. Click on it and then enter your new Apple ID and password.
Method 3 of 3: Create an Apple ID with iTunes
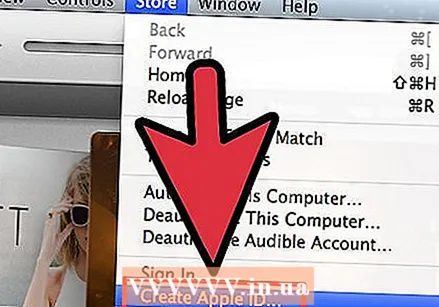 Open iTunes. From the "Store" menu, choose "Create Apple ID". Click "Continue" in the next window.
  If you wish to proceed, you must accept the terms and conditions. Once you have read and agreed to the terms and conditions, click the "I have read and agree to the terms and conditions" check box. Click on "Agree".
  Enter your information. You must provide an email address, which will be your Apple ID. You must also provide a good, strong password of at least 8 characters, consisting of letters and numbers.
 - You must also create a security question and enter your date of birth. This is used to verify your identity if you have forgotten your password.
 Indicate that you do not wish to receive emails from Apple. If you do not wish to receive information about updates and newsletters, do not forget to check the ticked options.
  Enter your billing information. Choose the type of credit card, fill in the details and provide a billing address. This is necessary to make purchases in iTunes or the App Store. It is not necessary for free apps or books.
  Verify your account. You will now be directed to the secure Apple ID page to verify your email address. Enter the email address and password you used to create your Apple ID. Then click on "Verify address".
  Ready.
Tips
- First, make sure you have all the necessary information at hand, such as credit card details.
Warnings
- If you create multiple accounts with false information, Apple can delete your accounts.


