Author:
Roger Morrison
Date Of Creation:
4 September 2021
Update Date:
20 June 2024

Content
- To step
- Method 1 of 2: Number rows dynamically
- Method 2 of 2: Fill a column with consecutive numbers
- Tips
- Warnings
There are two different ways to automatically add numbers to a column. The most reliable way to number rows automatically in Excel is through the function QUEUE to use. This ensures that the cells show the correct row numbers even when rows are added or deleted. Another option (where no formulas are used!) Is to use the Fill function - it's easier, but removing rows can leave a gap in the range of your numbers. Learn to number your rows dynamically or by filling the columns with a continuous sequence.
To step
Method 1 of 2: Number rows dynamically
 Click on the first cell where you want the series of numbers to begin. This method explains how each cell in a column can get a corresponding row number. This is a good method to use if rows are frequently added and removed in your worksheet.
 - To create a base row of consecutive numbers (or other dates, such as the days of the week or the months of the year), see the section Filling a column with consecutive numbers.
 Type = ROW (A1) in the cell (if this is cell A1). If it is not cell A1, use the correct cell number.
 - For example, if you are in cell B5, type = ROW (B5).
 Press ↵ Enter. The cell now shows the row number. If you = ROW (A1) typed, the cell returns one 1 weather. Do you have = ROW (B5) typed, you will see a 5 standing in the cell.
 - To start with a 1 regardless of the row where you want the sequence of numbers to begin, count the number of rows above the current cell, then subtract that number from your formula.
- For example, if you = ROW (B5) and want the cell to have a 1, edit the formula so that it says = ROW (B5) -4, because B1 is 4 rows back from B5.
 Select the with the first number in the series.
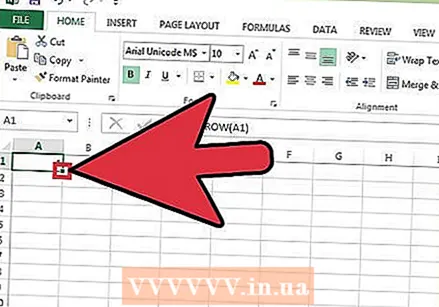 Hover the cursor over the square in the lower right corner of the selected cell. This square is called the Fill handle. When the mouse cursor hovers directly over the Fill handle, the cursor changes to a crosshair.
 - If you don't see the Fill handle, navigate to File> Options> Advanced, and check the box next to "Enable auto-complete cell values".
 Drag the Fill handle to the target cell of your series. The cells in the column now show the corresponding row numbers.
 - If you delete a row in this range, the cell numbers will automatically correct themselves depending on their row numbers.
Method 2 of 2: Fill a column with consecutive numbers
 Click on the cell where your number sequence begins. This method shows you how to add a continuous series of numbers to the cells of a column.
 - If you use this method and at some point want to delete a row, you will have to repeat the steps to renumber the entire column. If you expect to frequently edit rows of data, see the Number Rows section.
 Enter the first number of your sequence in the cell. For example, if you are going to number data in a column, type 1 in this cell.
 - You don't have to start with 1. Your number sequence can start with any number, and can even follow other patterns (such as those of even numbers, in multiples of 5, etc.)
- Excel also supports other forms of "numbering", including dates, seasons, and days of the week. For example, to fill a column with the days of the week, the first cell should read "Monday".
 Click the next cell in the range. This should be the cell directly below the currently active cell.
  Type the second number in the sequence to create a pattern. For consecutive numbers (1, 2, 3, etc.), enter 2 here.
 - If you want the consecutive numbers to look like 10, 20, 30, 40, etc., then the first two cells of the sequence belong 10 and 20 to be.
- If you are using the days of the week, enter the next day of the week in the cell.
 Select both cells by clicking and dragging. When you release the mouse button, both cells will be outlined in bold.
  Hover the cursor over the small box in the lower right corner of the selection. This box is called the Fill handle. When the mouse pointer is directly over the Fill handle, the cursor becomes a crosshair.
 - If you don't see the Fill handle, navigate to File> Options> Advanced, and check the box next to "Enable auto-complete cell values".
 Click and drag the Fill handle down to the last cell of the range you want. When you release the mouse button, the cells in the column will be numbered according to the pattern you indicated in the first two cells.
Tips
- Microsoft offers a free online version of Excel as part of Microsoft Office Online.
- You can also open and edit your spreadsheets in Google Sheets.
Warnings
- Make sure the "Confirm overwrite cells" option in File> Options> Advanced is checked. This helps avoid data entry errors and the need to recreate formulas or other data.


