Author:
Janice Evans
Date Of Creation:
25 July 2021
Update Date:
1 July 2024
Content
- Part 2 of 3: Threading the upper thread
- Part 3 of 3: Threading the lower thread
- Tips
- Warnings
- What do you need
- Check the top side of the sewing machine for a threading pattern before threading the bobbin thread. On some sewing machine models, a small diagram of where the thread should go from the spool for further threading of the bobbin is displayed on top.
 2 Pull the thread off the spool. Pull the bobbin thread to unwind it slightly and loop it through the thread tension disc from the top of the sewing machine. Typically, this tensioner is located at the opposite end of the spool on the top of the sewing machine, approximately above the needle. A small wire can also be attached to the disc tensioner to help hold the thread in place. 3 Attach the end of the bobbin thread to the bobbin. Next, you need to thread the end of the bobbin thread into one of the holes on the spool, and then wind several turns of the thread on the bobbin axis for its primary fixation.
 - Be aware that you can sometimes buy pre-tucked bobbins from fabric and craft stores if you don't feel like messing around with winding the bobbins yourself.
4 Place the bobbin on the bobbin winder pin. The small bobbin winding pin is usually also located on top of the sewing machine, near the spool pin. Place the bobbin on this pin. Then slide the pin to the right or slide the adjacent lock to the left (depending on the sewing machine design) to lock the bobbin in the winding position. - There should be a slight click when the bobbin is locked when you slide the pin or lock into position.
5 Start winding the bobbin. For a few seconds, start winding the bobbin by pressing the foot control of the sewing machine or the special winding button (if your sewing machine has one). This will ensure that the thread is securely attached to the bobbin. After a few turns of the bobbin, you can stop to cut off the end of the thread sticking out of its hole. 6 Finish winding. Gently push down on the sewing machine pedal or press the winding button again to completely fill the bobbin with thread. Winding may stop automatically when the bobbin is full, but if this does not happen, stop it yourself when the thread is almost flush with the outer edge of the bobbin. 7 Remove the bobbin from the pin. If not automatically, slide the bobbin winder pin or catch to its original position and remove the bobbin. The spool and bobbin will still be tied together with the thread, so take your scissors and cut the bobbin so that a tail about 5-7.5 cm long remains on the bobbin. - Once the bobbin is ready, you can start threading the sewing machine.
Part 2 of 3: Threading the upper thread
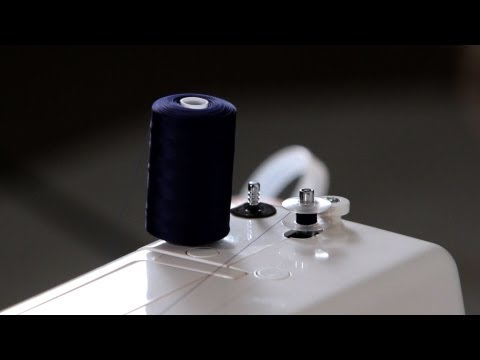
- 1 Place the spool on the spool pin. The spool pin will be located on the top right of the sewing machine. It is noticeably larger in size than the other bobbin-winding pin, which may also be nearby. Place the spool on the pin and unwind a little thread from it.
- The spool can be more stable when sewing if you set it so that the thread comes out from behind it when you look at it from the front.
- If your sewing machine has a threading diagram for the upper thread, pay attention to the markings for the position of the bobbin pin and the direction of winding the thread from the spool.
- 2 Hook the thread onto the thread guide. Pull out the thread from the bobbin on top of the sewing machine. Draw the thread to the left along the top of the sewing machine and pass it through the thread guide located there. The thread guide is a metal or plastic piece that protrudes from above, and the thread clings to it before going down.
- Be sure to pass the thread behind the thread guide, not in front of it, so that it can then safely slide down the front of the sewing machine and make its own U-path there.
- Most likely, the machine will have a circuit for passing the thread through this section.
- 3 Pull the thread down to hook it onto the tension disc. Follow the directions of the arrows on the body of the sewing machine and pull the thread towards you from the thread guide. Next, it will be necessary to hook it to the disc tensioner located below the front on the body of the sewing machine, and then lift the thread up again and pass it through or along the second thread guide (often represented by a slit). As a result, from the front, the thread forms an extended upward letter “U”.
- 4 Pass the thread through the thread take-up. After threading a kind of "U", you will need to hook the thread or pass it through the hole in the thread take-up located at the top, and then lower it down towards the needle mechanism. The thread take-up is a metal piece that sticks out of the body of the sewing machine from the slot of the second thread guide. The thread take-up has a hole or hook through which the thread must pass. When you complete this step, the thread has already drawn a large S-shaped zigzag on the front of the sewing machine.
- 5 Thread the sewing machine needle. Pull the thread towards the needle. Hook the thread on the last thread guide above the needle (if provided by the sewing machine), and then thread the thread into the small eye of the needle and from the opposite side pull out a tail about 10 cm long.Then pass the tail of the thread under the sewing machine foot through the slot in the front of the sewing machine. ...
- The upper thread of the sewing machine is now fully threaded and you only need to thread the lower thread before you can start sewing.
Part 3 of 3: Threading the lower thread
- 1 Remove the hook cover. The shuttle mechanism is usually hidden under a cover, which is located on the platform of the sewing machine body, directly in front of the needle or slightly to the side of it. Find this cover and open it. Inside you will see a hook into which you will need to insert and thread the bobbin.
- The shuttle cover should be easily removable. If you are unable to remove it, check your sewing machine manual to make sure you are actually trying to open the hook.
- In some models of sewing machines, there may be another protective cover on the hook itself. It will also need to be removed to get to the place where the bobbin is inserted.
 2 Unwind about 10 cm of thread from the bobbin. Before inserting the bobbin into the hook, you need to unwind about 10 cm of thread from the bobbin. This should be enough for the upper thread to catch and pull the lower thread up when you turn the handwheel of the sewing machine.
 - Make sure to wind the tail long enough from the bobbin so that it can be picked up by the upper thread later.Ten centimeters is usually more than enough, while a too short tail of the bobbin thread will simply prevent it from being picked up.
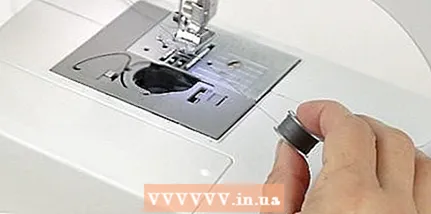
- 3 Insert the bobbin into the hook under the needle. Check the bobbin-to-hook threading pattern shown on the hook cover to ensure that the bobbin thread direction is not mistaken. Thread the bobbin into the hook according to the directions in the diagram.
- If you pull the end of the bobbin thread to the right, the bobbin should start rotating in the hook without any difficulty.
- Close the hook when inserting the bobbin. If the shuttle hook has an extra cover, be sure to replace that as well.
- 4 Bring the bobbin thread up. The lower bobbin thread is still under the throat plate. To bring it up through the hole in the needle plate, place your right hand on the handwheel on the right side of the sewing machine and hold the end of the upper thread with your left hand. Turn the handwheel towards you several times until the upper thread pulls up the loop of the lower thread. Grasp the loop and pull out the end of the bobbin thread, about 10 cm long.
- If the bobbin thread does not pick up, check the hook section to make sure the thread is taking off the bobbin in the correct direction and still flowing easily enough. If the thread is difficult to thread, there may be too much thread wound around the bobbin, in which case you will need to unwind the excess thread from the bobbin.
Tips
- Most sewing machines have the same threading process. If you think the sewing machine you are using does not look like a standard sewing machine, try to find instructions for sewing machines similar to yours, or just try to guess the correct threading yourself.
- Look for the threading diagram of the sewing machine on its body. In many cases, sewing machine manufacturers print guide lines and arrows on them to follow.
- Refer to the sewing machine manual, if you have one. Some manufacturers now make this information available online, so you can do a little web search on your sewing machine model name to get more specific instructions for that particular sewing machine.
Warnings
- Thread the needle with the sewing machine turned off. Serious injury can occur if you accidentally step on the pedal while your fingers are still trying to thread the needle.
What do you need
- Spool of thread
- Bobbin (plastic or metal)
- Sewing machine


