Author:
Sara Rhodes
Date Of Creation:
15 February 2021
Update Date:
1 July 2024

Content
This article will show you how to copy images from your computer to a USB flash drive (flash drive).
Steps
Method 1 of 2: On Mac OS X
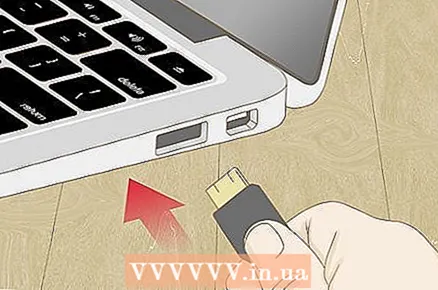 1 Connect the USB flash drive to your Mac OS X computer. Locate the rectangular connectors, called USB ports, located on the sides of your laptop, on the back of your monitor, on the side of your keyboard, or on your desktop computer chassis. Insert the USB stick into the USB port.
 - There is a plastic piece at the top of the USB port; the USB stick is also equipped with a plastic element. Insert the USB stick into the USB port with the plastic piece facing down.
- If you are unable to insert the flash drive into the USB port, turn it over.
- Note that some Mac OS X computers do not have USB ports.
 2 Open Finder. The icon for this program looks like a blue face and is located in the dock, which in turn is located at the bottom of the screen.
 - Perhaps the flash drive will open as soon as you connect it to your computer; in this case, you do not need to open Finder.
 3 Click on the name of the flash drive. You will find it at the bottom of the left pane of the Finder window under Devices. A window with the contents of the flash drive will open; you can drag photos into this window.
 - If the flash drive opened when you connected it to your computer, skip this step.
 4 Open the Photos app. Her icon looks like a multi-colored daisy and is in the dock.
  5 Drag the photo to the flash drive window. As soon as the file appears in the flash drive window, it was copied from the computer to the USB flash drive.
 - By default, photos are not moved from the computer to the USB flash drive - they are copied. If you want to move your photos, delete them on your computer as soon as they are copied to the flash drive.
- Pinch ⇧ Shift and click on each desired photo to select multiple images. You can also hold down the left mouse button and move the pointer over the desired photos to select multiple images.
 6 Repeat this process for all desired photos. You can copy as many photos to a USB flash drive as its volume allows.
 - For example, on a 64 GB flash drive, you can record photos, the total size of which is approximately 64 GB.
 7 Click on the "Check Out" button. This upward-facing arrow icon is located next to the flash drive's name in a Finder window. In this case, the files will not be damaged when you remove the USB flash drive from the computer.
  8 Remove the USB flash drive from the computer. The photos are now on the USB stick. If you need to move photos from a flash drive to another computer, connect it to another computer, and then drag the photos from the flash drive to the appropriate folder on your computer.
Method 2 of 2: On Windows
 1 Connect the USB flash drive to your Windows computer. Locate the rectangular connectors, called USB ports, located on the sides of your laptop, on the back of your monitor, on the side of your keyboard, or on your desktop computer chassis. Insert the USB stick into the USB port.
 - There is a plastic piece at the top of the USB port; the USB stick is also equipped with a plastic element. Insert the USB stick into the USB port with the plastic piece facing down.
- If you are unable to insert the flash drive into the USB port, turn it over.
 2 Click "My Computer". This computer monitor icon is located on the desktop or in the Start menu (click Start in the lower-left corner of your screen, and then click My Computer).
 - On some computers, the specified icon is called Computer or This Computer.
- Perhaps the system will ask what to do with the flash drive. Click "OK" when prompted and then select the "Open folder" option; a window with the contents of the flash drive will open.
 3 Double click on the name of the flash drive. It's in the "Devices and Disks" section in the middle of the window.
 - If the flash drive opened when you connected it to your computer, skip this step.
 4 Right click on the Pictures folder. It's in the left pane of the My Computer window.
 - If the flash drive opened when you connected it to your computer, left-click on "Pictures".
 5 Click Open in New Window. A second window will open with the contents of the "Pictures" folder, in which images (photos, pictures, and so on) are stored by default.
 - If the flash drive opened when you connected it to your computer, skip this step.
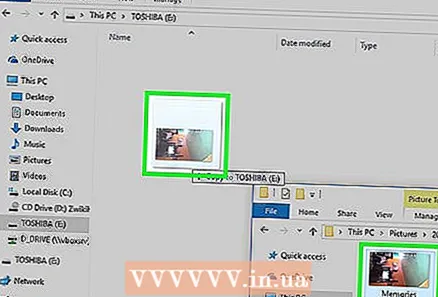 6 Drag the photo to the flash drive window. As soon as the file appears in the flash drive window, it was copied from the computer to the USB flash drive.
 - By default, photos are not moved from the computer to the USB flash drive - they are copied. If you want to move your photos, delete them on your computer as soon as they are copied to the flash drive.
- Pinch Ctrl and click on each desired photo to select multiple images. You can also hold down the left mouse button and move the pointer over the desired photos to select multiple images.
 7 Repeat this process for all desired photos. You can copy as many photos to a USB flash drive as its volume allows.
 - For example, on a 64 GB flash drive, you can record photos, the total size of which is approximately 64 GB.
 8 Right-click on the flash drive icon in the My Computer window. This icon is located in the "Devices and Disks" section.
 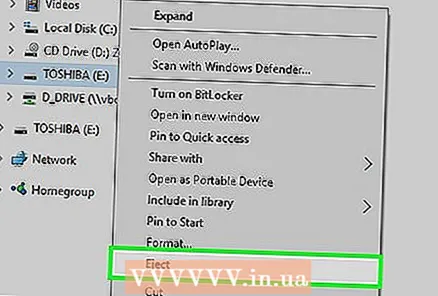 9 Click Checkout. In this case, the files will not be damaged when you remove the USB flash drive from the computer.
 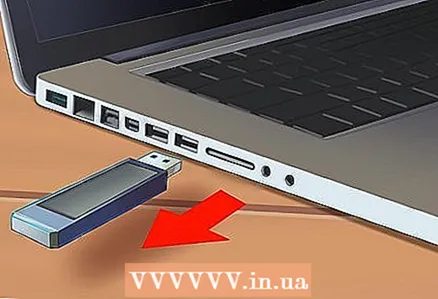 10 Remove the USB flash drive from the computer. The photos are now on the USB stick. If you need to move photos from a flash drive to another computer, connect it to another computer, and then drag the photos from the flash drive to the appropriate folder on your computer.
Tips
- The described methods can be applied to any external storage device, for example, to a USB flash drive, external hard drive or MicroSD card.
- If you're on a Chromebook, plug in your USB flash drive and then click the three-by-three matrix of dots; the Files application opens. Click on the panel in the lower left corner of the Files pop-up window, select the name of the flash drive and drag photos onto it.
Warnings
- If you do not safely remove the external drive, files may become damaged or lost when you remove the drive from your computer.


