Author:
Ellen Moore
Date Of Creation:
18 January 2021
Update Date:
1 July 2024
Content
- Method 2 of 3: Create crystal patterns
- Method 3 of 3: Making a crystal candy
- Tips
- What do you need
- Crystals from alum
- Crystal patterns
- Crystal lollipop
 2 Pour in alum. Add a few tablespoons of alum to the water and stir until the alum is completely dissolved. Add more alum while stirring the water. Continue adding alum until it stops dissolving in the water. After that, leave the mixture to stand for a couple of hours. As the water begins to evaporate, a crystal will begin to grow at the bottom of the jar.
 - Alum is used for pickling vegetables and can be found in the spice section.
- You will find that the alum will no longer dissolve when it starts to accumulate in the bottom of the container.
3 Pull out the crystallization grain. Choose the largest and most beautiful crystallization grain, then drain the water from the container into a clean jar (and try to drain the water without particles of undissolved alum) and use tweezers to remove the crystal from the jar. - If the crystals are still small, wait a few more hours before removing the crystallization grain.
- If you want to grow crystals in the first container, then leave it alone for about a week. In this case, the bottom and walls of the jar will be covered with crystals.
4 Wrap the crystal with thread and place it in the second container. Use fine nylon floss or dental floss to do this. Wrap one end of the thread around the crystal, and tie the other on a pencil. Then place the pencil on top of the jar and immerse the crystal in the solution. 5 Wait a week for the crystal to grow. When the crystal is the desired shape and size, remove it from the water. Untie the thread and enjoy the crystal you made! Method 2 of 3: Create crystal patterns
- 1 Mix water and alum. Fill a container halfway with warm water, then dissolve a few tablespoons of alum in it until it stops dissolving.
- Salt or sodium tetraborate can be used instead of alum.
- If you want the patterns to come out in different colors, you will need several containers.
- 2 Pour food coloring into a container. Add a few drops of red, blue, yellow, green, and whatever color you like to the solution. If you are working with several containers, then add dye to all
- Experiment with the dye for a unique color. For example, 4 drops of yellow and 1 drop of blue will give light green, and red and blue in equal proportions will give purple.
- If you are making a decoration for a certain holiday, then use the colors associated with it.
- 3 Use wire (or wire brushes) for patterns. Shape them into trees, stars, snowflakes, pumpkins and whatever your heart desires. Please note that the blanks must be understandable and recognizable, and, in addition, since they will be covered with crystals, the outlines of different shapes will be thicker as a result.
- 4 Place the blanks in the solution, securing them to the top of the container. Try to keep the mold in the center of each container and not touch the edges.
- If you have several containers with different colors, then let the colors match the shapes. For example, a tree-shaped mold is best immersed in a green solution.
- If you have several molds in one container, then make sure that they do not touch each other.
 5 Wait for the crystal to form. Leave the molds in the containers for a week or two until the crystals grow to the desired size. When the crystals have taken the desired shape and size, remove them from the vessels and gently wipe them with a paper towel. The patterns are ready!
Method 3 of 3: Making a crystal candy
- 1 Mix water and sugar. To make the lollipop, you need sugar as the base of the crystal, not salt or alum. Fill a container halfway with warm water and stir in as much sugar as possible until it stops dissolving.
- The most commonly used white sugar is granulated, although you can experiment with any other sugar.
- Don't use artificial sweeteners instead of sugar!
- 2 Add color and flavor. The lollipop will turn out to be more appetizing if you add dye and a natural flavoring agent there. Try any of these combinations or create your own:
- Red colorant and cinnamon flavor
- Yellow dye and lemon flavor
- Green dye and mint flavor
- Blue dye and raspberry flavor
- 3 Dip wooden sticks into the solution. Place a few wooden chopsticks in the container with the ends resting on the edge of the container.No chopsticks - no problem, both wooden skewers and ice cream sticks will do.
- 4 Cover the container with a plastic lid. You are working with sugar, and that might attract some bugs. Place a lid on the container - you don't want a beetle lollipop, do you?
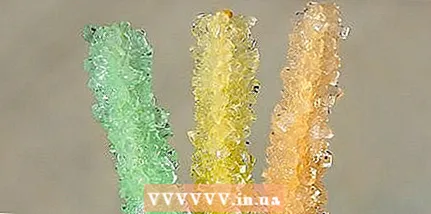 5 Wait for the crystal to form. After 1-2 weeks the sticks will be covered with pretty crystals. Take them out of the container, let them dry and enjoy their taste! Do not forget to share with your friends.
Tips
- Rock salt and bitter salt will also work.
What do you need
Crystals from alum
- 2 glass jars
- Water
- Alum (salt or sodium tetraborate will work as well)
- A thread
- Tweezers
Crystal patterns
- Glass jar
- Water
- Alum, salt or sodium tetraborate
- Brushes or wire
- Food coloring
Crystal lollipop
- Glass jar
- Water
- Food coloring
- Flavoring
- Chopsticks, wooden skewers, or ice cream sticks
- Plastic cover


