Author:
Clyde Lopez
Date Of Creation:
18 June 2021
Update Date:
1 July 2024
Content
- Steps
- Part 1 of 3: Choosing Good Growing Conditions
- Part 2 of 3: Planting an avocado
- Seed planting
- Budding
- Part 3 of 3: Caring for your avocado
- Tips
- Warnings
- What do you need
Avocados are smooth, creamy, nutrient-dense fruits that are important for a dish like guacamole (sauce) they can be grown from the pits left over from the fruit. While seed-grown avocados take quite a long time to produce their own fruit (sometimes 7-15 years), growing an avocado tree is a fun, worthwhile project that leaves you with a great looking tree in the meantime. After your tree has grown, you can wait for the avocado to start growing, or start the process by grafting or budding productive plant members for your tree. Whichever method you choose, learn how to grow your own avocados from scratch starting with step 1 below!
Steps
Part 1 of 3: Choosing Good Growing Conditions
 1 Find a warm growing area with partial sun. Subtropical plants like avocados love the sun. Native to Central America, Mexico, and the West Indies, avocados have evolved to thrive in warm, humid environments. Although avocados were bred to grow in places as far away as California, they always require good sunlight to grow well. However, paradoxically, young avocados can be damaged by excessive amounts of direct sunlight (especially before they have developed extensive leaves). Because of this, if you are growing a single-pit avocado, you want to choose a growing location that has good sun during some parts of the day, but not consistently in direct sunlight.
 - Sunny windowsills are great places to grow avocados. In addition to ensuring that avocados receive sunlight for only part of the day, indoor windowsills allow you to carefully control the temperature and humidity that the plant is exposed to.
 2 Avoid cold, wind and frost. In general, avocados do not grow well in inclement weather. Snow, cold winds and rapid temperature changes, which can be harmful even to hardy plants, can directly kill avocados. If you live in tropical or subtropical climates with fairly mild winters, you should keep avocados outside all year round. However, if you live in an area where winter temperatures are likely to drop below freezing, you need to prepare by moving the mature plant indoors for the winter to protect it from the elements.
 - Different varieties of avocado have different low temperature exposure. In general, the common avocado varieties listed below suffer significant freeze damage at the temperatures indicated:
- West Indies - -2.2-1.7 ° C
- Guatemalan - -2.8-1.7 ° C
- Hass - -3.9-1.7 ° C
- Mexican - -6.1-2.8 ° C
- Different varieties of avocado have different low temperature exposure. In general, the common avocado varieties listed below suffer significant freeze damage at the temperatures indicated:
 3 Use saturated soil with good drainage. Like many other common garden plants, avocados grow best in loose, saturated soil. These soil types will provide a high nutrient content to help the plant grow stronger, as well as reduce the risk of over-watering and provide for aeration. For best growing results, try putting a stock of this type of soil (such as soil rich in humus and organic matter) ready to use as a potting medium by the time your avocado roots and stem are well established.
 - To be clear, you don't necessarily need ready-made soil at the very beginning of the growing process, as avocado seeds grow in water prior to transplanting into soil.
 4 Use soil with a fairly low pH. Like many other common garden plants, avocados grow best in low pH soils (in other words, acidic soils, not alkaline or basic ones). For best results, try planting your avocado in soil with a pH of 5-7. At higher pH levels, the avocado's ability to absorb vital nutrients such as iron and zinc can be significantly reduced, hindering its growth.
 - If the soil pH is too high, it is recommended to use a technique to lower the pH, such as adding organic matter or introducing alkali resistant plants into the garden. You can also achieve good results with a soil additive such as aluminum sulfate or sulfur.
Part 2 of 3: Planting an avocado
Seed planting
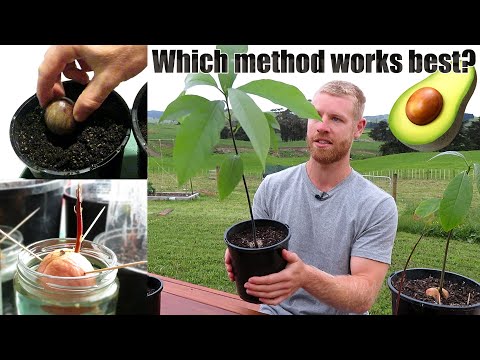
 1 Remove and wash the pit. Removing the pit from a ripe avocado is easy. Use a knife to cut the avocado in half lengthways on both sides, then grab and twist to separate the halves. Remove the seeds from the half of the fruit in which it is stuck. Finally, wash off any excess avocado pulp that has stuck to the pit until it is perfectly clean and smooth.
 - Don't throw away the avocado fruit - try making guacamole by spreading it on a piece of toast or eating it raw for a delicious, nutritious snack.
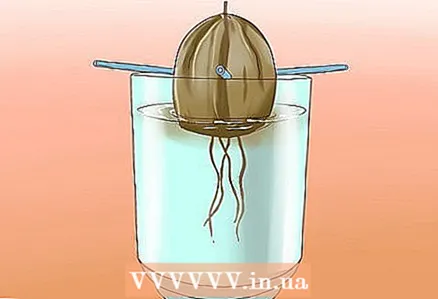 2 Hang the bone in water. Avocado seeds should not be planted directly in the ground - instead, they should be submerged in water until their roots and stem have developed enough to support the plant. The easiest way to hang a pit in water is to stick three toothpicks into the sides of the pit and place the pit so that it sits on the rim of a cup or large bowl. Don't worry - the plant doesn't get hurt. Fill a cup or bowl with water until only the bottom of the bone is underwater.
 - Make sure the pit is right side up in the water. The top of the pit should be slightly rounded or pointed (like the top of an egg), and the bottom, which is in the water, should be slightly flatter and may have discoloration compared to the rest of the pit.
 3 Place on a sunny window and add water as needed. Next, place the pit with a container of water in a place where it will receive occasional (but less often direct) sunlight, like a windowsill where the sun is only a few hours a day. Watch your plant occasionally and add fresh water every time the level drops below the bottom of the seed. Within a few weeks to about a month and a half, you should notice roots starting to emerge from the bottom of the seed, a small stem beginning to emerge from above.
 - The initial stage of passivity can take anywhere from two to six weeks. It may seem like your seed is not doing anything, but be patient - eventually you will see the plant's roots and stem sprouting.
 4 When the stem is about 15 cm. in length, cut it off. When the avocado roots and stem begin to grow, continue to monitor their development and change the water as needed. When the stem reaches a height of about 15 cm, cut it back to 8 cm. Within a few weeks, this should lead to the development of new roots and cause the stem to eventually grow into a wider, fuller tree.
  5 Plant an avocado seed. A few weeks after the first pruning, when the roots of the avocado are thick and have developed and new leaves have grown on the stem, you should finally transplant it into a pot. Remove the toothpicks and place the seed, roots down, in a soil saturated with organic matter with good drainage. For best results, use a pot with a diameter of about 25.4-30.5 centimeters. Smaller pots can cause the roots to grow outside the pot, inhibiting the growth of the avocado unless you transplant it into a new pot.
 - Do not completely cover the pit with soil - cover the roots, but leave the top half open.
 6 Give the growing plant good sunlight and frequent watering. Once you have planted the avocado in the pot, give it good watering by soaking the soil gently but thoroughly. Later on, water the soil just enough to keep it slightly damp, without looking soggy or muddy. Place the avocado in a location where it will receive plenty of sunlight, but not constant, direct sunlight during the day, especially if you live in very hot climates.
  7 Pinch off the leaves every 15 cm. growth. After your plant has been potted, continue with frequent watering and strong sunlight as it starts to grow. Periodically monitor his progress with a ruler or tape measure. When the stem of the plant reaches a height of about 30 cm, pinch off any new growth of leaves. As the plant continues to grow, pinch off the newest, tallest sets of leaves each time it grows another 15 cm.
 - This stimulates the plant to grow new shoots, resulting in a fuller, healthier avocado in the long run. Don't worry about harming your plant - avocados are hardy enough to recover from this routine of pruning without a problem.
Budding
 1 Grow your seedling to a height of 0.6-0.9 m. As noted above, growing an avocado from seed does not necessarily mean that you can grow your own avocado in the current time frame. Some avocado trees may take several years to begin producing fruit, while others may struggle to bear fruit much longer or may never even bear good fruit. To speed up this process and ensure the tree produces excellent fruit, use the technique that professional gardeners use - budding. For the tree to blossom, you must have an avocado tree that is already bearing good fruit and an avocado seedling that is at least 60 to 75 centimeters tall.
 - If possible, try to find a “grower” tree that is hardy and disease-free, in addition to producing good fruit.Successful budding physically bonds your two plants together, so use the healthiest plants possible to avoid future health problems.
 2 Make a T-shaped cut in the seedling. Using a sharp knife, cut a T-shaped cut in the stem of the plant about 20-30 centimeters from the ground. Cut horizontally about a third of the stem's thickness, then turn the knife and cut about 2.54 cm (2.54 cm) of the stem down towards the ground. Use a knife to peel the bark from the trunk.
 - Obviously, you want to avoid cutting too far into the stem. Your goal is to "open up" the bark along the side of the stem so that you can attach a new branch to it without damaging the seedling.
 3 Cut the bud from the "producer" tree. Next, find a seemingly healthy bud on the fruit-producing tree of your choice. Remove it from the tree by making a diagonal cut that starts 1.2cm below the bud and ends 2.5cm below it. If the bud is in the middle of a branch or twig and not at the end, make an incision 2.54 cm above the bud to remove it.
  4 Attach the bud to the seedling. Then, tuck the cut bud you removed from the "grower" tree into the T-shaped cut on the seedling. You want the green material under the bark of each plant to touch - if it doesn't, budding may not be successful. After the cut bud sits in the cut of the seedling, secure it in place with rubber bands or budding rubber (you can buy a special substance at most garden stores).
  5 Wait for the kidney to take. If the budding attempt is successful, the cut bud and sapling should eventually grow together to form one seamless plant. In the spring, this can happen in a month or less, but in the slow growing months, it can take up to two months. After the plant is completely healed, you can remove the rubber bands or budding rubber. If you wish, you can also carefully cut the stem of the starting plant 2.54 cm or 5 cm above the new branch to make it the new "main" branch.
 - Once the branch you introduced to the plant grows to a sufficient size, it should start producing high quality fruit just like it would on an old tree. By using this technique, professional gardeners are able to maintain consistent results from all of their avocado trees.
Part 3 of 3: Caring for your avocado
 1 Water frequently, but avoid over-watering. Compared to other plants in the garden, avocados can require a lot of water. However, it is important to remember that over-watering is a potential problem for almost all plants, including avocados. Try to avoid watering so often or thoroughly that the soil of the avocado tree looks runny or muddy. Use a soil with good drainage (soil rich in organic matter is usually a good bet). If the tree is in a pot, be sure the pot has drainage holes at the bottom to allow the water to drain. Follow these simple tips to keep your plant safe from over-watering.
 - If the leaves of your plant start to turn yellow and you water frequently, this could be a sign of over-watering. Stop watering immediately and start again only after the soil is dry.
 2 Fertilize only occasionally. You don't need fertilizer at all to grow a strong, healthy avocado tree. However, if used wisely, fertilizers can significantly stimulate the growth of a young plant. Once the tree is well rooted, add a balanced citrus fertilizer to the soil during the growing season according to the fertilizer directions. Don't overdo it - when it comes to commercial fertilization, it is generally best to be somewhat conservative.Always water after fertilizing so that the fertilizer is absorbed into the soil and delivered directly to the plant's roots.
 - Like many plants, avocados do not need to be fertilized at all when they are very young, as they can be very sensitive to the "burn" that can result from over-fertilizing. Try to wait at least a year before feeding.
- 3 Watch for signs of salt buildup. Compared to other plants, avocados can be particularly vulnerable to salt buildup in the soil. Avocados suffering from high salt levels may have slightly wilted leaves with "burnt", brown tips where excess salt builds up. To reduce the salinity (salinity) of the soil, change your watering practice. At least once a month, try to water vigorously while saturating the soil. The heavy water flow will carry the accumulated salts deep into the soil, under the roots, where it will be less harmful to plants.
 4 Know how to defeat common avocado pests and ailments. Like any crop, avocados can suffer from a variety of pests and diseases that can threaten the quality of the plant's fruit or even endanger the whole plant. Knowing how to recognize and resolve these issues is critical to maintaining a healthy, productive avocado tree. Below are just a few of the most common avocado pests and diseases - check your botanical resource for more information:
 - Plant Cancer - "Rusty", settled sores on the plant that can secrete gum. Cut the ulcers out of the affected branches. Ulcers on the trunk of a tree can kill the plant.
- Root Rot - Usually due to over-watering. Causes yellowing of leaves, wilting and possible decay even when all other growth conditions are met. Stop over-watering immediately, if the current is heavy, dig up the roots to expose them to the air. Sometimes fatal to the plant.
- Withers and plant diseases - "Dead" areas on the tree. Fruits and leaves in these areas wither and die. Remove the affected areas from the tree immediately and wash the tools you are using before using them again.
- Lacemakers - Cause yellow spots on leaves that dry out quickly. Damaged leaves die and fall off the branch. Use a commercial pesticide or natural insect control, such as pyrethrin.
- Woodworm - sharpens wood, creating small holes from which sap can ooze. Preventive treatment is better - keeping trees healthy and well fed, making it more difficult for trees to be affected. If woodworms are present, remove and destroy any affected branches to reduce their spread.
Tips
- Fertilizers are suitable, which are specially designed for avocados. Used as directed, they will almost always be helpful. Other fertilizers can also be helpful, especially if the shared soil is somehow not optimal for avocado growth. Since you will be eating the result, consider buying an organic fertilizer rather than synthetics.
Warnings
- If the leaves turn brown and brown at the tips, too much salt has accumulated in the soil. Let the water flow freely into the pot and drain for a few minutes.
- While it is true that you can grow a tree from an avocado seed, keep in mind that a tree grown from a seed will be very different from its parent variety and may take 7-15 years to start producing fruit. Fruits from a seed-grown tree tend to have different flavor characteristics than their parent variety.
What do you need
- Avocado seeds
- Container for placement of seedlings.
- Toothpicks
- Capacity for planting a seedling after germination
- Fertilizer
- Knife
- Rubber strips / gum for budding
- Organic pesticides (optional)


