Author:
Eric Farmer
Date Of Creation:
3 March 2021
Update Date:
1 July 2024

Content
- Steps
- Method 1 of 3: On the computer
- Method 2 of 3: On iPhone
- Method 3 of 3: On an Android device
- Tips
- Warnings
This article will show you how to install a mod (modification) in desktop and mobile versions of Minecraft. Keep in mind that mods cannot be installed on the Windows 10 and console versions of Minecraft.
Steps
Method 1 of 3: On the computer
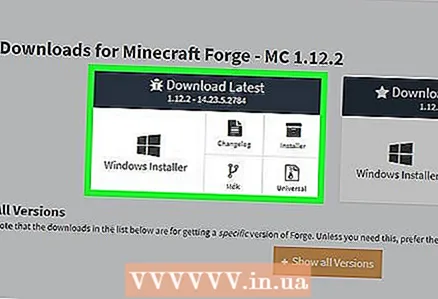 1 Install Minecraft Forge. Minecraft Forge is a free add-on for the original Minecraft. Mods can be run with Minecraft Forge.
 - Minecraft Forge cannot be installed on the exclusive version of Minecraft for Windows 10.
 2 Download the mod. To do this, open one of the many sites with Minecraft mods and download the desired mod. Some of the most popular Russian-language sites with Minecraft mods are the following:
 - https://minecraft-inside.ru/mods/
- https://ru-minecraft.ru/mody-minecraft/
- http://ru-m.org/mody-minecraft/
- https://modscraft.net/mods/
 3 Extract the mod from the archive (if necessary). If you downloaded a zip file, double-click it, click Extract, click Extract All, and then click Extract when prompted.
 - On a Mac computer, just double click on the zip file to extract the mod.
 4 Copy the mod. Open the extracted folder, find the JAR file in it, click on it, and then click Ctrl+C (Windows) or ⌘ Command+C (Mac).
 - On a Mac, the JAR file icon looks like a coffee cup on a white background.
 5 Open the Minecraft launcher. Double click on the file icon, which looks like a block of earth with grass.
  6 Click on Launch options (Options, Options, Settings or similar option). It's a tab in the upper-right side of the launcher window.
  7 Click on Latest release (Latest version, Latest release or similar option). It's in the middle of the window.
  8 Open your Minecraft game folder. Click on the green right-facing arrow on the right under the Game directory section. This will open a folder containing all the folders and files of the Minecraft game.
 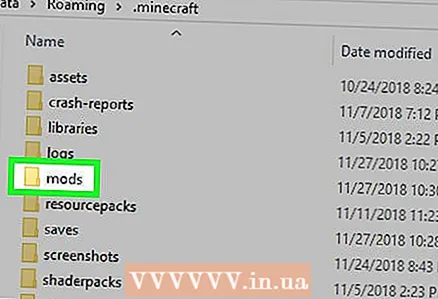 9 Open the "mods" folder. To do this, find and double-click on this folder in the middle of the window. If you don't see the "mods" folder, create it:
 - On Windows, right click on an empty space in the folder, click New> Folder, enter mods and press ↵ Enter.
- On Mac OS X, click an empty folder space, click File> New Folder, enter mods and press ⏎ Return.
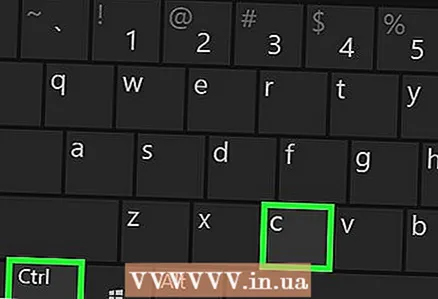 10 Insert the mod. Click in an empty space in the folder and then click Ctrl+V (Windows) or ⌘ Command+V (Mac). The mod will be displayed in the "mods" folder.
  11 Start a single player game with the mod. For this:
 - select the profile "Minecraft Forge"; to do this, click on the arrow next to the Play button and then click forge in the pop-up menu;
- click "Play";
- wait for Forge to load;
- click "Singleplayer";
- choose the world;
- click Play Selected World.
Method 2 of 3: On iPhone
 1 Install the MCPE Addons app. To do this, launch the App Store application
  , and then:
 - click "Search";
- tap the search bar at the top of the screen;
- enter mcpe addons in the search bar;
- click "Find";
- Tap Download to the right of the MCPE Addions for Minecraft app.
- enter your passcode or tap the Touch ID when prompted.
 2 Run the MCPE Addons app. Tap "Open" in the App Store, or tap the app icon on the iPhone home screen.
  3 Find a mod. Browse the list of available mods, or click the magnifying glass icon at the bottom of the screen and enter a name or description for the mod. When you find a mod, tap its name to open its page.
 - Keep in mind that the mods for the iOS version of Minecraft are less interesting than those for the Android and PC versions.
 4 Click on Download (Download). This orange button is located at the bottom of the page. An ad will open.
 - If there are multiple Download buttons displayed on the screen, press the top button. When you install the first file, go back and install the other files.
 5 Close the ad. Click the "X" in the upper left or upper right corner of the screen when this icon appears there. You will be returned to the mod page.
 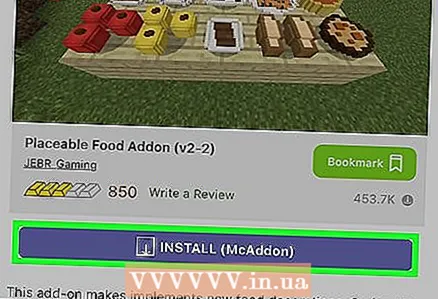 6 Click on Install (Install). It's a purple button in the middle of the page.
 - If a pop-up menu appears at the bottom of the screen, skip this step.
 7 Swipe and tap Copy to Minecraft (Copy to Minecraft). It's in the top row of options. Minecraft PE will open.
 - If the Minecraft option is not on the menu, scroll right, tap More and tap the white switch to the right of the Minecraft option.
 8 Wait for the mod to be installed. At the top of the screen, a message will appear stating that the mod is installed - now proceed to the next step.
  9 Install other mod files. If the mod page displays multiple Download buttons, launch the MCPE Addons app, tap the next Download button, close the ad, tap Install, and then click Copy to Minecraft ); repeat the described process with each mod file.
 - Most mods consist of one or two files.
 10 Start the game with the mod. To use the mod, open an already modified world or create a new one. For this:
 - start Minecraft PE;
- click "Play";
- tap "Create new";
- click "Create game world";
- scroll down the page and find the Resource Sets or Parameter Sets section on the left side of the screen;
- Tap Resource Sets or Presets;
- select a mod and click "+" under it;
- tap "Create";
- to play a world with a mod, select it from the list of available worlds.
Method 3 of 3: On an Android device
 1 Install Inner Core. With this application, you can find and install Minecraft mods. Open Play Store
  , and then:
 - tap the search bar;
- enter inner core;
- click "Inner Core - Minecraft PE Modes" in the search results;
- tap "Install";
- click "Accept".
 2 Launch the Inner Core app. Click Open in the Play Store or tap the Inner Core app icon. A modified version of Minecraft will open.
  3 Click on Mod browser. You will find this option in the lower right corner of the menu.
  4 Browse through the available mods. To do this, scroll to the first page with mods or click "Next" in the upper right corner of the mod browser to go to the next page with mods.
  5 Select a mod. Click on the desired mod to open its page.
 - Most of the descriptions of mods are presented in Russian.
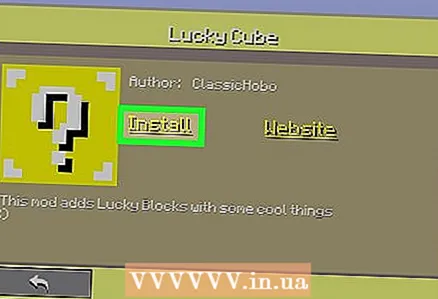 6 Click on Install. It's in the middle of the page.
  7 Tap Yeswhen prompted. The mod will be installed.
 - Most mods take only a few seconds to install.
 8 Restart the Inner Core app. When the mod is installed, you will be prompted to restart Inner Core in order to load the mod; to do this, close Inner Core and then start this application again.
  9 Create a new world. When Minecraft starts, click Play> Create New> Create Game World> Create. The mod will be automatically activated in the new world.
 - You can uninstall the mod through the "Inner Core" option on the main Minecraft PE screen; to do this, click on the gear-shaped icon to the right of the mod and select "Delete".
Tips
- You can back up game worlds on your computer before installing mods. To do this, open the game folder, copy the "saves" folder and move it to another folder. Do this because some mods damage existing worlds.
Warnings
- Never download mods from suspicious or untrustworthy sites. If the site has reviews about the fashion, read them.
- Some mods conflict with other mods. To find out about the compatibility of a mod, read the forum about it - you may find known compatibility issues with other mods.


