Author:
Carl Weaver
Date Of Creation:
28 February 2021
Update Date:
1 July 2024

Content
The Android market is booming now, and anyone can create another great app. All it takes is a good idea and some free development tools. Installing these tools is a fairly straightforward process. In a few minutes you can start working on your new project. See Step 1 below to get started.
Steps
Part 1 of 2: Installing Eclipse
 1 Install the Java platform. Eclipse and ADT are built on the Java platform, so you need the latest Java Development Kit (JDK) to run them. The JDK is available for free download from the Oracle website. Make sure to download the correct version for your operating system.
 - If you do not have the Java Runtime Environment (JRE) installed, Eclipse will fail to start.
 2 Download the Eclipse platform. Before installing the Android development tools, you should download the Eclipse IDE, on top of which the Android development tools will be installed. Eclipse is available as a free download from the Eclipse Foundation site.
 - For most Android developers, the Eclipse Standard package contains everything they need.
 3 Unzip the Eclipse file. Eclipse downloads as a ZIP file. Just unzip the zip file to a folder of your choice, for example C: . The zip file contains an “eclipse” subfolder, so unzipping to C: will create a “C: eclipse” folder.
 - Many users complain about problems when using the built-in Windows program to unpack archives. When unzipping the file, use another program such as 7-Zip or Winzip.
 4 Create an Eclipse shortcut. Since Eclipse is not “installed” in the classic sense of the term, you should create a shortcut so that you can quickly launch the program from the desktop. This will also make it easy to specify the Java Virtual Machine (JVM) that it will run with.
 - Right click on eclipse.exe and select Submit. Select “Desktop (create shortcut)”. A shortcut will be created on your desktop pointing to the eclipse.exe file.
 5 Specify the Java virtual machine. If you have multiple JVMs installed on your machine, you can configure Eclipse to always use a specific virtual machine. This will help avoid errors if your computer switches the default JVM in some other program.
 - To specify where to install the JDK, add the following line to your Eclipse shortcut, replacing the path to your javaw.exe file:
-vm C: path to javaw.exe
- To specify where to install the JDK, add the following line to your Eclipse shortcut, replacing the path to your javaw.exe file:
Part 2 of 2: Installing the ADT Plugin
 1 Download and install the Android Software Developer Kit (SDK). It is available for free download on the Android website. Select “Use the current development environment (IDE)” to download only the SDK. You can of course download an ADT package that includes Eclipse and is already configured as needed, but this way you will definitely have the latest version of Eclipse.
 - After installing the SDK, the SDK Manager should start automatically. Leave it running for the next step.
 2 Add packages to your Android SDK. Before using the SDK for development, you need to add the packages that you want to use along with your Android SDK. In the SDK Manager, you will see a list of all packages available for download. For basic development, be sure to select the following:
 - The most recent version of the Tools package in the Tools folder.
- The most recent version of Android (This is the very first Android folder on the list).
- Android Support Library, which is located in the Extras folder.
- After you have finished choosing, click Install. The files will be downloaded and installed.
 3 Start Eclipse. You will be installing ADT directly from the Eclipse program. If Eclipse does not start, make sure you specify the Java Virtual Machine (see the previous section).
  4 Install the ADT plugin. The ADT plugin will need to be downloaded using the Eclipse program itself, directly from the Android developer repository. You can easily add this repository to your Eclipse program.
 - Click Help. Select Install New Software. The Available Software window will open with a list of software available for download from the repository you selected.
 5 Click the “Add” button. It is located to the right of the “Work with” field. Clicking on this button will open the “Add Repository” dialog. Here you will enter information to download the ADT plugin.
 - In the “Name” field, enter “ADT Plugin”
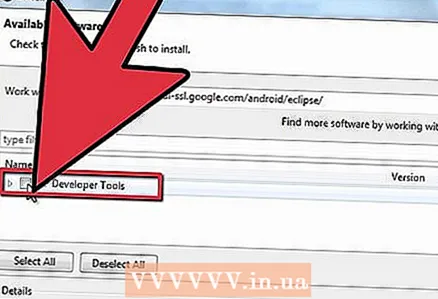
- In the “Location” field, enter “https://dl-ssl.google.com/android/eclipse/”
- Click OK.
- Open the "Developer Tools" dialog. Click Next to display a list of tools to be downloaded. Click Next again to open the license agreements. Read them and click Finish.
- You may receive a warning that the program's expiration date cannot be determined. You can ignore this warning.
 6 Restart Eclipse. After the tools are downloaded and installed, restart Eclipse to complete the installation process. Upon restart, the “Welcome to Android Development” window will appear.
  7 Specify where to install the Android SDK. In the welcome window, click “Use existing SDKs” and navigate to the folder where you have the SDK installed. Once you click OK, the ADT installation process is complete.


