Author:
Bobbie Johnson
Date Of Creation:
6 April 2021
Update Date:
1 July 2024

Content
- Steps
- Method 1 of 2: Site Preparation for Concrete Placement
- Method 2 of 2: Place the concrete
- Tips
- What do you need
Knowing how to properly lay the concrete mix can save you some money on small jobs around your home. You can place concrete using the tools you keep in your barn or garage; no special tools are needed for small projects. In order to lay concrete, you will need to make some effort, since the mixture is quite heavy. Otherwise, using this step-by-step guide, you can easily complete your concrete projects.
Steps
Method 1 of 2: Site Preparation for Concrete Placement
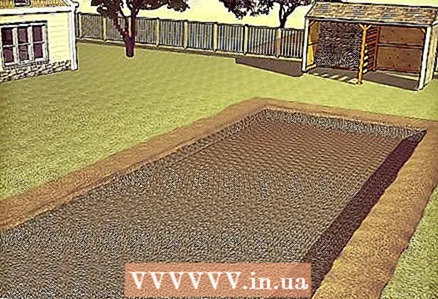 1 Clear the area of any objects or materials that will interfere with the installation process. These include grass, rocks, trees, bushes, and even old concrete. Clean everything until damp earth is visible.
 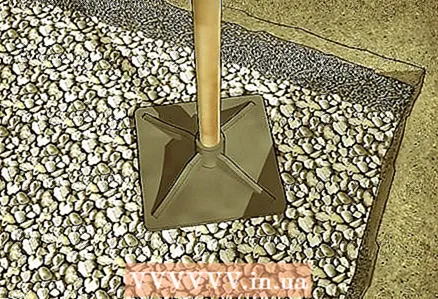 2 Prepare the underlayment. The underlayment is, in other words, the material on which the concrete rests. Typically, granular backfill or road bedding is used as the underlayment, although in some rare cases the soil itself can be used if it is very strongly compacted and stable.
 - The land on which the subgrade lies is called the subgrade, and the concrete will be as strong as the subgrade. Think about it: if the sub-base moves, settles, or moves in any other way, the integrity of the concrete will be compromised. Ensure that the subgrade is properly compacted and stabilized before adding sub-base.
- Many professionals use coarse-grained, void-free or fine-grained aggregates as their underlays. The coarse-grained, void-free aggregate is free of fine particles and allows water to seep through. Plus, it's cheaper. Its disadvantages include insufficient ramming capacity compared to fine-grained aggregate. Smaller aggregate is easier to ram, but more expensive.
- Place the underlay 10-15 centimeters thick with the material of your choice, then tamp it down with a hand rammer or vibratory plate. For small do-it-yourself projects, the plate compactor can be kinky, however, it provides greater compaction performance.
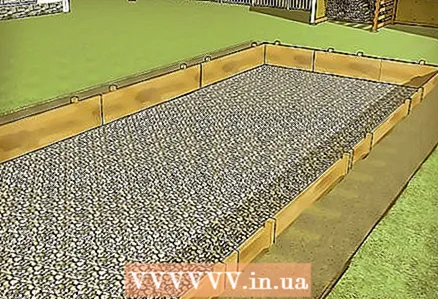 3 Prepare the formwork. Formwork is usually a wooden perimeter, fastened with special nails or screws, and built around the area intended for placing concrete. When constructing the formwork, consider some points:
 - In the case of square or rectangular formwork, make sure that the corners form 90 degrees. Take a tape measure and measure both diagonals of a square or rectangle; they must be exactly equal. If they are not equal, then you will need to return to the formwork drawings.
- Also make the formwork slope slightly. If they are at the same level, then water will accumulate in the center of your concrete. To eliminate this possibility, create a slight slope of 6 mm for every 30 cm. With certain types of rammed concrete, a slope of 3 mm by 30 cm is acceptable.
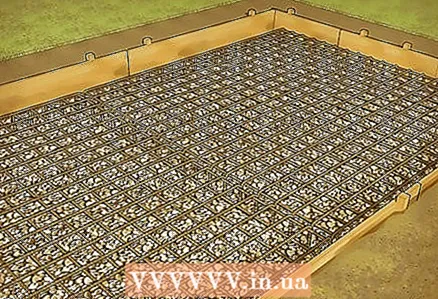 4 Add wire mesh or reinforcement (if needed). Wire mesh and reinforcement are used for added stability, especially in the case of high-traffic structures such as driveways.If you are placing concrete on a surface that is unlikely to be heavily loaded, wire mesh or reinforcement will be overkill. Both have their own advantages and disadvantages:
 - The wire mesh will help prevent the growth and propagation of small cracks and will also increase stability along two axes (the wire mesh is welded while the reinforcement is bonded). The disadvantage of wire mesh is that it does not provide sufficient structural integrity.
- The reinforcement can provide better structural integrity and is more suitable for loaded surfaces. On the other hand, it is not conducive to minimizing the resulting cracks.
Method 2 of 2: Place the concrete
 1 Prepare the concrete mix. The concrete is mixed by adding Portland cement, sand and coarse aggregate (gravel) in a ratio of 1: 2: 4. Water is also added to the dry mixture to bind all the components.
 - Add a certain amount of water and concrete to the mixer. You can also knead it in a cart using a shovel. Use as little water as possible. Water makes the concrete more mobile but also weakens the strength of the finished product. A less wet mix makes concrete more crack resistant. The mixture will be smooth and even. Switch off the engine.
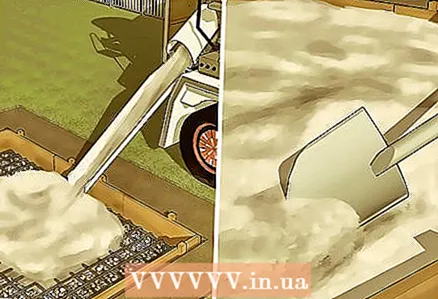 2 Pour concrete into the formwork. In some cases, concrete can be poured into the formwork directly from the concrete mixer, or concrete can be loaded into the trolley and tilted over the formwork until the highest point is reached. During this operation, ask helpers to scatter concrete with shovels, rakes and other accessories, which include a special concrete rake.
 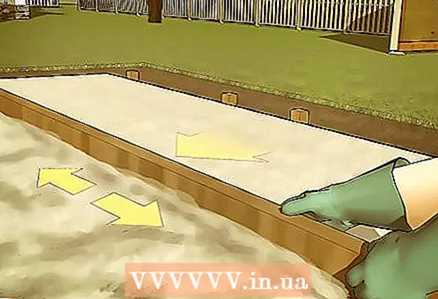 3 Flatten the top of the concrete pile. Use a leveling tool to level wet concrete from the top. Leveling is also done by moving the wide board back and forth, if possible leaning on the formwork, in order to create a flat surface.
 - Work from top to bottom, gently leveling the concrete until a smooth surface is obtained. The work on the concrete surface will not be completed yet, but at this point it will already take on a more complete and professional look.
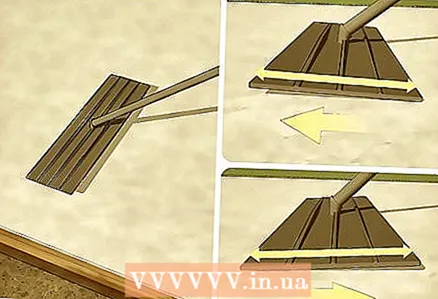 4 Smooth the leveled surface. You must act quickly at this stage as the concrete will set quickly. The smoothing process should include two steps:
 - Use a large flattening tool, also known as a trowel, to press down on the aggregates and help the slurry (concrete without gravel) rise to the surface. Move the float away from you by slightly lifting the tail section, and then pull the float towards you, lifting the front slightly.
- Work over the surface with a magnesium hand float. After a little water has seeped to the surface, use the hand float to sweep wide, sweeping strokes.
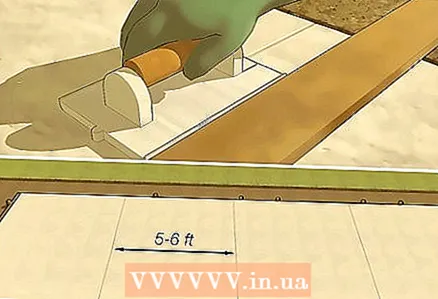 5 Make expansion joints every 1.5–1.8 m with a furrow maker. Use the board as a ruler to make periodic movement joints in concrete. These seams will help the concrete resist cracking caused by temperature changes.
 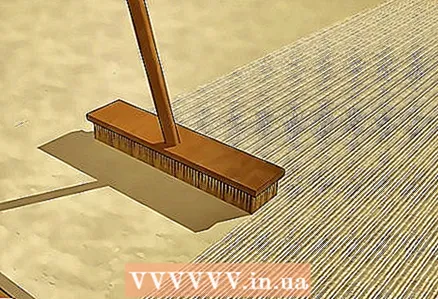 6 Create grip. Use a broom to sweep the surface, creating a pattern on it. This will ensure adhesion to the concrete and will not be slippery when wet. For other textures that are less rough, you can use a soft brush. For a smoother surface that will still have a pattern, you can use a trowel and slide it across the surface in circular motions. Make sure that the grooves are not so large, as this will stagnate water on the surface. Standing water will damage the integrity of the concrete.
 - If lumps of concrete accumulate on the surface when the broom is moving, then it is too early to use the broom. Run the magnesium float again to smooth out the broom marks and repeat the process later.
 7 Let the concrete harden and seal with a sealant. The concrete must be allowed to harden within 28 days, with the first day being the most critical. Once the concrete is laid, professionals recommend treating it with a silicone sealant. The sealant will help the concrete harden and prevent cracks and discoloration.
  8 Watch out for concrete. Despite the fact that concrete is considered a problem-free surface, regular maintenance is beneficial to it. Regular cleaning with soap and water will ensure the best concrete appearance, and periodic sealer treatment (~ every five years) can help prevent concrete damage during use.
Tips
- To paint concrete in different colors, you can buy special dyes in order to choose colors that match the color of your home or landscape, or to highlight it. Add color when mixing concrete with water.
What do you need
- Formwork
- Aggregate
- Steel wire mesh or reinforcement
- Concrete
- Water
- Concrete mixer or shovel trolley
- Leveler
- Master OK
- Planks
- Broom


