Content
- Steps
- Part 1 of 6: Selecting Ingredients
- Part 2 of 6: Different Kinds of Wort
- Part 3 of 6: Fermenting the wort
- Part 4 of 6: Choosing a Distillation Apparatus
- Part 5 of 6: Distilling the mash
- Part 6 of 6: Finishing Touches
- Tips
- Warnings
Attention:this article is intended for people over 18 years of age.
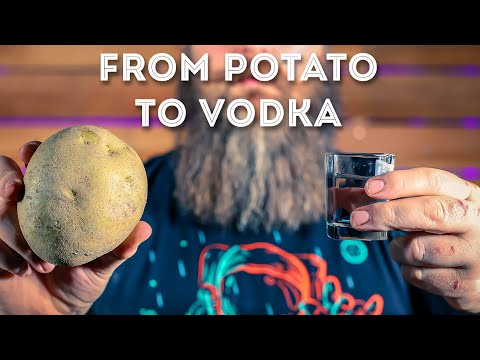
Vodka is a neutral alcoholic beverage that is usually not aged and is made from cereals, potatoes, sugar, or fruits that are fermented to produce alcohol. When making vodka at home, you need to be extremely careful during the distillation process to get rid of the deadly methanol. In some countries, such as the United States and Australia, it is illegal to produce alcohol at home. In other countries, such as New Zealand or the Czech Republic, it may be necessary to register a distillation apparatus or obtain a distillation license. In Russia, it is allowed to receive moonshine for personal use, but it is forbidden to drive it for sale. Before attempting to obtain vodka on your own, be sure to check your local laws on the matter.
Steps
Part 1 of 6: Selecting Ingredients
 1 Select the ingredients from which you want to make the vodka. Usually vodka is made from wheat, rye, barley, corn or potatoes. You can also use sugar or molasses by themselves or along with other ingredients. One of the producers even got a new type of vodka made from red wine "pinot noir". Whichever ingredients you choose, they must contain sugar or starch in order to ultimately make alcohol. Yeast consumes sugar and produces alcohol and carbon dioxide.
 - If you decide to make vodka from wheat or potatoes, you need to prepare a wort with active enzymes that decompose the starch contained in grains or potatoes and create fermenting sugar.
- Fruit juices already contain sugar, so starch-degrading enzymes are not required. Enzymes are also unnecessary if you want to make vodka from store-bought sugar, so you can skip the wort step.
- If you are using ingredients that have already fermented, such as wine, they can be distilled directly into vodka.
 2 Decide if additional enzymes are needed. Depending on what you make your vodka from, you may need to add enzymes to convert the starch into sugar more easily. Additional enzymes will be needed if you are using cereals or potatoes. Grains and potatoes are sources of starch, and enzymes are needed to break it down into sugar.
 - If you're using malted whole grains, you won't need any additional enzymes. Malted whole grains, such as malted barley or malted wheat, are rich in natural enzymes that break down starch into fermentable sugar.
- If you are using refined sugar or molasses, you do not need to add enzymes as the sugar is already available.
 3 Add additional enzymes as needed. For example, if you are using potatoes as your starting material, you can buy food-grade amylase enzyme powder from a pastry store and add it to your wort to convert the starch into fermentable sugar. Use the recommended amount of enzyme to break down existing starch. If you are adding enzyme powder, there is no need to use enzyme-rich malted barley or wheat grains.
 - The starch needs to be jelly (gelatinized) so that enzymes can then break it down. The cereal flakes are often already gelatinized. To turn other ingredients into a jelly wort, such as potatoes, unprocessed or malted grains, they are heated in water to the gelatinization temperature of the particular starch.
- Potatoes, as well as barley and wheat, usually jelly at around 65 ° C. Therefore, the potato wort should be warmed up to at least 65 ° C.If you don't want to heat your potatoes to higher temperatures, you need to chop them into small pieces before placing them in the water.
- The enzymes that break down starch work at certain temperatures and are destroyed at too high temperatures. Many enzymes break down starch at 65 ° C, and above 70 ° C they begin to break down. The maximum permissible temperature must not exceed 75 ° C.
Part 2 of 6: Different Kinds of Wort
 1 Try wheat wort. Take a metal saucepan with a lid of 40 liters and heat 25 liters of water in it to about 75 ° C. Add 8 liters of dry wheat flakes and stir. Check that the temperature is between 65 and 68 ° C. Add 4 liters of ground wheat malt. After that, the temperature should not drop below 65 ° C. Cover the pot and maintain the desired temperature for one and a half to two hours. Stir the wort from time to time.
 - During this time, the starch should turn into fermentable sugar and the mixture will become much less viscous.
- After one and a half to two hours, cool the mixture to 27-29 ° C. Use an immersion chiller to quickly chill the wort, or simply leave it overnight (but the temperature should not drop much below 27 ° C).
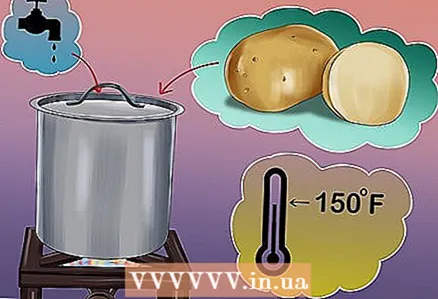 2 Prepare the potato wort. Peel 9 kilograms of potatoes. Boil the peeled potatoes in a large saucepan for about one hour until tender. Drain off excess water and remember the potatoes properly by hand or in a food processor. Transfer the mashed potatoes back to the pot and add 19 to 23 liters of tap water. Stir the contents of the pot and heat it slightly above 65 ° C.
 - Add 1 kg of ground malted barley or wheat and mix well. Cover the pot, stir the wort from time to time and heat it for 2 hours. Then turn off the heat and leave the mixture overnight to cool to 27-29 ° C.
- If it cools for a long time, the enzymes in the malted barley will have more time to break down the potato starch.
 3 Prepare corn wort. Make the mixture in the same way as for the wheat wort, but add gelatinized cornflakes instead of the wheat flakes. You can also sprout the corn for 3 days and then mash it without adding any malted kernels. Moreover, each grain should take root about 5 centimeters long.
 - Sprouted corn kernels contain enzymes that are formed during the germination process.
Part 3 of 6: Fermenting the wort
 1 Clean all necessary utensils and prepare your work area properly. Fermentation is carried out in clean, sterilized containers, which are sometimes left open, but are often isolated from outside air to prevent cross-contamination. Fermentation usually lasts 3-5 days.
 - Fermentation can be carried out in both uncleaned and non-sterile containers, and the distilled product will contain potable alcohol, but this can lead to high levels of undesirable aromatic compounds and higher alcohols due to the action of extraneous yeast strains and bacteria.
- Oxidizing cleaners and disinfectants such as iodophor are available at beer stores.
 2 Select and install the air lock. Such a shutter is a device that releases carbon dioxide CO from the container.2, but at the same time does not allow oxygen O2... For fermentation of 20 liters of strained wort, a 30 liter food bucket or a 25 liter bottle is sufficient. The bucket can be closed with a lid, and the bottle with a rubber stopper, but in any case do not close them tightly, otherwise an excess pressure of carbon dioxide will build up in them, and they may burst.
 - Be sure to attach an air seal to the lid or plug to prevent the vessel from bursting due to overpressure.
- If you are fermenting in an open vessel, cover it with gauze to keep out insects and debris.
 3 Strain the wort or other liquid into a fermentation vessel. If you've prepared wort, strain it through a fine sieve into a cleaned and sterilized fermentation vessel. At the same time, try to splash the liquid a little and pour it from a certain height so that it is saturated with air.
 - At first, the yeast needs air (oxygen) to start multiplying and fermenting. This is because yeast produces cellular material from oxygen in the form of lipids. However, after the initial stage of fermentation, oxygen is undesirable, since in its absence the yeast produces alcohol.
- Sugar solution can be added at this stage. Pour the sugar solution into the fermentation vessel from a certain height so that it is saturated with air.
- If you are using juice, pour it through a sieve or colander into the fermentation vessel from a certain height so that it is saturated with air.
 4 Add yeast to the fermenting medium. Activate the required amount of dry alcohol or other yeast and add them to the liquid. Stir the liquid with a clean, sterilized spoon to distribute the yeast evenly. If you use an air lock, bubbles will come out of the air lock as you ferment. Gas bubble formation will slow down dramatically or stop altogether after the fermentation process is complete.
 - Keep the fermenting liquid in a 27–29 ° C room to make the fermentation process easier and more efficient. If the room is colder, a heating belt can be used.
- Alcohol yeast produces large amounts of alcohol (ethanol) and produces relatively few undesirable compounds, such as alcohols other than ethanol. The amount of yeast you want depends on the brand and type.
- A yeast bag may also contain nutrients. They are essential for fermenting low nutrient media, such as sugar solution, and can improve fermentation when using nutrient rich media such as grain wort.
 5 Collect the fermented liquid. Using a siphon, pour the fermented liquid containing alcohol (called “wash”) into a clean, sterile container or distillation apparatus. Leave the yeast sediment in the fermentation vessel, otherwise it may burn when heated in the distillation apparatus. The drained mash can be further purified before distillation by filtration or other methods.
Part 4 of 6: Choosing a Distillation Apparatus
 1 Use a column still if possible. Such devices have a more complex design than conventional cubes. The column apparatus can be purchased or made independently from available materials. Nevertheless, the principle of operation of columns and simpler stills is similar.
 - Typically, cooling water is circulated through a sealed compartment in the distillation column, which causes the vaporized alcohol and other substances in the column to condense. This means that such a device should be connected directly to a water tap or water pump in order to pump water through it.
- Unless there is a constant recirculation of water from a single source, it can take thousands of liters of water to make a small dose of vodka. If water is supplied from a central reservoir using a pump, about 200 liters will suffice, but the water will heat up, which will reduce the cooling efficiency.
 2 Choose a distillation cube if you do not have the opportunity to use a column apparatus. A simple alembic is like a pressure cooker to which pipes are attached. You can easily assemble it yourself from the materials at hand.Unlike columns, which are vertical columns of circulating water, in simple cubes, curved or spiral tubes can be used immersed in a container of cooling water. In this case, a pump and large volumes of cooling water can be dispensed with, although they are sometimes used.
  3 If necessary, use a distillation apparatus with a reflux condenser. Such an apparatus is capable of performing several distillations at the same time. A seal between the condenser and the tank allows the vapors to condense and drain back into the liquid container. This re-distillation cleans the rising vapors and increases the purity of the vodka.
Part 5 of 6: Distilling the mash
 1 Prepare for distillation. In the distillation apparatus, fermented and containing relatively little alcohol, mash is heated to a temperature that is higher than the boiling point of alcohol, but below the boiling point of water. As a result, the alcohol evaporates, but almost no water. The evaporated alcohol (and a small amount of the evaporated water) rises up the column or pipes of the distillation apparatus.
 - The column or pipes are cooled externally with cold water, and as a result, alcohol vapors condense. The condensed alcohol is collected in a receiving container, and vodka is obtained.
 2 Preheat the mash in the distillation apparatus to start the distillation process. This can be done with a gas burner, wood or electric oven, depending on the type of appliance used. At sea level, it is advisable to heat the mash to a temperature of about 78 ° C, while the temperature should not exceed 100 ° C (the boiling point of water).
 - When the wash heats up, alcohol and other substances will begin to evaporate and condense in the cooled part of the machine.
 3 Throw away the pervach. The top cut, called pervac, contains large amounts of harmful methanol and other volatile substances that toxic and can be fatal... If you are distilling 20 liters of mash, pour at least the first 60 milliliters of distillate.
 - Never drink Pervach!
 4 Collect the rest of the distilled liquid. After you drain the pervach, the condensed liquid will contain the alcohol (ethanol) you need, as well as some water and other substances. This part is called the "body". If you are using a cold running water column, you can adjust the water flow at this stage to control the yield and purity of the distillate.
 - Expect to get 2-3 teaspoons (10-15 milliliters) of distillate per minute. Increasing the yield of the distillate decreases its purity.
 5 Pour out the tails. By the end of the distillation process, when the temperature rises to 100 ° C or more, other harmful substances will appear in the distillate. They are called "tails" and contain fusel oils. It is undesirable to leave the tails, as they contain propanol and butanol, so drain them.
 - Be sure to dump the tails - they should not be drunk!
 6 Check the alcohol content and purity of the distillate. Cool the distillate sample to 20 ° C and measure the alcohol concentration using an alcohol meter. The distillate may contain less than 40% alcohol (this is what standard vodka contains) or be stronger than it should be (for example, contain more than 50% alcohol).
 - Vodka is usually diluted before bottling, so the distillate can have a very high alcohol content. In addition, the distillate may also have a strong odor, and additional distillation or carbon filtration will be required.
 7 Distill the liquid again if necessary or desired. This will increase the concentration of alcohol and better purify the distillate. To obtain high-purity vodka, the distillate is often distilled 3 or more times.
 - Please note that with every distillation, you should get rid of the perch and tails!
- Premium vodkas are distilled 4-5 times, and most other brands are distilled 3 times before being diluted and bottled.
Part 6 of 6: Finishing Touches
 1 Pass the vodka through activated carbon. Pass the distillate through an activated charcoal filter (available from a local brewery store) to remove unwanted volatiles and odors. Carbon water filters can also be used to purify the distillate.
  2 Dilute the vodka to the desired strength. Add purified water to the distillate to obtain the desired alcohol content. When doing this, measure the alcohol concentration with an alcohol meter.
  3 Bottle the vodka. Pour the vodka using gravity bottle filler and close the bottles with corks or caps. Label bottles if desired. Some gravity fillings contain a 30-liter filling container with a tap, a vinyl tube, and a simple spring-loaded plastic bottle spout. You can also use a multi-spout wine filler.
Tips
- The vodka can be flavored as desired.
- Excellent small stills are produced in New Zealand.
- You may need to adjust the pH of the wort with gypsum or other substances for the starch-breaking enzymes to work effectively.
- In Russia, it is allowed to make vodka at home for your own consumption, but not for sale. In addition, making vodka at home is allowed in countries such as New Zealand and the Czech Republic.
Warnings
- Be sure to pour out the first about 5% of the distillate. They contain methanol, which is poisonous to the optic nerve and can be fatal if ingested!
- Alcohol is flammable and potentially toxic.
- In many countries, it is illegal to produce and consume alcohol by persons under 18 or even 21 years of age.
- Leaking in the distillation apparatus, as well as any contact of alcohol or its vapors with an open flame can lead to an explosion and fire.
- For safety reasons, it is better to distill alcohol not at home, but elsewhere.
- Distilleries are heated by open fire and other methods that can cause damage and burns, as well as lead to an explosion, especially given the flammability of alcohol.
- High pressure can build up in the fermentation tank, which can cause an explosion. Distillation apparatus are usually not closed, so no overpressure builds up inside them.
- In many countries, including the United States and Australia, the production of alcoholic beverages at home is prohibited.
- When making a distillation apparatus, keep in mind that during the distillation process, chemicals from plastic and rubber, as well as lead from solder and other metals, can enter the distillate.


