Author:
Sara Rhodes
Date Of Creation:
10 February 2021
Update Date:
1 July 2024

Content
This article discusses how to lay a cable for the Internet, television or any other cable in an existing building.
Steps
 1 First of all, you need to decide on the "route" of the cable around the house. Keep in mind that most of the time, wall posts are vertical, from floor to ceiling. The location of the ceiling beams depends on the builder, building type, regulations, etc. Go up to the attic and look around, or cut a small hole somewhere in the ceiling and peer into it.
  2 The less work the better. Try to organize your route in such a way as to reduce the number of holes in the drywall. Closed ceilings (like in two-story houses) will be the biggest problem as you will have to remove a lot of drywall if you need to run the cable across the beams rather than along them.
  3 For the purposes of this article, we will imagine that we will be laying an Ethernet cable from a router on the first floor to an office on the second floor of our house. In practice, the "Ethernet" cable can be replaced with any other cable you are installing. The only thing that will change is the end connections.
 - Our router is located in the farthest corner of the house from the office (to make it more difficult). And the ceiling beams will be located across the cable route (even more difficult). It is often best to find an area with pre-existing wiring, such as a power outlet or TV cable. Then you can simply pull the cable through the existing contractor holes. In our case, we will be placing a wall box.
 4 Decide on the point of entry for the cable into the office on the second floor.
- Note:
- You can follow the simple path if there is a baguette on the ceiling. Just pry the baguette lightly with a suitable tool. At this stage, you need an assistant and caution. Especially with older baguettes. A sudden movement can damage any baguette, and old baguettes generally crumble easily. Then run the cable behind the baguette and into the wall as described below.
- Explanation of wall trunks:
- We'll look at a couple of types. The first will be the "new" box. And the point here is not whether the box is really new. This means installing the box in a place where there is no drywall yet. They are usually installed where there is no drywall or other obstruction.
- The second type is the "old" box.This means that the house is already completely ready, and you do not have the convenience of an open area for work. Typically, these boxes have small ribs that fold back behind the drywall and hold the box tightly after tightening the screws. We need an old box today.
- Note:
 5 Use the post finder to locate the post in the wall so we know where to place the wall box.
 6 Draw the location of the stand with a pencil.
- Usually the distance between the center of the posts is 40 cm. Sometimes the distance between them can be greater. It depends on building codes, curtain walls and construction savings.
 7 Remove any baguettes that could be damaged. Cover the floor.
  8 ALWAYS WORK WITH PROTECTIVE GLASSES!!
  9 Turn OFF the electricity in the room where you will be working. This is safer in case you touch or cut the wires in the wall. Get in the habit of always turning off the electricity when you are blindly working inside a wall.
  10 Using a mounting knife, cut a hole to fit the wall box. Do not forget that the outer edge of the wall box should press it against the wall by means of ribs. Do not cut too large a hole. Less is better, because it can always be expanded.
  11 Look through the hole for pipes or other obstructions?
- Now you have to spoil the appearance of the room a little. Since our cable runs across the beams, we can only cut the drywall on the ceiling. Don't forget, this is a closed ceiling between floors. At home, you can find an easier way to run the cable. We will consider the most difficult option.
 12 With a meter lay a straight line across the ceiling. Preferably next to the wall (20-25 cm from it) to hide defects when re-installing drywall.
  13 Cut a hole in the corner of the ceiling where we will start routing the cable. Look into it and check that there are no obstacles. After making sure everything is in order, we make long cuts along the width of the ceiling. Make sure these pieces of drywall can be recovered later. Also, when cutting strips, try to cut in the middle of the beam, so that later there is something to attach the drywall to.
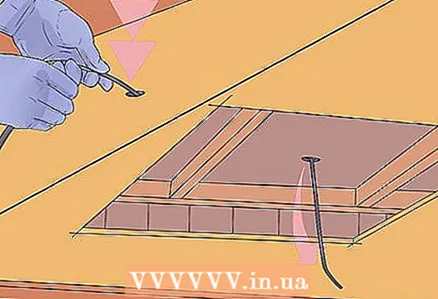
 - We now have an opening for work. Take a chisel drill and drill a straight row of holes in the cable beams. Make the holes high enough not to damage the cable when we screw the drywall in place.
 14 We repeat this step for all sections of the ceiling where the cable will be laid across the beams. When laying along the beams, one hole at the beginning and one at the end is sufficient, after which you can use a special wire. Since we have already decided on the route, you already know where to make the holes.
  15 Now we need free access to lay the cable to the second floor.
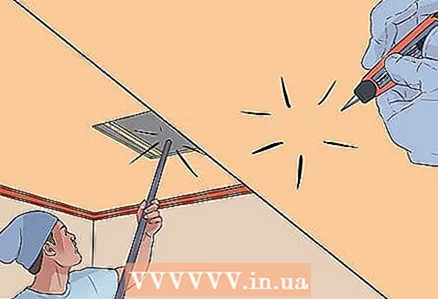 16 Go to the office and, following the instructions described above, install the wall box in the desired location. Be sure to check that there are no obstacles.
 - Your friend (let it be Andrey) stays on the ground floor to help you find the best drilling site. Use a hammer or something else to tap the floor in the opening until both of you meet at the correct point.
 17 Use the chisel drill again to drill a hole from the first floor to the second. Andrey will drill, and you make sure that the hole is made at the correct point. This will be a thick layer of planks as it carries the load.
 - If everything is done correctly, then everything is now ready to lay the cable.
 18 Start at the top to make the most of gravity. Lower the cable into the holes and pull gently. All it takes to turn is to pull out enough cable to relieve stress on it.
  19 If you have never done this, but you need to use wire to pull cables through, then this is very simple. Whenever you need it, unwind the wire, push it through the holes until it comes out in the right place, and attach the cable to the end with electrical tape. Then carefully pull the wire back. That's all.
  20 Now we need to run the ends of the cable through the corresponding wall boxes, attach the connectors and test the cable to work before sealing the openings.
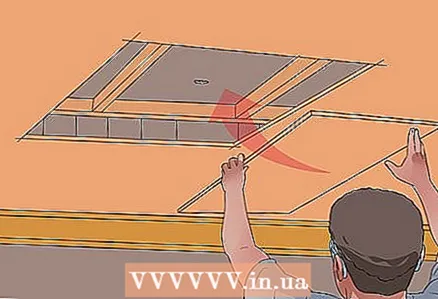 21 Since we did everything well and correctly, it's time to reinstall the drywall.
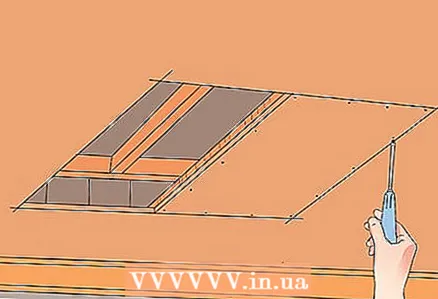 22 Use screws or glue (liquid nails or construction glue) to secure the drywall in place. Seal the drywall properly: tape, putty, sanding and painting. Then replace the baguettes.
  23 This is how the cable is laid in an existing building. Your particular case may differ significantly from the one described. Make the necessary changes, and you already know the basis for the work.
Tips
- If you have not done anything like this before, then it is recommended that you read about all the questions you are interested in on the Internet or ask a friend who understands them.
Warnings
- There is a danger of electric shock
- There is a risk of property damage or personal injury
- Do not try to do this job if you are not confident in your abilities or know little / nothing about the house arrangement, electrical wiring, pipe laying, etc.
- There is a risk of damage to pipelines
- Be careful when doing work
- These tips are based on the experience and knowledge of the author. Do not try to get the job done if you are not familiar with the tools or do not know their purpose.
- These tips are provided for reference only and the author is not responsible for any damage or damage.
- Just use common sense. If you are not 100% sure that you can cope with the task at hand, then it is better to use the services of a qualified specialist.
What do you need
- General knowledge of construction work and the use of tools
- Long wire for pulling cables through walls, available at hardware and hardware stores
- Drill
- Chisel drill 12 or 25 mm, depending on the cable
- Long drill bit to drill the ceiling
- Insulating tape
- Wall boxes, plates and corresponding connectors
- Mounting knife
- A hammer
- Wall post finder
- Torch
- Meter
- Cable
- One or two assistants
- Ability to work with drywall (if necessary)


