Author:
Clyde Lopez
Date Of Creation:
17 June 2021
Update Date:
1 July 2024

Content
1 Grasp the handle correctly. Remove the cap from the handle and take it in your main hand, gently squeezing it between your thumb and forefinger. In this case, the body of the handle should rest on the middle finger. Use the rest of your fingers to rest on the paper to stabilize your hand.- It is very important to hold the fountain pen correctly, as this will avoid hand fatigue while writing and will facilitate your work.
- For further writing, the removed cap can be put on the opposite end of the pen or simply removed if it bothers you.
 2 Place the nib of the pen on the paper. It may seem simple enough to do this, but the design of a fountain pen is somewhat more complex than that of a ballpoint pen. Because of the pointed nib, instead of the ball at the end, the pen must be properly applied to the paper so that it can write. This is the so-called optimal position.
 - Tilt the pen at a 45-degree angle and place it against the paper.
- Make the pen a few strokes, rotating it slightly in your hand, until you achieve a smooth writing without scratching or gaps.
3 Hold the handle firmly. When writing, there are two ways to control the pen: with your fingers or your hand in general. When you work with a ballpoint pen, it is quite possible to do with only your fingers, since thanks to the ball, the pen will write in any position. But the fountain pen needs to be controlled with the whole hand so as not to miss the optimal position. Therefore, use the recommendations below. - With the pen in your hand, keep your fingers and wrist still, using your entire hand while writing to move the pen. Practice writing in the air first, and then on paper to gradually get used to writing with your whole hand.
4 Press lightly on the pen while writing. You do not need to press hard on the fountain pen, however, you do need to apply some pressure on the nib for ink to flow into it. Press down gently on the nib and begin practicing writing with the fountain pen. - Write in a light handwriting, as excessive pressure on the nib can ruin the nib and disrupt the ink supply system.
- Writing with your entire hand (not your fingers) will also help you avoid putting too much pressure on the pen.
Part 2 of 3: How to fill the fountain pen with ink
 1 Determine the type of fountain pen. Today, you can find three types of fountain pens on sale: with cartridges, converters and a built-in piston system. The difference between the two lies in the ink supply system and the way the pen is filled with ink when it runs out.
 - Cartridge fountain pens are currently the most common, as cartridge replacement is the easiest to change. To write with this type of pen, you will need to buy off-the-shelf ink cartridges and periodically replace them in the pen when ink runs out.
- The converter pens are equipped with a refillable cartridge that fits inside. They are perfect for you if you don't mind refilling the cartridge yourself every time they run out.
- Piston handles are similar to converter knobs, except they have a built-in refueling system, so you don't have to replace the refillable cartridge with a converter sold separately.
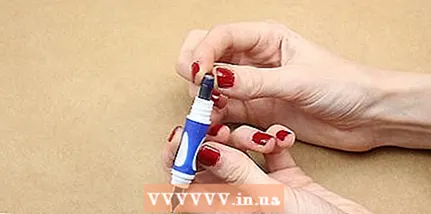
- 2 Replace the fountain pen cartridge. First remove or unscrew the cap from the handle, then unscrew its body. Take out the empty cartridge from the inside. Then follow the steps below with the new cartridge.
- Insert the narrow end of the cartridge into the part of the pen where the nib is attached.
- Press down on the cartridge until it clicks when the ink supply nipple on the nib pierces the cartridge.
- If the pen does not start to write right away, hold it upright so that gravity drains the ink towards the nib. This process can take about an hour.
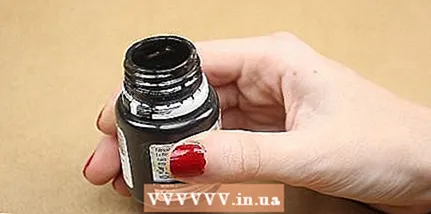
 3 Fill the piston handle. Remove the cap from the nib and, if necessary, the extra cap at the back of the pen that covers the piston mechanism. Rotate the plunger adjuster (usually counterclockwise) so that the plunger is at the nib of the pen. Then follow the steps below.
 - Dip the nib completely into the ink jar so that the ink hides the hole in the base of the nib.
- Start turning the plunger clockwise to draw ink into the pen.
- When the ink bottle is full, remove the pen from the ink bottle. Rotate the plunger counterclockwise a little again to let a few drops of ink back into the jar. This will allow you to get rid of air bubbles.
- Wipe the ink off the nib with a tissue.
 4 Fill the converter handle. There are two types of converters in fountain pens: with a piston mechanism or with a pipette filling system. To refill a pen with a pipette system, remove the cap from the pen, unscrew its barrel, dip the pen in ink, and then follow the steps below.
 - Slowly press down on the ink reservoir and wait for air bubbles to appear on the ink surface.
- Release the ink reservoir slowly and wait for it to fill with ink.
- Repeat these steps until the reservoir is full.
Part 3 of 3: How to Use the Nibs Properly
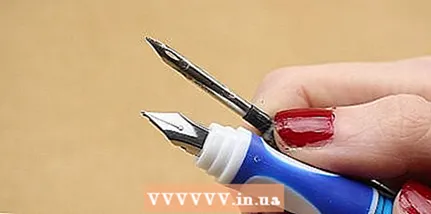
 1 Choose the right nib for your everyday writing. There are many different types of fountain pen nibs that are designed to be used in a variety of situations and to create a variety of effects. For daily writing, opt for:
 - feather with a rounded end, leaving behind uniform lines;
- a small pen, writing in thin lines;
- a stiff nib that extends slightly to the sides so it won't break under pressure when you press on it in an attempt to create bolder lines.
- 2 Choose nibs for decorative writing. To write in decorative or calligraphic handwriting, you will not be able to use the pens used for everyday writing. Instead, opt for one of the options below.
- Use a blunt nib for calligraphy, which will be wider and flatter than rounded nibs. These pens can create both wide and narrow lines: vertical strokes will correspond to the width of the nib, and horizontal strokes will be thin.
- Use wider feathers to create thicker lines. Calligraphy nibs are usually available in five sizes: very narrow, narrow, medium, wide and very wide.
- Flexible and semi-flexible nibs allow you to control the width of your strokes by increasing or decreasing pressure when writing.
 3 Explore the characteristics of feathers from different materials. Ink nibs are made from a variety of metals, each with its own unique properties. The most common feather metals are listed below.
 - Gold has increased flexibility, so it is easy to control the width of the lines with the gold nib.
- Steel has increased elasticity, which allows you to push harder on the steel nib without separating its halves, so the lines do not get wider from the pressure on the nib.
- 4 Flush the pen and ink supply periodically. To keep the pen working as efficiently as possible, the pen and ink delivery mechanism should be flushed about once every 6 months, or whenever the type or color of ink is changed. Follow the steps below to rinse the pen.
- Remove the cap from the handle and unscrew it. Take out the ink cartridge. If there is still ink in it, cover the opening of the cartridge with tape to prevent the ink from drying out.
- Place the nib under running water at room temperature to rinse the ink off the nib. Then submerge it in a bowl of clean water, feather down. Refresh the water as the ink stains. Repeat until the water is invariably clear.
- Wrap the nib in a soft, lint-free cloth such as microfiber. Then place this half of the pen in the mug, pen down, and leave to dry for 12-24 hours. When the handle is dry, reassemble it.
- 5 Take care of the feather. To prevent the nib from getting clogged, always store the nib with the nib facing up when not in use. To prevent damage and injury from the pen, use the cap or store the pen in a protective case.


