Content
- Steps
- Method 1 of 3: How to connect an internal hard drive
- Method 2 of 3: How to connect an external hard drive (Windows)
- Method 3 of 3: How to connect an external hard drive (macOS)
- Tips
- Warnings
This article will show you how to connect a second hard drive to your computer. Keep in mind that it is not possible to install a second hard drive on modern laptops or Macs. However, you have the option of replacing the primary hard drive (this will likely void your warranty). If you can't install an additional internal hard drive on a Windows or macOS computer, connect an external hard drive.
Steps
Method 1 of 3: How to connect an internal hard drive
 1 Make sure your computer is running Windows. You cannot install an additional hard drive on modern Windows or macOS laptops and Mac desktops.
 - You can connect an external hard drive to your Windows and macOS computer.
 2 Buy an internal SATA hard drive. Do this if you do not already have such a disk.
 - Better to buy a hard drive made by the same company as your computer (eg HP).
- Some hard drives are not compatible with some computers. Before purchasing a hard drive, search for your computer model and hard drive model (for example, search for “HP Pavilion Compatible with L3M56AA SATA”) to see if they will work together.
 3 Turn off your computer and unplug it. Do not work inside the computer while it is on, as this could damage components or result in injury.
 - Some desktop computers shut down within a couple of minutes. In this case, wait for the computer fans to stop working.
 4 Open the computer case. This process depends on the model of your computer, so read the instructions for your computer or find related information on the Internet.
 - In most cases, you will need a Phillips screwdriver.
 5 Ground yourself. This will prevent accidental damage to sensitive internal components of the computer (such as the motherboard).
  6 Find an empty hard drive bay. The main hard drive is installed in a special compartment of the computer case; next to this bay should be a similar empty bay in which you will install the second hard drive.
  7 Insert the second hard drive into the bay. The bay is located under or above the primary hard drive bay. Insert the disc so that the side with the cable connectors is facing the inside of the computer case.
 - In some cases, the drive needs to be secured with screws.

Spike baron
Network Engineer and User Support Specialist Spike Baron is the owner of Spike's Computer Repair. He has over 25 years of experience in technology and specializes in PC and Mac computer repair, used computer sales, virus removal, data recovery, and hardware and software updates. Holds CompTIA A + certifications for computer service technicians and Microsoft Certified Solutions Expert. Spike baron
Network Engineer and User Support SpecialistOur expert agrees: “After you open the case, insert the hard drive into the dedicated drive bay and secure it with the screws. Then connect the power cable to the hard drive, and then the SATA cable (connect one end to the hard drive, and the other to a free connector on the motherboard). "
 8 Locate the hard drive connector. Run the cable over the primary hard drive to find out where the hard drive connectors are on the motherboard. (A motherboard is a large board that connects other boards and devices.)
 - If the cable of the primary hard drive looks like a wide thin tape, it is an IDE hard drive. In this case, you will need an adapter to connect the second hard drive to the motherboard.
 9 Connect a second hard drive. Connect one end of the cable to the second hard drive and the other to the connector on the motherboard (this connector is located next to the connector to which the primary hard drive is connected).
 - If your computer motherboard has only IDE connectors (connectors several centimeters long), buy a SATA-IDE adapter. In this case, connect the adapter to the motherboard, and the cable of the second hard drive to the adapter.
 10 Connect the second hard drive to the power supply. Connect one end of the power cable to the power supply and the other to the second hard drive.
 - Typically, the power supply is located at the top of the computer case.
- The power cable plug looks like a wider SATA cable plug.
 11 Make sure all cables are securely and correctly connected. Otherwise, the operating system of the computer will not recognize the second disk.
 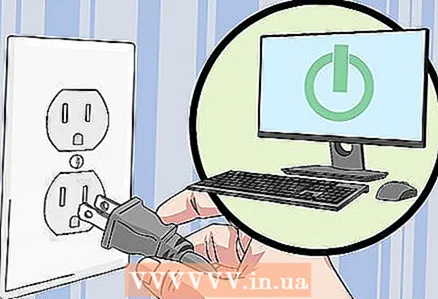 12 Connect your computer to an electrical outlet and turn it on. Now you need to make Windows recognize the second hard drive.
  13 Open the Disk Management window. Right Click on the Start Menu
  in the lower-left corner of your screen, and then choose Disk Management from the menu.
 - You can also click ⊞ Win+Xto open the menu.
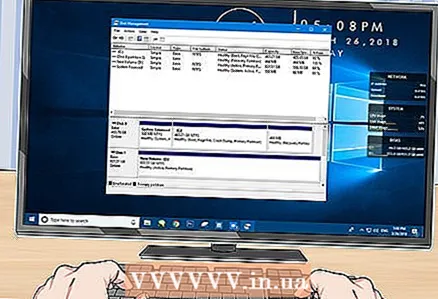 14 Wait for the "Initialize Disk" window to open. It will open a few seconds after the Disk Management window opens.
 - If the Initialize Disk window does not open, click Refresh above the Location tab at the top of the window.
 15 Click on OKwhen prompted. Windows will now initialize the second hard drive.
  16 Make the second hard drive usable. Right-click the name of the second hard drive, select Create Simple Volume from the menu, and then click Next on a few pages. Now you can work with the second hard drive.
 - The second hard drive can be accessed from the This PC window.
Method 2 of 3: How to connect an external hard drive (Windows)
 1 Buy an external hard drive. Buy a drive with sufficient capacity and from a reliable manufacturer such as Western Digital or Seagate.
 - Keep in mind that a 1TB external hard drive doesn't cost much more than a 500GB drive, so it's better to buy a larger drive.
- A 1TB drive can be purchased for less than RUB 6,000.
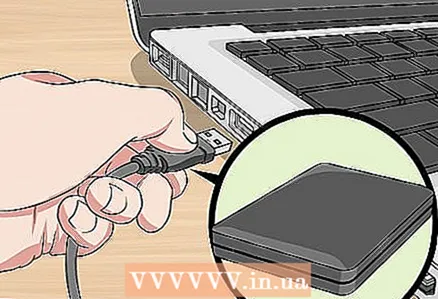
 2 Connect your external hard drive to your computer. Connect the USB hard drive cable to one of the USB ports on your computer.
  3 Open the start menu
  . Click on the Windows logo in the lower left corner of the screen.
  4 Open an Explorer window
  . Click on the folder-shaped icon in the lower left corner of the menu.
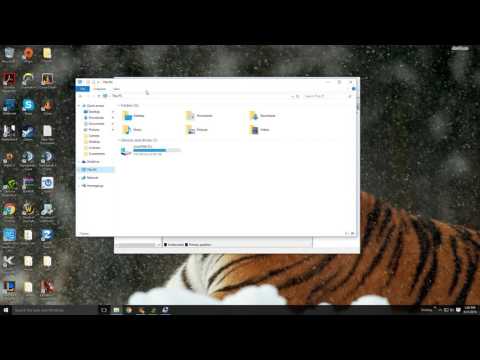
  5 Click on This computer. It's on the left side of the menu.
 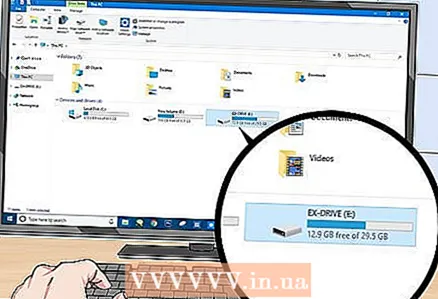 6 Select the name of your external hard drive. Click on the name of your external hard drive under Devices and Drives in the middle of the This PC window.
 - The external hard drive name usually includes the manufacturer's name or model.
 7 Click on Control. It's a tab in the upper left corner of the window. A toolbar appears below the tab.
 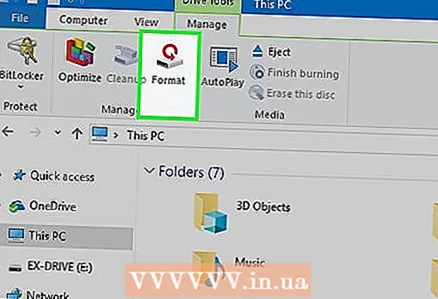 8 Click on Format. It's on the left side of the Manage toolbar. A pop-up window will open.
  9 Select the file system format. From the File System menu, select NTFS or ExFAT.
 - A disk in NTFS format can be used only on Windows, and in exFAT format - on any system, including macOS.
 10 Click on Run. This button is at the bottom of the window.
 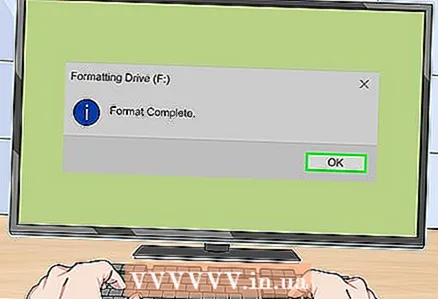 11 Click on OKwhen prompted. The process of formatting the external hard drive will start.
 - When the external hard drive is formatted, click "OK" - now the external hard drive can be used as a second hard drive.
Method 3 of 3: How to connect an external hard drive (macOS)
 1 Buy an external hard drive. Buy a drive with sufficient capacity and from a reliable manufacturer such as Western Digital or Seagate.
 - Make sure the selected hard drive has a Thunderbolt connector (also known as USB-C), as modern Macs don't have USB 3.0 ports.
- Keep in mind that a 1TB external hard drive doesn't cost much more than a 500GB drive, so it's better to buy a larger drive.
- A 1 TB drive costs less than RUB 6,000.
 2 Connect your external hard drive to your computer. Connect the Thunderbolt cable of your external hard drive to one of the USB-C ports on your Mac.
 - If you bought a USB 3.0 external hard drive, purchase a USB3.0 to Thunderbolt 4 (or USB3.0 to USB-C) adapter.
 3 Open the menu Transition. It's in the menu bar at the top of the screen.
 - If you don't see this menu, click on the desktop or open a Finder window.
 4 Click on Utilities. It's on the Go menu. The Utilities folder will open.
  5 Run Disk Utility. Double-click the hard drive icon with a stethoscope.
  6 Select an external hard drive. Click on the name of the external hard drive on the left side of the window.
 - The external hard drive name usually includes the manufacturer's name or model.
 7 Click on Erase. It's a tab at the top of the Disk Utility window. A pop-up window will open.
  8 Choose a format. Click the Format menu at the top of the window and select Mac OS Extended (Journaled).
 - To use the external hard drive on any system (not just macOS), select "ExFAT".
 9 Click on Erase. It's near the bottom of the window.
  10 Click on Erasewhen prompted. The process of formatting the external hard drive will start. When the process is complete, the external hard drive can be used as a second hard drive.
Tips
- You can install an operating system on an external hard drive. In this case, do not disconnect the external hard drive from the computer.
- SATA drives are more commonly used and faster than IDE drives. Moreover, the SATA cable does not impede air circulation inside the computer case.
Warnings
- Most hard drives are sensitive to electrostatic discharge, so be sure to ground yourself before working on the inside of your computer.


