Author:
Gregory Harris
Date Of Creation:
7 August 2021
Update Date:
20 June 2024

Content
- Steps
- Method 1 of 7: Getting Started
- Method 2 of 7: Adding Tracks Using "Software Instrument"
- Method 3 of 7: Adding Tracks Using "Real Instrument"
- Method 4 of 7: Adding loops
- Method 5 of 7: Importing Media
- Method 6 of 7: Editing Tracks
- Method 7 of 7: Exporting Your Track
- Warnings
- Additional articles
With GarageBand, you can record music on Mac computers. Includes an on-screen mini keyboard, multitrack recording system, and an extensive loop library. Music created with GarageBand can sound quite professional with the right approach. Learn how to use GarageBand in this guide.
Steps
Method 1 of 7: Getting Started
 1 Launch Garageband and choose "File> New" in the upper left corner of the screen. Come up with a title for your new song, and set the tempo and key as needed.
  2 When a new screen appears, click on the "+" symbol in the lower left corner. This will create a new track.
 - Important: you can also do this by choosing "Track> New Track" from the top menu.
- 3 Decide which tool you want to use: "Software Instrument", "Real Instrument", or "Electric Guitar".
- "Software Instrument" lets you write music using built-in GarageBand instruments and either a regular keyboard or a musical keyboard connected via MIDI or USB.
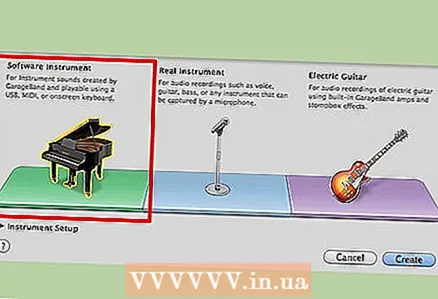
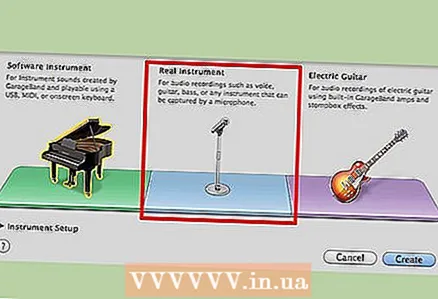
- "Real Instrument" allows you to record voice or real instruments using a microphone.
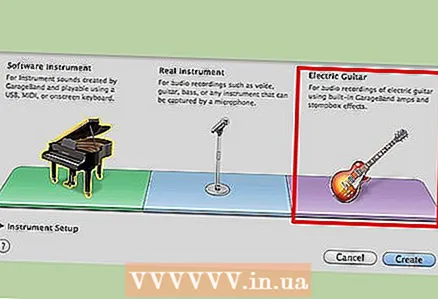
- "Electric Guitar" lets you process your real-life electric guitar recording with GarageBand's built-in amp, sustain, and delay effects.
- "Software Instrument" lets you write music using built-in GarageBand instruments and either a regular keyboard or a musical keyboard connected via MIDI or USB.
Method 2 of 7: Adding Tracks Using "Software Instrument"
 1 Select the "Software Instrument" option. The default instrument is "Grand Piano", but you can choose from an extensive list to use. When you add a new track, a menu will appear on the right side of the screen, in which you can select an instrument of your liking.
 - To display or hide this menu, click on the "i" symbol in the lower right corner of the screen.
 2 Use the onscreen GarageBand keyboard. You can play any instrument of your choice using the on-screen GarageBand keyboard. To display it, press the "Window> Keyboard" key combination or hold down "Command + K". Just click the keyboard keys to play music.
 - You can also use the "Musical Typing" option, which will allow you to use your computer's real keyboard. To do this, select "Window> Musical Typing" or hold down the key combination "Shift + Command + K". You can also switch to this mode from keyboard mode by clicking on the "A" symbol in the upper left of the keyboard.
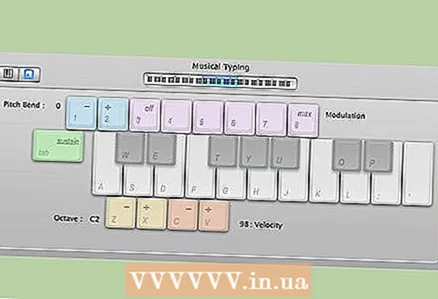
- In both cases, the part of the mini-keyboard that is highlighted in blue is the currently active octave. You can change the octave by clicking on a different part of the mini keyboard.

- You can also use the "Musical Typing" option, which will allow you to use your computer's real keyboard. To do this, select "Window> Musical Typing" or hold down the key combination "Shift + Command + K". You can also switch to this mode from keyboard mode by clicking on the "A" symbol in the upper left of the keyboard.
 3 Record the track. To record, click on the round red button at the bottom of the screen. Next, while in the "Keyboard" or "Musical Typing" window, start playing. After recording starts, a bar corresponding to the new track will appear next to the name and image of the instrument. During recording, this bar will be red and will grow to the right. When you decide to finish recording, press the red button again. The bar will change color from red to green.
Method 3 of 7: Adding Tracks Using "Real Instrument"
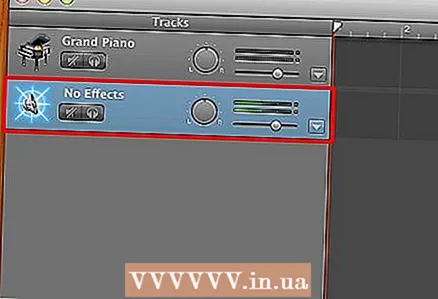 1 Select the "Real Instrument" option when adding a new track. You can record your voice or other sounds using a microphone connected to your computer. When you select this option, a speaker image and “No Effects” will appear on the left side of the GarageBand window under Tracks.
  2 Record the track. To start recording, click on the round red button at the bottom of the screen, just like with "Software Instrument." After you start recording, the bar corresponding to the "Real Instrument" track will change color to red and grow to the right until you stop recording by pressing the "Record" button again. When the recording is finished, the bar will change color to purple.
 - When recording using a microphone connected to your computer, try to sing or play as cleanly as possible while being as close to the computer as possible. Try to eliminate most of the ambient noise.
Method 4 of 7: Adding loops
 1 Open the "Loop Browser". Loops are pre-built music pieces that come with GarageBand. To access them, click on the eye image in the lower right corner of the screen. A window will open with a list of many different types of buttonholes that you can use.
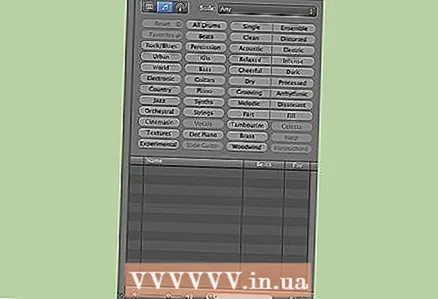
  2 Find the loop that works for you. "Loop Browser" allows you to select loops according to a variety of parameters, such as size, instrument, mood, genre and tone. You can select several parameters at once. For example, you can only search for loops that match the Jazz, Piano, and Grooving parameters. After connecting the necessary filters, you will see a list of available loops.You can listen to any of them by double-clicking on its name. You will also receive information about the tempo, key and length of the loop, and you can also add the loop to your favorites list.
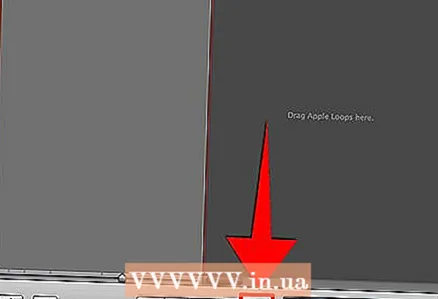
  3 Drag the selected loop onto the track list. To add a loop as a track to your song, drag it from the list of available loops to the middle of the screen. Release and the loop will be added as a new track. It will be presented as a picture of the tool that was used to create this loop.
 - You can repeat the loop many times by simply dragging and dropping several loops in a row, one after the other.
Method 5 of 7: Importing Media
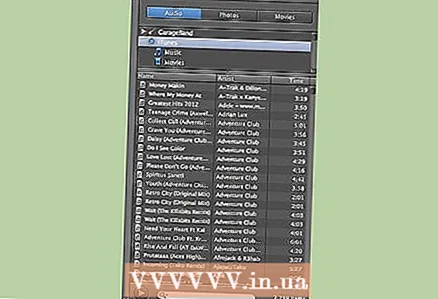 1 Open the "Media Browser". You can import your songs from your iTunes library as follows. To open the Media Browser, click the musical note and film clip in the lower-right corner of the GarageBand window.
  2 Find the media you want to import. Enter the name of a song or musician in the search field in the lower-right corner of the GarageBand screen. You can listen to a song by double-clicking on its name in the list.
  3 Drag the song to the track list. Select the song you want and drag it to the middle panel. Release the mouse button and the song will be added as a new track, represented by the song title and speaker image.
 - Now you can edit the track and combine it with your other tracks and loops. This way you can create remixes of your favorite songs.
Method 6 of 7: Editing Tracks
 1 Experiment with the different features of GarageBand. Once you've added all the tracks you want, you can edit them to sound better in tandem. There are many different possibilities for this. With the following steps, you will learn the most useful ones.
  2 Dividing tracks This allows you to divide tracks into multiple sections, which can then be swapped. To do this, drag the red line that marks the current position to the point along which you want to split. Then select "Edit> Split" from the main menu. Then you can move parts of the track independently of each other.
 - To reconnect the split pieces together, click on the first piece and hold down Shift and click on the second. Both parts should be highlighted. Then choose "Edit> Join" from the main menu.
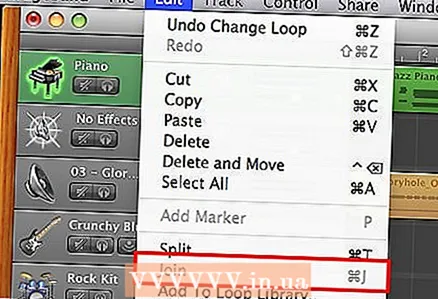
- To reconnect the split pieces together, click on the first piece and hold down Shift and click on the second. Both parts should be highlighted. Then choose "Edit> Join" from the main menu.
- 3 Changing the volume of a track You can change the volume of the tracks so that some are louder than others. This can be done in two different ways.
- By adjusting the volume, which is in the "Tracks" section, in the same place as the images and names of the instruments. Find the circle with the letters "L" and "R" next to it. (More on this later.) Next to this circle is the volume bar. Scroll the dial to the left to decrease the volume and to the right to increase it. This will change the volume for the entire track.

- Clicking on the down arrow to the right of the tool image. After that, a cell will appear with the inscription "Track Volume". To the right of it is the track volume control. At standard settings, the volume will be at half the maximum. Click on the thin line (the line will be the same color as the track to which it belongs, for example, green in the case of a piano track) and drag it up or down. (A small node will appear each time you click.) This way you can change the volume at different points in the track.

- By adjusting the volume, which is in the "Tracks" section, in the same place as the images and names of the instruments. Find the circle with the letters "L" and "R" next to it. (More on this later.) Next to this circle is the volume bar. Scroll the dial to the left to decrease the volume and to the right to increase it. This will change the volume for the entire track.
- 4 Setting track panning This will allow you to control which channel (left or right) of your speakers or headphones the sound will come from. As well as volume, panning can be adjusted in two ways.
- To the right of the track tool image is a knob with the letters "L" and "R" on either side. Rotate this knob to adjust the panning of the track. Turning it all the way to one side will make the track sound from only one channel.If you turn it only partially, the track will sound more in one channel, but overall the sound will still come from both. Any changes you make will affect the entire track.

- Click on the down arrow located under the track tool name. Click on the cell labeled "Track Volume" and switch it to "Track Pan". Now you can change the panning in the same way as you changed the volume before. Click on the thin colored line and move it up or down to adjust the balance of the left and right channels for different parts of the song.

- To the right of the track tool image is a knob with the letters "L" and "R" on either side. Rotate this knob to adjust the panning of the track. Turning it all the way to one side will make the track sound from only one channel.If you turn it only partially, the track will sound more in one channel, but overall the sound will still come from both. Any changes you make will affect the entire track.
 5 Adjust the pitch, duration and position of notes. You can manually change the characteristics of the notes you played when creating the "Software Instrument" track. To access these features, click the scissors symbol in the lower-left corner of the GarageBand screen. You will see an enlarged view of the various notes on the track. Click on a note to select it. It will change its color from white to the color of the track. Each time you click on a note, it will play.
 - Move the scales labeled "Pitch" and "Velocity" to change the pitch and duration. You can click on a note and hear how it will sound after your changes. (Changing the pitch will cause the note to sound higher or lower, and changing the length will affect the duration.)

- To change the location of the notes, that is, to quantize them, click on the panel under the "Adjust to" label. The default is "None". Select a time interval and the selected note will be moved to the closest point of this interval.

- You can also quantize all notes at the same time. To do this, click on the area in which the notes are located, and not on any individual note. After that, the inscription "Adjust to" should change to "Enhance Timing". You can then display a list of possible intervals. Click on one of them to quantize the notes. You can always select "None" to revert to the original version of your song.
- Move the scales labeled "Pitch" and "Velocity" to change the pitch and duration. You can click on a note and hear how it will sound after your changes. (Changing the pitch will cause the note to sound higher or lower, and changing the length will affect the duration.)
Method 7 of 7: Exporting Your Track
 1 Save your song. Select "File> Save" from the main menu to save the track. The track will be saved with the name and location you specified when creating a new project. Select "File> Save As ..." to change the name and location.
  2 Submit the song to iTunes. To send your new song to iTunes, choose Share> Send Song to iTunes. You will need to enter information related to the track. It will take some time before the track is converted and exported. If you don't have iTunes running, it will launch itself and start playing your song.
 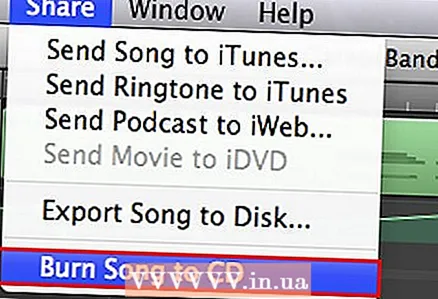 3 Burn the song to disc. To burn your song to disc, you first need to insert the disc into your computer's drive. Next select "Share> Burn Song to CD". Wait for the recording to finish before removing the disc.
Warnings
- Remember to save your work. Unlike iPhoto, GarageBand doesn't have an autosave feature.
Additional articles
 How to write lyrics
  How to learn to read sheet music
  How to read sheet music for drums
  How to write a rap song How to play drums How to play violin
  How to come up with an interesting name for your group
  How to beatbox correctly
  How to read sheet music for violin
  How to create a SoundCloud account
  How to play the ukulele
  How to Record a Song at Home Easily
  How to write a song
  How to compose a melody


