Author:
Mark Sanchez
Date Of Creation:
7 January 2021
Update Date:
1 July 2024
Content
- Steps
- Part 1 of 7: Customizing Your Preferences in the Work Category
- Part 2 of 7: Customizing Your Education Preferences
- Part 3 of 7: Customizing Your Preferences in the Locations Category
- Part 4 of 7: Making Changes to the About Me Category
- Part 5 of 7: Updating Your General Information Category
- Part 6 of 7: Updating Your Contact Category
- Part 7 of 7: Changing Your Favorite Quotes
- Tips
- Warnings
- What do you need
Each Facebook user is expected to fill in their profile details. However, such a task can seem daunting, especially when you consider how much you need to enter. Do not be afraid! Thanks to the presented article, you will quickly find out how you can easily and quickly fill out this information; just follow the instructions described here.
Steps
 1 Go to Facebook site and log into your social network account. After opening the page, you will be taken to your news feed, regardless of which version of the profile you are using.
  2 Click on your name in the upper right corner of the Facebook webpage.
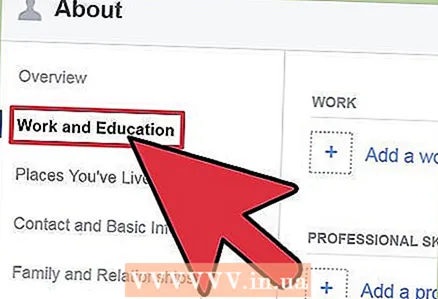
 3 Find the tab under your name on your profile called “About”.
 4 Click on the "About" button. As a result, you will be taken to a page containing all the displayed information about your account.
  5 Locate the section and data category that you would like to customize. There are many options to choose from, including: Work and Education, Living, General information (date of birth, address, religious, political, etc.) .) "(Basic information)," About me (favorite quote, or something that sets you apart from others) "(About Me), a separate block" Contact information (containing contact information and additional website) "(Contact Information) and an item called Favorite Quote. There is even a field for entering your relatives who are registered on Facebook.
  6 Follow the instructions for adjusting your settings in the section below titled “Adjusting Your Settings”.
Part 1 of 7: Customizing Your Preferences in the Work Category
 1 Find a category called Work and Education.
 2 Click on the "Edit" button in the upper right corner of this category.
 3 To get started, place your mouse cursor in the field marked “Where did you work?"(Where have you worked?).
 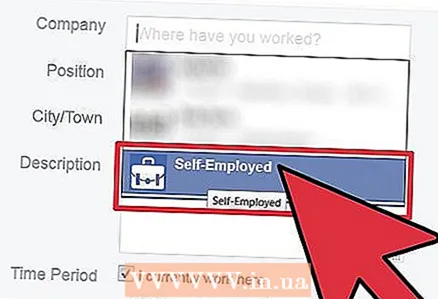 4 Enter the name of the organization you worked for. Do not add city / country information. The name of the company will suffice. You will be presented with a list of filtered results based on the entered text.
 - Occasionally, if there is no firm whose name has been printed in full, you will see a line titled Add (Business name).
- Select the required company name.
 5 Click on the "Edit" link to more accurately and properly indicate the years worked in the company and indicate your position, awards received, etc. When finished, click on the Add Job button.
 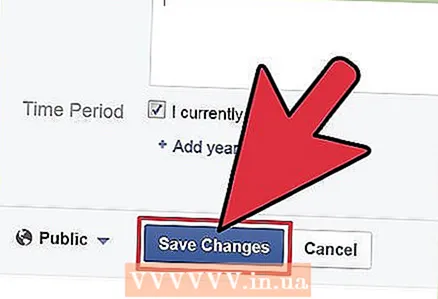 6 Click on “Finish Editing” in the upper right corner of the “Work and Education” section as you did before.
Part 2 of 7: Customizing Your Education Preferences
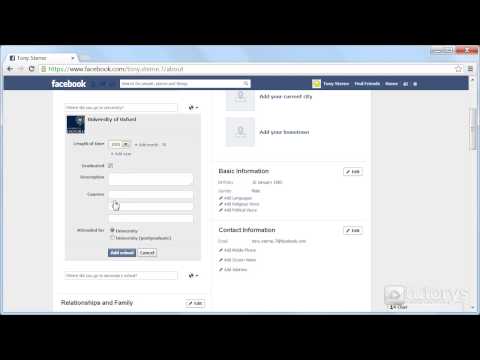
 1 Look for a category called Work and Education.
 2 Click on the "Edit" button in the upper right corner of this category.
 3 To get started, place the mouse cursor in the appropriate field marked “What university / university did you study at?"(Where did you go to college / university?).
  4 Enter the name of your university. Do not add city / country information. The name of the institute will suffice. You will be presented with a list of filtered results based on the entered text.
 - Although most of them are included in the lists, some are not. Therefore, do not be misled by unnecessary data.
- In addition, there is another edit field called "What school did you go to?" (Where did you go to high-school?) Where you can add your high school.
 5 Select the name of the school you want.
 6 Click on the Edit link to more accurately and appropriately indicate your years of school / college / university attendance, excellence in majors, and so on, as well as many other major educational accomplishments.
 7 Click on the Add school button when you have finished adding information related to work and study at a higher education institution, and have completed all other enumerations.
 8 Click on “Finish Editing” in the upper right corner of the “Work and Education” section as you did before.
Part 3 of 7: Customizing Your Preferences in the Locations Category
 1 Find the category called Living. You may have to scroll down a bit to find it. Click on the "Edit" button in the upper right corner of this category.
  2 Click on the empty field labeled "Current City". Enter the name of your current city of residence in the field and, if necessary, your province / state. Use only cities on the map. Based on Facebook settings, there is no Confusion area. (If your city is called "Diamond" and the area is "Confusion", then do not type "Diamond Confusion", because none of the options will be found. So, you added an incorrect and unverifiable location on the map).
 - Almost any city / region from all over the world is accepted here, but it may take a little longer to enter data (including district and so on). Keep this in mind.
 3 Place your mouse cursor in the Hometown field. Enter your location as you originally did above for Current City, filling in the relevant information here too.
  4 Click on the “Save” button in the lower right corner of the field after completing the entry of both items.
Part 4 of 7: Making Changes to the About Me Category
 1 Look for the category labeled "About You". You will probably need to scroll down the page slightly to see it.
  2 Click on the "Edit" button in the upper right corner of this category.
 3 Place your mouse cursor in the large box called Edit. Add some text that describes you in real life.
  4Click the Save button .br>
Part 5 of 7: Updating Your General Information Category
 1 Find the category called Basic Info. You may have to scroll down the page a little to notice it.
  2 Click on the "Edit" button in the upper right corner of this category.
 3 Click on the first field. Enter or select the necessary answers to the questions: "Gender", "Birthday" (in the form of separate drop-down lists), "Relationship status" (married, etc.), any languages, in which you can speak fluently (Languages, Religion type and Political Party, if any).
 - Even if Facebook was not designed to establish romantic relationships between users, there is still another field that can help you find your soul mate. Click, if desired, on the corresponding item "Interested in".
 4 Click on the "Save" button in the lower right corner of the window after you have filled in all the items.
Part 6 of 7: Updating Your Contact Category
 1 Look for a category called Contact Info. You may need to scroll down the page slightly to find it.
  2 Click on the "Edit" button in the upper right corner of this category.
 3 Click on the Add / Remove Emails link and fill in the current field when you have other emails to which you would like to receive correspondence if other email addresses do not suit your friends.
 4 Place your mouse cursor in the appropriate field inside the Contact Info category to add your details.
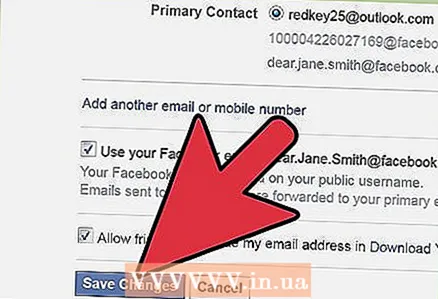 5 Click on the "Save" button in the window of this category.
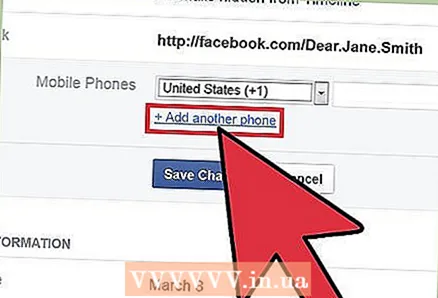 6 Fill in the field for a mobile phone using the Add a phone link.
 7 Enter or select the appropriate answers for any other phone numbers (including what type of line), any other IM logins on various other services, full contact information (exact mailing address), and a personal website.
- There is even a Networks option that you can select to get help connecting to your contacts from the institute (which is what Facebook originally did in its inception).
 8 Click on the "Save" (Save) button in the lower right corner of the window, completely completing your filling in all the items.
Part 7 of 7: Changing Your Favorite Quotes
 1 Look for the category labeled Favorite Quotations. You may have to scroll down the page a little to see it.
  2 Click on the "Edit" button in the upper right corner of this category.
 3 Enter the exact words of any of the quotes you use that will help reflect your essence.
 4 Only one quote per line is allowed. If it spans two lines, then do not press the [Enter / Enter] key. Just let these lines / quotes drift on their own.
  5 Click on the Save button.
Tips
- Sometimes, profile information on Facebook becomes known to people, providing them with additional information. However, as long as you control the "action", you have the right to determine what you post and how much of this information will be hidden.
- You also have the option to optionally set certain items for personal viewing, or for a select group of friends (the Friends option, or for your friends' friends (the Friends-of-Friends option). In some cases, you is free to select a number of settings using the Custom option. Facebook seems to be counting on the full release of information to the public (the Everyone setting, no matter what you share in the beginning. You will have to have this in mind by setting each individual parameter that you would like to fix.
- Set those settings for displaying information that you think are sufficient. You are the person who determines the rules for displaying information based on your desire or unwillingness.
- When you add a Life Events item to your Facebook feed, you will be redirected to a completely new window called History by year, where the only way to change these events is to edit the event from your news feed.
Warnings
- Since passwords and your social media username were considered two secure pieces of data, Facebook does not allow anyone to edit such personal information here. It is also prohibited here to change your mobile phone number or other protected personal information. You will need to edit this information through the Account Settings link located in the upper right corner of any Facebook page or in the drop-down menu after clicking on the tab known as Home.
What do you need
- Access to the Internet
- Facebook account
- Web browser


