Content
- Steps
- Method 1 of 4: How to restore factory settings (Windows)
- Method 2 of 4: How to clean up your disk (Windows)
- Method 3 of 4: How to restore factory settings (macOS)
- Method 4 of 4: How to clean up your disk (macOS)
- Tips
- Warnings
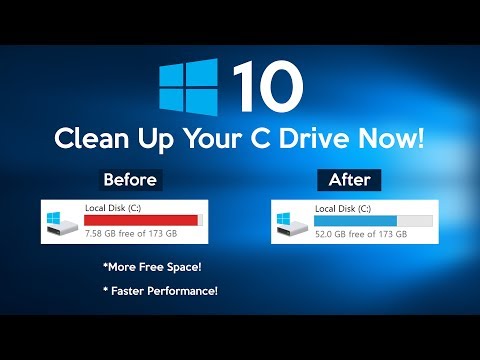
In this article, we will show you how to erase files and uninstall programs from your computer hard drive. To do this, you can restore your computer to factory settings or perform a Secure Disk Cleanup, which prevents deleted data from being recovered. If you have a Mac with a solid state drive (SSD), simply restart your computer to safely clean up the drive.
Steps
Method 1 of 4: How to restore factory settings (Windows)
 1 Open the start menu
  . Click on the Windows logo in the lower left corner of the screen.
 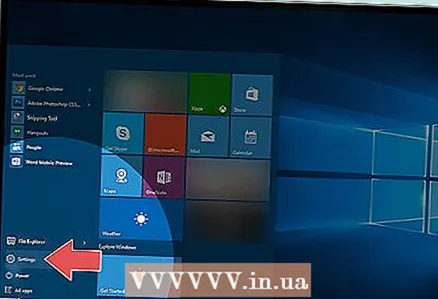 2 Click "Options"
  . Click the gear-shaped icon in the lower-left corner of the Start menu.
  3 Click on "Update & Security"
  . This round arrow icon is found on the settings page.
 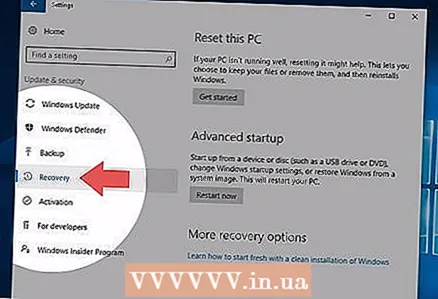 4 Click on Recovery. This tab is in the left pane.
 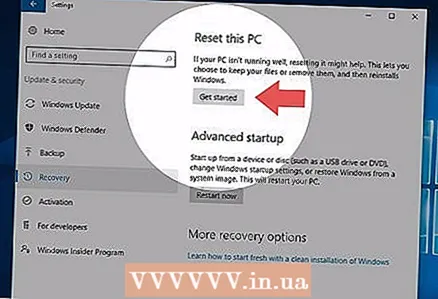 5 Click on To begin. It's at the top of the window, under Reset This Computer. A pop-up window will appear.
  6 Click on delete everything. This option is in the pop-up window and activating it will remove all files, settings and programs.
  7 Click on Delete my files. This option is on the next page. In this case, only user programs, files and settings will be removed, but not the operating system.
 - If you want to perform a hard reset of your system, select the "Delete my files and clean up disk" option. Please be aware that this process can take several hours and you will have to reinstall Windows.
 8 Click on Reset. This button is at the bottom of the window. The process of deleting files will start. When the hard drive is cleaned up, you will be taken to the settings page, where you will log into Windows as a new user.
Method 2 of 4: How to clean up your disk (Windows)
 1 Find a blank DVD or USB drive. On it you will need to write the program "DBAN".
 - To find out if your optical drive is a recordable drive, look for the letters "DVD" on it.
- If the drive cannot write DVDs, use an external optical drive.
 2 Download the DBAN program (ISO file). Go to https://dban.org/ and click “Download DBAN” in the upper right corner of the window. An image (ISO file) of this program will be downloaded to your computer.
 - Depending on your browser settings, you may have to confirm the download first or select a download folder.
 3 Burn the DBAN program to DVD. Once the program image has been downloaded to your computer, open the This PC window to burn the ISO file to a DVD.
 - When the program is written to the disc, do not remove it from the computer.
- If you are using a USB drive, write the ISO file to it and do not disconnect the drive from your computer.
 4 Reboot your computer. Open the start menu
  and click "Shutdown"
  > Restart.
  5 Enter BIOS. Once you click on "Restart", start pressing the key to enter BIOS. Typically, this key is Del or one of the F keys (for example, F2). If you do not know which key to press, read the instructions for your computer or motherboard (such instructions can be found on the Internet).
 - If you are unable to enter BIOS in time, restart your computer and try again.
 6 Find the "Boot order" section. On most computers, use the arrow keys to navigate to the Advanced or Boot tab and locate the section indicated.
 - In some BIOS versions, the specified section is located directly on the start page.
 7 Select your computer's DVD drive. It should be called "CD Drive" or "Disk Drive" or something similar. Use the arrow keys to select the appropriate option.
  8 Move your DVD drive to the top of the boot device list. After selecting the "CD Drive" (or similar) option, press the +until this option is at the top of the boot device list.
 - If the option does not move, check the key assignments on the right side (or bottom) of the screen to find out which key to press.
 9 Save changes and exit BIOS. In most BIOS versions, you need to press a specific key to do this - check the key assignments on the right side (or bottom) of the screen to figure out which key to press.
 - On some computers, you will have to press an additional key to confirm that you want to save your changes.
 10 Select your computer hard drive. When the DBAN program starts, press the key J or Kto highlight a hard drive with a marker, then press Space.
 - Check the key assignments at the bottom of the DBAN window to find out which keys to press to highlight and select options.
- If your computer has multiple hard drives (or is partitioned), select the drive / partition you want to clean up.
 11 Clean up your hard drive. To do this, click F10 or the key specified in the list of keys at the bottom of the window. The disk cleanup process starts. It will take at least a few hours, so make sure your computer is connected to a reliable power source.
  12 Remove the DBAN DVD when prompted. Do this when a Blancco ad appears on the screen. The hard drive has been safely cleaned up.
 - To reinstall the operating system, replace the DBAN DVD with the correct operating system installation DVD, then follow the instructions on the screen. You may need to restart your computer to start the system setup process.

Spike baron
Network Engineer and User Support Specialist Spike Baron is the owner of Spike's Computer Repair. He has over 25 years of experience in technology and specializes in PC and Mac computer repair, used computer sales, virus removal, data recovery, and hardware and software updates. Holds CompTIA A + certifications for computer service technicians and Microsoft Certified Solutions Expert. Spike baron
Network Engineer and User Support SpecialistThere are various ways to clean your computer. For example, DoD cleanup (a technique developed by the military), where the free space of the hard disk is overwritten with ones and zeros. Another method is KillDisk, but it is generally not recommended for home computer users. If you are using your computer at home, simply reinstall the system to reliably clean up your hard drive.
Method 3 of 4: How to restore factory settings (macOS)
 1 Open the Apple menu
  . Click on the Apple logo in the upper left corner of the screen. A dropdown menu will appear.
 - If you have a Mac with a solid state drive (SSD), simply restart your computer to safely clean up the drive.
 2 Click on Reboot. It's near the bottom of the menu.
  3 Click on Rebootwhen prompted. The computer will go to reboot.
  4 Boot into recovery mode. When the computer goes to restart, press and hold the ⌘ Command and the key R - release them as soon as the Utilities window opens.
  5 Please select Disk utility. This option is marked with a hard drive icon with a stethoscope.
  6 Click on Proceed. It's in the lower-right corner of the window.
  7 Select your computer hard drive. Select the "HDD" or "SSD" option under the "Internal" section in the upper left corner of the window.
  8 Click on Erase. This tab is located at the top of the window.A pop-up window will appear.
  9 Click Format. It's in the right pane. A dropdown menu will open.
  10 Please select Mac OS Extended. This option is located on the menu.
  11 Click on Erase. You will find this option in the lower right corner of the window. The disk cleanup process starts.
 - This process may take some time, so do not restart or use your computer.
 12 Click on Readywhen prompted. The computer's hard disk is cleaned up.
 - To reinstall the operating system, exit Disk Utility and click Reinstall macOS> Continue. Now connect your computer to the Internet to download the installation files for the system.
Method 4 of 4: How to clean up your disk (macOS)
 1 Open the Apple menu . Click on the Apple logo in the upper left corner of the screen. A dropdown menu will open.
 - If an SSD is installed on your computer, you cannot erase it. Try restarting your computer.
 2 Click on Reboot. It's near the bottom of the menu.
 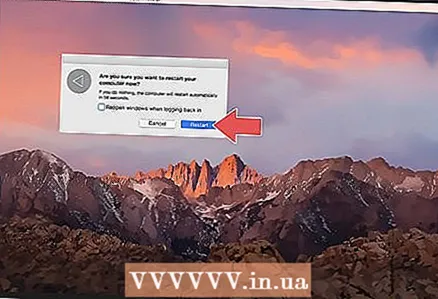 3 Click on Rebootwhen prompted. The computer will go to reboot.
  4 Boot into recovery mode. When the computer goes to restart, press and hold the ⌘ Command and the key R - release them as soon as the Utilities window opens.
  5 Please select Disk utility. This option is marked with a hard drive icon with a stethoscope.
  6 Click on Proceed. It's in the lower-right corner of the window.
  7 Select your computer hard drive. Select the "HDD" option under the "Internal" section in the upper left corner of the window.
  8 Click on Erase. This tab is located at the top of the window. A pop-up window will appear.
  9 Click on Security options. You will find this option at the bottom of the window.
  10 Select the "High Security Level" option. To do this, move the slider to the extreme right position. This option will allow you to overwrite the hard disk with random data seven times.
  11 Click on OK. This option is located in the lower right corner of the window.
  12 Click on Erase. You will find this option at the bottom right of the window. The hard drive wiping process starts.
 - This process will take several hours, so start it before you leave for work or go to bed.
 13 Click on Readywhen prompted. The computer's hard drive has been safely cleaned up, which means that data can no longer be recovered.
 - To reinstall the operating system, exit Disk Utility and click Reinstall macOS> Continue. Now connect your computer to the Internet to download the installation files for the system.
Tips
- If you are going to get rid of your computer, we recommend that you destroy the hard drive with a hammer or similar tool. Physical destruction is the only guarantee that data will not be recovered.
Warnings
- You can't undo Computer Cleanup, so back up your important files before running it.


