Author:
Marcus Baldwin
Date Of Creation:
21 June 2021
Update Date:
24 June 2024

Content
- Steps
- Method 1 of 3: Measuring Resistance with a DMM
- Method 2 of 3: Measuring resistance with an analog multimeter
- Method 3 of 3: Getting Accurate Measurements
- Tips
- Warnings
Resistance is a physical quantity that characterizes the properties of a body (object) to prevent the passage of electric current. To some extent, the resistance is similar to the frictional force that occurs when a body moves over a certain surface. Resistance is measured in ohms (ohms): 1 ohm = 1 V (volt, voltage) / 1 A (ampere, current). Resistance is measured with an ohmmeter or digital or analog multimeter.
Steps
Method 1 of 3: Measuring Resistance with a DMM
 1 Select the element whose resistance you want to measure. To obtain an accurate result, measure the resistance of each element of the circuit (circuit). To do this, either remove the element from the circuit, or measure the resistance before connecting the element to the circuit. Measuring the resistance of an element connected to a circuit can lead to inaccurate results due to the influence of other elements.
 - For example, you can measure the resistance of a resistor, relay, or motor.
- Ensure that any power supply to the circuit is disconnected before measuring the resistance of a circuit or individual component.
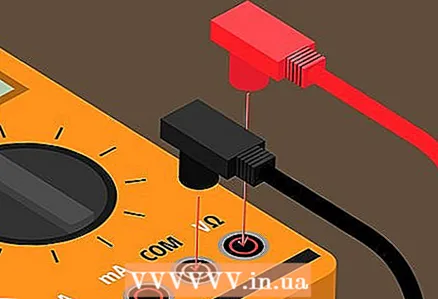 2 Connect the test leads of the multimeter to the appropriate connectors. Most multimeters have two probes - black and red, as well as several connectors that are designed to measure various quantities - resistance, voltage or current. Typically, connectors for resistance measurements are designated by the letters "COM" (English "common" - standard) and the Greek letter Ω (omega), which is the symbol for the unit of measurement.
 - Connect the black test lead to the connector labeled "COM" and the red test lead to the connector labeled "Ohm".
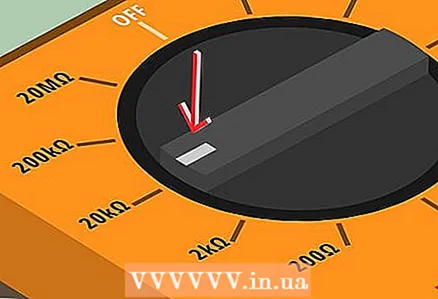 3 Turn on the multimeter and set the measuring range. Cell resistance can range from a few ohms (1 ohm) to several megohms (1,000,000 ohms).For accurate results, set the resistance range that matches the selected element. Some DMMs set this range automatically, while others do it manually. If you know in what range the resistance of the selected element lies, set the corresponding range; otherwise, determine the range by trial and error.
 - If you do not know the range, set the middle range first; as a rule, this range is 0–20 kΩ.
- With one probe, touch one terminal of the element (resistor), and with the second probe, touch the opposite terminal of the element.
- The indicator will show either "0.00" or "OL", or the actual resistance value.
- If the measurement result is zero, then the range you selected is very large; in this case, narrow it down.
- If the indicator shows "OL" (English "overloaded" - overloaded), the range you specified is too narrow; in this case, increase it to the next maximum value. Now measure the resistance of the element again.
- If the indicator displays a certain number, for example, 58, then this is the value of the resistance of the resistor. Do not forget to consider the specified range. The DMM displays the range you set in the upper right corner of the DMM indicator. If "kΩ" (kOhm) is displayed in the corner of the indicator, then the resistance of the resistor is measured in kilo-ohms, that is, in our example it is 58 kOhm.
- Once you find a suitable range, try narrowing it down to get more accurate results. Use the smallest range for the most accurate resistance values.
 4 Touch the test leads of the multimeter to the terminals of the resistor whose resistance you want to measure. With one probe, touch one terminal of the element, and with the second probe, touch the opposite terminal of the element. Wait for the moment when the numbers on the indicator stop changing, and write down the displayed number, which is the value of the resistance of the resistor.
 - For example, if the indicator displays "0.6", and in its upper right corner displays "MΩ", then the resistance of the resistor is 0.6 MΩ.
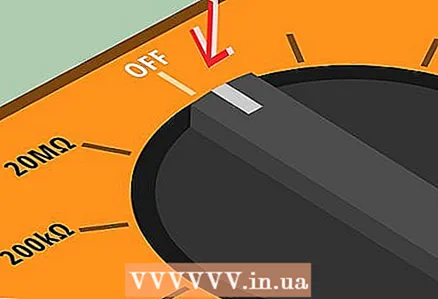 5 Turn off the multimeter. When finished measuring the resistances of the resistors, turn off the multimeter and disconnect the probes.
Method 2 of 3: Measuring resistance with an analog multimeter
 1 Select the element whose resistance you want to measure. To obtain an accurate result, measure the resistance of each element of the circuit (circuit). To do this, either remove the element from the circuit, or measure the resistance before connecting the element to the circuit. Measuring the resistance of an element connected to a circuit can lead to inaccurate results due to the influence of other elements.
 - For example, you can measure the resistance of a resistor or motor.
- Ensure that any power supply to the circuit is disconnected before measuring the resistance of a circuit or individual component.
 2 Connect the test leads of the multimeter to the appropriate connectors. Most multimeters have two probes - black and red, as well as several connectors that are designed to measure various quantities - resistance, voltage or current. Typically, connectors for resistance measurements are designated by the letters "COM" (English "common" - standard) and the Greek letter Ω (omega), which is the symbol for the unit of measurement.
 - Connect the black test lead to the connector labeled "COM" and the red test lead to the connector labeled "Ohm".
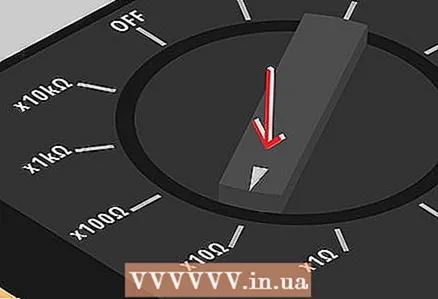 3 Turn on the multimeter and set the measuring range. Cell resistance can range from a few ohms (1 ohm) to several megohms (1,000,000 ohms). For accurate results, set the resistance range that matches the selected element. Some DMMs set this range automatically, while others do it manually.If you know in what range the resistance of the selected element lies, set the corresponding range; otherwise, determine the range by trial and error.
 - If you do not know the range, set the middle range first; as a rule, this range is 0–20 kΩ.
- With one probe, touch one terminal of the element (resistor), and with the second probe, touch the opposite terminal of the element.
- The indicator hand will move along the scale and stop at a certain number, indicating the resistance value of the element.
- If the pointer moves to the maximum range limit (left side), narrow the specified range, zero the multimeter (set the pointer to zero), and repeat the measurement.
- If the arrow moves to the minimum range limit (right side), extend the specified range, zero the multimeter and repeat the measurement.
- Analog multimeters should be zeroed after each range change. To do this, touch one probe to the other to cause a short circuit. If the pointer is not at zero, correct its position using a special regulator ("Ohm regulator" or "Zero control").
 4 Touch the test leads of the multimeter to the terminals of the resistor whose resistance you want to measure. With one probe, touch one terminal of the element, and with the second probe, touch the opposite terminal of the element. The arrow will move from right to left - the minimum resistance value (right) is zero, and the maximum value (left) is 2000 ohms (2 kΩ). An analog multimeter has several scales at once, so look for the resistance value on the scale labeled “Ω”.
 - As the values grow, the numbers on the scale will be grouped closer together. Therefore, setting the correct range is extremely important to obtain accurate readings.
 5 Determination of resistance. Touching the probes to the terminals of the resistor, the arrow will stop somewhere in the middle of the scale. Make sure you read off the scale marked “Ω”; write down the number pointed to by the arrow - it is the resistance value of the resistor.
 - For example, if the range you specified is 0-10 ohms, and the arrow stops at 9, then the element resistance is 9 ohms.
 6 Set the maximum voltage range. When you are finished using your multimeter, turn it off properly. To do this, set the maximum voltage range so as not to damage the device if the next time you (or someone else) forget to set the range first. Turn off the multimeter and disconnect the test leads.
Method 3 of 3: Getting Accurate Measurements
 1 Measure resistance when elements are not connected to the circuit. If a resistor is connected to the circuit, then the value of its resistance will be inaccurate, since the multimeter measures not only the resistance of the resistor you need, but also the resistances of other resistors included in the circuit. However, sometimes it is required to measure the resistance of the resistor connected to the circuit.
  2 Measure the resistance of the de-energized element. The current passing through the circuit will negatively affect the accuracy of the multimeter readings, as it affects the resistance value of the resistors. In addition, additional voltage can damage the multimeter (therefore, it is not recommended to measure the resistance of a battery or accumulator).
 - When measuring the resistance of a capacitor included in a circuit, you must first discharge it. The discharged capacitor will be charged from the multimeter, which will lead to short-term jumps in the meter readings.
 3 Determine the presence of diodes in the circuit. Diodes conduct current only in one direction, therefore, changing the position of the multimeter probes when you touch the terminals of the circuit with diodes, you will get different readings.
  4 Watch your fingers. Some resistors or other elements need to be held in order to ensure reliable contact of the multimeter probes with the resistor (element) leads.Touching a resistor or test leads can result in inaccurate readings because some of the current will pass through your body. This is not a major problem when using a low voltage multimeter, but it does interfere with a high voltage multimeter.
 - In order not to touch the elements with your hands when measuring resistance, attach them to the test stand. Alternatively, attach crocodile clips to the multimeter probes to grip the leads of the resistor or other element you want to measure.
Tips
- The accuracy of the multimeter depends on its model. The error of a cheap multimeter will be ± 1% of the exact value. An expensive multimeter will provide much more accurate measurements.
- The resistance level of a resistor can be recognized by the number and color of the stripes applied to its case. Typically, resistors are labeled with four or five stripes. One bar indicates the level of accuracy.
Warnings
- Multimeter probes are as sharp as needles. If you are working with such probes, keep them away from sharp ends to avoid pricking.


