Author:
Carl Weaver
Date Of Creation:
28 February 2021
Update Date:
1 July 2024

Content
- Steps
- Part 1 of 5: How to troubleshoot
- Part 2 of 5: How to clear the DNS cache
- Windows
- Mac OS X
- Part 3 of 5: How to Remove Extra Connections
- Part 4 of 5: How to Change DNS Server Settings
- Windows
- Mac OS X
- Part 5 of 5: How to Reset Your Router
- Tips
- Warnings
This article will show you how to fix internet connection problems caused by DNS errors on your computer. DNS is a server that translates website addresses into IP addresses so that the browser can connect to them. If the addresses are out of date or the server is malfunctioning, you will encounter a DNS error and will not be able to open the site (or sites) even if the internet connection is OK. To get rid of DNS errors, you can troubleshoot an active connection, clear the DNS cache, remove unnecessary connections, change the default DNS server settings, or reset your router.
Steps
Part 1 of 5: How to troubleshoot
 1 Try connecting another device. If you are able to connect another phone, tablet, or computer to the Internet and open a web page that does not load on the main device, the problem is caused by that device and not the router.
 - If you cannot open the site on another device, it does not mean that the problem is caused by the router.
- If you are unable to access a particular site, try downloading it by connecting to a cellular data network. If the site does not open, the problem is caused by the site itself.
 2 Please use a different browser. This is one of the fastest ways to check DNS connections. Download another free browser like Firefox or Chrome and try to connect to the internet; if the problem still occurs, it is definitely not caused by the browser.
 - If the problem no longer exists, reinstall your old browser.
 3 Reboot your modem and router. This will clear the router's cache and possibly get rid of DNS errors. For this:
 - disconnect the power cables from the modem and router;
- wait 30 seconds;
- turn on the modem and wait for it to connect to the Internet;
- connect the router to your modem and wait for the router to establish an internet connection.
 4 Connect your computer to your router via Ethernet cable. If you are already using a wired connection, skip this step.
 - If the web page opens with a wired connection, the problem may be caused by the router you need to reset.
- If you are still unable to load the webpage, the problem is most likely caused by your DNS settings.
Part 2 of 5: How to clear the DNS cache
Windows
 1 Open the start menu
  . Click on the Windows logo in the lower left corner of the screen or click ⊞ Win.
  2 In the start menu search bar, type command line. This will search for the Command Line program.
  3 Click Command Prompt
  . This program is at the top of the Start menu. A command prompt will open.
  4 Enter ipconfig / flushdns and press ↵ Enter. This command will delete all saved DNS server addresses. Now, when you try to open the website, a new DNS address will be created.
  5 Restart your web browser. This will update its cache. You may now be loading a web page that you could not open before.
 - If the page still won't open, go to the next method.
Mac OS X
- Open Spotlight 1
 ... It's in the upper right corner of the screen. 2
- You can also click ⌘ Command+Spaceto open Spotlight.

 ... It is the first program listed in Spotlight search results.

sudo killall -HUP mDNSResponder
and press ⏎ Return... This will restart the "DNS" process.
- You may need to enter an administrator password.

Part 3 of 5: How to Remove Extra Connections
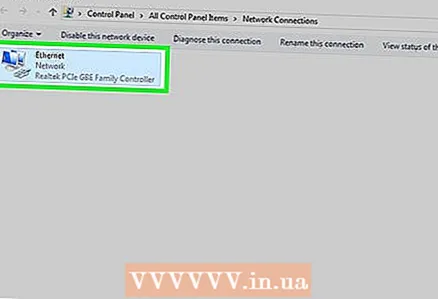
 1 On your computer, open the network settings.
- On Windows open the start menu
 and click "Options"
  > "Network and Internet"
  > "Change adapter settings".
 - On Mac OS X open the Apple menu
 and click System Preferences> Network.
- On Windows open the start menu
 2 Find redundant connections. Remove any connection you are not using, including Bluetooth and wireless connections.
 - The most common cause of DNS problems is the Microsoft Virtual WiFi Miniport Adapter.
 3 Select the redundant connection. To do this, just click on it.
 - In Windows, each icon displayed on the page represents a connection.
- In Mac OS X, connections are displayed on the left side of the window.
 4 Remove the connection. For this:
 - in windows click "Disconnect a network device" at the top of the window;
- on Mac OS X click on the minus sign (-) at the bottom of the window.
 5 Try to open a web page. If successful, the problem is resolved, and if not, move on to the next method.
Part 4 of 5: How to Change DNS Server Settings
Windows
 1 Click on the name of an active connection to select it. You will find it on the Network Connections page.
  2 Click on Configuring connection parameters. It's in the options bar at the top of the window. The connection settings will open.
  3 Click Internet Protocol Version 4 (TCP / IPv4). It's in the middle of the Wireless Connection Properties pop-up window. The option will be highlighted.
 - If you don't see this option, go to the Networking tab at the top of the window.
 4 Click on Properties. This button is at the bottom of the window.
 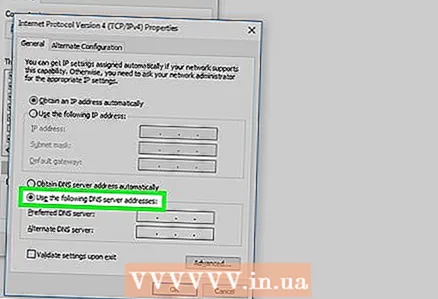 5 Check the box next to "Use the following DNS server addresses". It's near the bottom of the window.
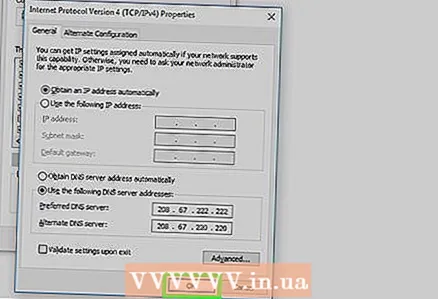
  6 Enter your preferred address. Do this in the "Preferred DNS Server" line at the bottom of the window. The following are considered reliable DNS servers:
 - OpenDNS: enter 208.67.222.222;
- Google: enter 8.8.8.8.
 7 Enter an alternative address. Do this in the "Alternative DNS Server" line at the bottom of the window. Here enter the following addresses (they must be different from the addresses entered in the "Preferred DNS Server" line):
 - OpenDNS: enter 208.67.220.220;
- Google: enter 8.8.4.4.
 8 Click on OK. DNS settings will be saved.
  9 Click on Close. This button is at the bottom of the window.
  10 Reboot your computer. Now try opening the webpage. If successful, the problem was caused by the default DNS server.
 - If sites load, contact your ISP and notify them of DNS problems.
- If web pages still won't open, go to the next method.
Mac OS X
 1 Open the Apple menu
  . It's in the upper left corner of the screen.
  2 Click on System settings. You'll find this option at the top of the Apple dropdown menu.
  3 Click on Network. This globe-shaped icon is located in the System Preferences window.
  4 Click on an active wireless network. It's in the left pane of the window.
  5 Click on Additionally. You will find this option in the middle of the window.
  6 Click on the tab DNS. It's at the top of the window.
  7 Click on +. This icon is below the list of DNS servers.
  8 Enter the DNS server address. OpenDNS and Google have reliable and fast DNS servers:
 - Google: 8.8.8.8 or 8.8.4.4;
- OpenDNS: 208.67.222.222 or 208.67.220.220.
 9 Go to the tab Equipment. It is located at the top left of the window.
  10 Click Settings> Manually. It's near the top of the Hardware page.
  11 Click MTU> Arbitrarily. The MTU option is located under the Configure option.
  12 Enter 1453 in the text box. It is located under the "MTU" option.
  13 Click on OK. This button is at the bottom of the page.
 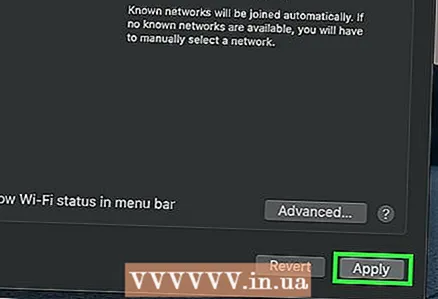 14 Click on Apply. This button is at the bottom of the page. The settings will be saved and applied to the active wireless connection.
  15 Reboot your computer. Now try opening the webpage. If successful, the problem was caused by the default DNS server.
 - If sites load, contact your ISP and notify them of DNS problems.
- If web pages still won't open, go to the next method.
Part 5 of 5: How to Reset Your Router
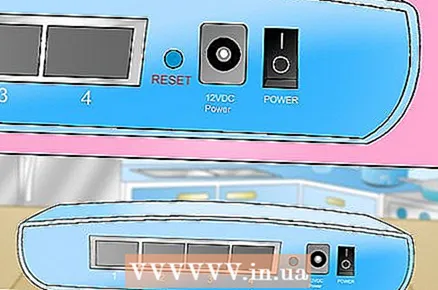 1 Locate the "Reset" button on your router. Typically, this button is located on the back of the router.
 - You will need a needle, paper clip, or similar thin object to press the Reset button.
- Resetting the router will disconnect all connected devices.
 2 Press and hold the Reset button. Hold it for 30 seconds to be sure to reset the router.
  3 Connect to a wireless network. To do this, use the factory password that is indicated on the bottom panel of the router.
  4 Try opening a site that hasn't loaded before. If you are still unable to connect to the internet or access the site, contact your ISP and report DNS issues.
 - If resetting your router fixed your DNS problems, consider buying a new router (especially if the device is more than two years old).
Tips
- Reboot your router periodically to prevent DNS problems.
Warnings
- When you clear your DNS cache, the first load of any website will take longer than usual. This is because the computer creates and validates a new DNS address for the site.


